In this tutorial I’ll show you how to create your own Arduino library.
You’ll see, this might be much simpler than you thought! Very simply put, an Arduino library is a bunch of Cpp files that you have to organize in a certain way. Then you import it, use it, and that’s it.
Creating an Arduino library is a great way to write reusable code for your projects, and also to help other Arduino developers in their own projects.
>> Here is a video version of this tutorial, as an additional resource:
After watching the video, subscribe to the Robotics Back-End Youtube channel so you don’t miss the next tutorials!
You are learning how to use Arduino to build your own projects?
Check out Arduino For Beginners and learn step by step.
Table of Contents
Step 1: Write your Arduino library code
Starting code
Let’s start with a very simple program, and from that create a library step by step.
First, write this small Arduino sketch, which only has one function. The function will take 2 integers as parameters and return the sum.
int addTwoInts(int a, int b)
{
  return a + b;
}

void setup()
{
  Serial.begin(9600);
  int result = addTwoInts(4,3);
  Serial.println(result);
}

void loop() {}
Here we’ll make the addTwoInts() function a part of a library named my_library.
For now, all the code is in the same file, which isn’t really practical for separating the library from the main code.
Separating the library code from the rest
Let’s create 2 files: a Cpp and a header file.
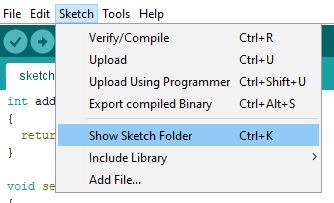
To do that, find where your Arduino sketch is located. Usually it’s inside the “My Documents/Arduino” folder, unless you changed the default location. Also, you can find where is your current sketch file directly from the Arduino IDE: click on “Sketch” > “Show Sketch Folder”.
In this folder, you should already have a .ino file. If you named your project MyProgram, then the file is called MyProgram.ino, and is located inside the MyProgram/ folder.
Create 2 new files: my_library.h and my_library.cpp. Then restart your Arduino IDE, or close/open your current sketch. You should now see 3 files.

Write the following code into those 3 files.
my_library.h
#ifndef MY_LIBRARY_H
#define MY_LIBRARY_H

#include <Arduino.h>

int addTwoInts(int a, int b);

#endif
This is a typical header file. You start with the header guards and add your code between the #define MY_LIBRARY_H and #endif.
For the header guard’s name, usually it’s a good practice to use the name of your file in uppercase and add “_H”. For example, if you have a temperature_sensor.h file, you can use “TEMPERATURE_SENSOR_H”.
Then, don’t forget to include the Arduino library. On your main program it’s automatically added for you if you forget it, but not on other files or libraries.
Finally, you have the prototype of your function. The implementation will be done in the Cpp file.
my_library.cpp
#include "my_library.h"

int addTwoInts(int a, int b)
{
  return a + b;
}
Here you just import your header file, and you implement the code for the function.
Now, let’s use this function in our sketch again.
your_main_code.ino
#include "my_library.h"

void setup()
{
  Serial.begin(9600);
  int result = addTwoInts(4,3);
  Serial.println(result);
}

void loop() {}
You just have to include the header file and you can use the addTwoInts() function without changing your initial code.
All right, now that we have separated the code, let’s create a real Arduino library! Separating the code you want to put into your library is only the first step.
Step 2: Package your Arduino library
Let’s use the my_library.cpp and my_library.h files that we just created.
Place your library files into the Arduino libraries folder
First, you have to know where to put your library. As for your Arduino sketches, there is a specific folder for libraries.
Go again in your Arduino folder (“My Documents/Arduino” or similar), and find a folder named libraries/. If you can’t find it, you’ll have to create it. This folder path will be “My Documents/Arduino/libraries”.
In this libraries/ folder, create a new folder named my_library/. Move the my_library.h and my_library.cpp files into my_library/.
Documents/
└── Arduino/
    └── libraries/
        └── my_library/
            ├── my_library.h
            └── my_library.cpp
Then, restart your Arduino IDE. Don’t forget this, as it doesn’t automatically detect changes in the file architecture.
On your main .ino code (now, in your sketch folder, you only have your .ino file again), change this line #include "my_library.h" to this: #include <my_library.h>. When including a header file located in your project directory, use “”. If the header file is globally installed, or in this case, from the Arduino libraries folder, use <>.
You can run your code, it should compile and work. You have successfully created your first Arduino library! Quite easy, isn’t it?
If you want to modify your library after you’ve put the files into your libraries/ folder, use any other text editor (for example Visual Studio Code). You won’t be able to direclty open those files in the Arduino IDE – unless you copy and paste the files into an existing project, modify the files, and put them back into the libraries/ folder.
Now, this library is quite basic and easy to use. But if you write something more complex, it may be more difficult for others to understand how to use it.
Remember, creating a library means that other people might actually use it!
Add examples to your Arduino library
A great way to provide a quick introduction to your library is to create a code example using your library. If you remember, when you started on Arduino, you may have used some code examples such as the famous Blink.ino, to teach you how to blink a LED.
It’s very simple to add examples to your libraries.
In the my_library/ folder, create an examples/ folder. Inside this examples/ folder, you’ll simply add a new Arduino project for each example.
For our custom library, let’s create an example to show how to use the addTwoInts() functions. In my_library/, create a folder add_two_ints/, and inside it a file named add_two_ints.ino.
Documents/
└── Arduino/
    └── libraries/
        └── my_library/
            ├── examples/
                ├── add_two_ints/
                    ├── add_two_ints.ino
            ├── my_library.h
            └── my_library.cpp
Here’s the code example:
/*
 *
 * Explanation of what your example does
 *
 */

#include <my_library.h>

void setup()
{
  // Setup Serial communication to print result on Serial Monitor
  Serial.begin(9600);

  // Get the sum of two integers into another integer
  int result = addTwoInts(4,3);

  // Check result
  Serial.println(result);
}

void loop() {}
Now, how to see your example from the Arduino IDE?
Simply restart your IDE, and your example is now showing in the menu!
You can click on it, compile it, and run it on your Arduino board. This example will make things easier for anyone who wants to learn how to use your library.
Step 3: Share your Arduino library
It’s great to have a library that you can use on your own computer, in your own programs. But the true purpose of a library is to be shared.
Export the library
To export and share your library, create an archive of the my_library/ folder, located into Arduino/libraries/.
Then, you just have to share it with other people you know, or online. You can easily find websites to host your library archives (usually a few KiloBytes). Now, the hard part is to make people get to know your library exists!
Once someone gets your library, there are 2 ways to install it on their Arduino environment (and this can be useful for you too, when you install libraries developed by other people).
You can try it on your own computer. Export your library into an archive, and place it somewhere else in your computer. Also remove the my_library/ folder. Now, if you restart your Arduino IDE, you won’t be able to use the library or open the examples. So, you’ll have to import it.
Manually import the library
Once you get the library, just 3 steps are required before you can use it:
- Extract the archive.
- Place the library folder in Arduino/libraries/.
- Restart the Arduino IDE.
Import the library through the Arduino IDE
This will work only if you have created a .zip archive (not .rar or other extensions).
Simply open the Arduino IDE, click on “Sketch” > “Include Library” > “Add .ZIP Library…”, and browse to find your .zip archive.
The Arduino IDE will extract the archive, place the library in the Arduino/libraries/folder, and update itself so you don’t need to restart it.
Another example: a library for a LED class
The code example I provided above is really small. The purpose was to focus on the library itself and not the code.
Now, let’s use a more real-world example. We’ll use the LED class we created in another tutorial on Arduino OOP. So, this will also be an opportunity for you to work on how to create an Arduino library with classes.
Library folder structure
Documents/
└── Arduino/
    └── libraries/
        ├── examples/
            └── blink_led/
                └── blink_led.ino
        └── Led/
            ├── Led.h
            └── Led.cpp
And the files:
Led.h
#ifndef LED_H
#define LED_H

#include <Arduino.h>

class Led {

  private:
    byte pin;

  public:
    // Setup pin LED and call init()
    Led(byte pin);

    // Setup the pin led as OUTPUT
    // and power off the LED - default state
    void init();

    // Power on the LED
    void on();

    // Power off the LED
    void off();
};

#endif
Here I have put comments on each method of the class. Documenting your code is always a good idea.
Led.cpp
#include "Led.h"

Led::Led(byte pin) {
  this->pin = pin;
  init();
}

void Led::init() {
  pinMode(pin, OUTPUT);
  off();
}

void Led::on() {
  digitalWrite(pin, HIGH);
}

void Led::off() {
  digitalWrite(pin, LOW);
}
Example file blink_led.ino
/*
 *
 * This examples shows how to blink a LED
 * using the Led class from the Led library
 *
 */

#include <Led.h>

// Use the built-in LED
#define LED_PIN 13

// Create a Led object
// This will set the pin to OUTPUT
Led led(LED_PIN);

void setup() { }

void loop() {
    // Power on the LED
    led.on();
    delay(1000);
    // Power off the LED
    led.off();
    delay(1000);
}
After writing those files and setting up the Led library folder, you can now restart your Arduino IDE and test the blink_led.ino example.
Going further with your Arduino library
In this tutorial you have seen how to create your own Arduino library, how to add examples to it, how to package it, and how to export it.
Here is what you can do next:
- Add a license to your library. I won’t tell you which license to use here because it depends on what you want to do. Some common open source licenses: MIT, BSD, Apache, GPL, … Adding a license means that you’ll add a comment header to every files in your library, stating the license agreements.
- Host your code on GitHub if you’re going open source. This might be a good idea to share your code, so you can get feedback from other developers and improve your library, as well as increasing the awareness around it.
- Communicate about your library: on the Arduino forum, on your own website, etc.
- Add more documentation and more examples. The clearer your library, the easier it will be for new users to use it efficiently and keep it in their code.
Note: before creating your own library – unless you do it for an educational purpose, first check if someone else has already published a library that meets your needs. If yes, you’ll have to check the license to see if you can use it. It’s important not to reinvent the wheel for everything you create. This way you’ll progress faster on your projects!