In this tutorial I’ll show you how to program your Arduino board from an Ubuntu virtual machine, using VirtualBox.
For some reasons, you could want to work with Arduino from your Ubuntu guest instead of your Windows 10 host. In this case, you’ll have a few things to configure before it can work. Nothing really difficult, just a few steps that I’ll explain below.
Let’s get started!
>> Watch this video as an additional resource to this article:
After watching the video, subscribe to the Robotics Back-End Youtube channel so you don’t miss the next tutorials!
You are learning how to use Arduino to build your own projects?
Check out Arduino For Beginners and learn step by step.
Table of Contents
Test your Arduino board on Windows 10
Make sure that your Arduino is correctly working, and that the Arduino drivers are installed on your Windows environment.
To do that, simply download and install the Arduino IDE on Windows 10.
Plug your Arduino board with a USB cable. Select the correct board on “Tools” > “Board”, and the port on “Tools” > “Serial Port”. Then upload any program – even empty, with only the setup() and loop() functions. If it works correctly, you can continue to the next step.
Install VirtualBox and Ubuntu
This step is required if you haven’t installed Ubuntu on a virtual machine yet.
First things first, you have to download and install VirtualBox on Windows 10. Go to the VirtualBox download page, and click on “Windows hosts”. This will download an installer that you can launch. Follow the instructions on the screen to install VirtualBox on your computer.
Then, you need to download Ubuntu (take the latest available LTS version). Follow this quick guide to add Ubuntu to VirtualBox and install it.
Now, let’s come back to Arduino.
Configure Arduino USB port on VirtualBox
First make sure to plug your Arduino board to your computer.
Launch VirtualBox, and open the settings for your Ubuntu virtual machine. Go to the USB section.
Click on the small USB icon with a “+”. In the list of devices you should see your Arduino board – in my case an Arduino Uno.
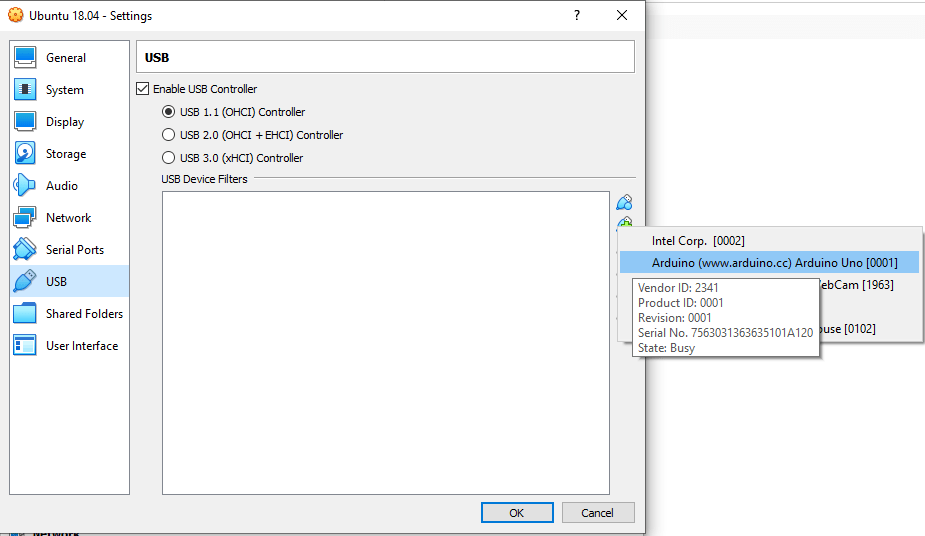
Select this Arduino device, it should now appear on the list.

Click on “OK” to save the settings. Now, the configuration from Windows and VirtualBox is done.
Start your Ubuntu virtual machine.
Setup the Arduino IDE on Ubuntu
Install Arduino IDE
The easiest and fastest way to install Arduino IDE on Ubuntu is by using one simple command line.
Open a terminal and install the Arduino IDE with sudo apt install arduino. Depending on your Internet speed and the performances of your computer, this may take a few seconds/minutes to install.
Launch Arduino IDE for the first time – Permissions
Now that the Arduino IDE is installed, all you have to do to launch it is to open a terminal and execute arduino.
On the first launch, you’ll get a popup asking you to add yourself to the “dialout” group.
Why this popup? Well, on Ubuntu, access to hardware ports is often restricted for standard users. You have to manually add yourself to some permission groups in order to access them. For accessing the USB devices over serial ports, you then have to be inside the “dialout” group.
In previous Arduino IDE versions, you would not have the popup. Now they make it easier for you, all you need to do is to click on the “Add” button.
Note: if you skip this step, don’t have the popup, or if the popup doesn’t work, you can execute sudo adduser $USER dialout on a terminal.
Now, and this is important, you have to logout/login so the group changes can take effect.
Test Arduino IDE on Ubuntu virtual machine
Once you’ve logged in again, open the Arduino IDE. Go on “Tools” > “Serial Board” and you should see the serial port for your Arduino board!
The name can vary. Usually this will be something similar to “/dev/ttyACM0” or “/dev/ttyUSB0”. The number can change if you have several connected USB devices (for example: “/dev/ttyACM1”).
Now, to complete the test, try to upload a small program. Run the Blink LED example from “Examples” > “01.Basics” > “Blink”.
Click on upload, and see what happens. On success, you should see “Done uploading” written in the bottom part of your IDE, and then the built-in LED on the Arduino board should blink.
Well, that’s it! You can now program your Arduino board directly from Ubuntu on a virtual machine.
If it doesn’t work
If you correctly follow all the steps it should be OK, however, whenever you deal with software and hardware, many things can go wrong, for many different reasons.
First, make sure that your Arduino board is correctly functioning. Download, install and run the Arduino IDE on Windows. See if you’re able to upload a basic program (for example, the blink LED example) to the board. If this test works, then nothing is wrong with your Arduino board.
Then, if you managed to get your Arduino working on Windows, if your Ubuntu virtual machine is working, and if you have installed the Arduino IDE, then most of the problems will be due to permissions. Try to redo every step from this tutorial, and make sure you have the expected result every time.
Once you get everything to work, then nothing will be different from using the Arduino IDE on Windows. The real work now is to create your own Arduino programs!