In this tutorial you’ll learn how to install Ubuntu 22.04 on Raspberry Pi 4, without needing any external monitor/keyboard/mouse.
You just need your computer – with which you’re reading this tutorial now, your Raspberry Pi 4 board, a micro SD card, and the power cable.
I will also show you how to completely configure Ubuntu server on your Pi4, using ssh, and how to add a Ubuntu desktop (optional).
>> Here is a video version of this tutorial, as an additional resource:
After watching the video, subscribe to the Robotics Back-End Youtube channel so you don’t miss the next tutorials!
You are learning how to use Raspberry Pi to build your own projects?
Check out Raspberry Pi For Beginners and learn step by step.
Table of Contents
Which configuration for your Raspberry Pi 4 board?
When you buy a Raspberry Pi 4 board you can choose between different amounts of RAM: 1 (not anymore), 2, 4, or even 8 GB.
Once installed and configured, you can expect Ubuntu server to take something like 200MB minimum, without counting the RAM in cache (this is the data I got with the steps of this tutorial).
The 1GB RAM configuration is not available anymore, so if you buy a new Raspberry Pi 4, you’ll have the choice between 2, 4 and 8GB. 2GB is plenty enough to get started. The more the better of course, but it also becomes more expensive.
If you only have a 1GB RAM board available, it’s ok! Everything will still work. In fact, before Raspberry Pi 4, boards like Pi 2, Pi 3B, and Pi 3B+ only had one possible hardware configuration: 1GB RAM. So if it was possible then, it is possible now. 2+GB of RAM will simply allow you to launch more/bigger programs and care less about RAM usage.
Flash Ubuntu 22.04 image into a micro SD card
micro SD card requirements
The micro SD card you have must be a class 10 card. To verify that check your card and if you see “10” within a circle then it’s OK.
Also, your card should have at least 8GB of space. 8GB is the minimum so you can run the OS + install a few things, but if you can, aim for 16GB or 32GB.
Install the Raspberry Pi Imager
Go to the Raspberry Pi website, software section, and download the Raspberry Pi Imager.
You’ll get an executable, just download and install it like any other software.
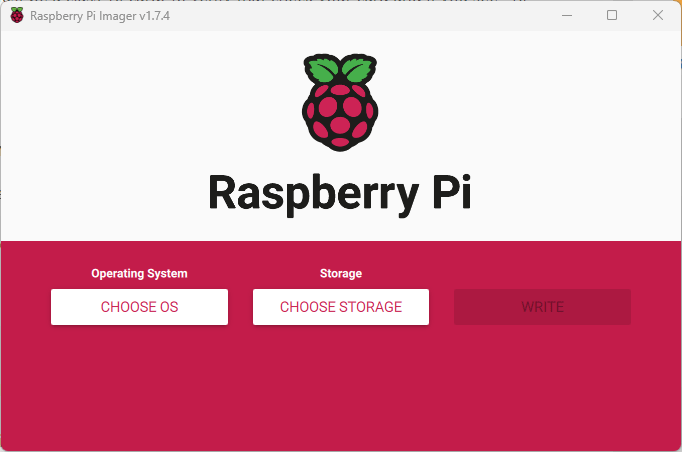
Select the OS Image and micro SD card
Start the Raspberry Pi Imager. Put your microSD card into your computer.
On the Raspberry Pi Imager, click on “Choose OS” > “Other general-purpose OS” > “Ubuntu”.
There you should find something like “Ubuntu 22.04.x LTS (64-bit)”, select this one.
Also, click on “Choose Storage” and you should find your microSD card.

Wi-Fi and SSH setup for your Raspberry Pi 4 – without a monitor
The configuration is not complete, do not click on “Write” yet.
Instead, click on the settings icon.
Then, here are the settings you need to enable:
- “Enable SSH” to enable SSH.
- “Set username”. For the username you can choose whatever you want, I will use “pi” for the following of this tutorial. You also need to choose a password.
- “Configure wireless LAN”. This will enable the Wi-Fi and automatically connect to the network + password you provide. Of course, this Wi-Fi network should be the same as the one your computer is currently connected to, otherwise the rest of this tutorial won’t work.
- (Optional) “Set locale settings”. If like me, your keyboard does not have a “qwerty” layout, you can set it up with this setting.
Make sure you double check everything (one small typo in the user password or Wi-Fi name will make it fail), and click on “Save”.
Now you can click on “Write” and wait until you see a popup telling you that you can remove the SD card safely. This can take some time.
First Ubuntu 22.04 boot on Raspberry Pi 4 – Find the Pi’s IP address
Eject and remove the micro SD card from your computer. Make sure your Pi is powered off (power cable removed), put the micro SD card in the corresponding slot, and only then power on your Raspberry Pi 4.
At this point, you don’t have any visible output since you don’t have a monitor. But you should see the green LED on the Pi blink randomly. It means the Pi is booting and working with the SD card. If the green LED is not blinking randomly, maybe it’s because the flash operation was not successful.
The Pi 4 will try to connect to your Wi-Fi network, using the name and password you’ve provided.
Now, the next step is to find what is the IP address of the Pi inside the network.
Important Note: with the following instructions, if you don’t see your Pi address at first, and if you’ve waited at least 2 minutes, power off/power on the Pi again. When I first booted the Pi with this Ubuntu image, it didn’t connect to the Wi-Fi. After I restarted it once, it worked.
On Windows
If you’re on Windows, you can use the Advanced IP Scanner tool.
All you have to do is click on “Scan” and wait.
OK, found it!
The Raspberry Pi 4’s IP address, in my case, is 192.168.43.56, and the name of the machine is “ubuntu”.
On Linux/Ubuntu
If you’re already running Ubuntu on your computer (natively or within a virtual machine), you can use only the terminal to find the Pi’s address.
I usually use nmap to do that (sudo apt install nmap).
First find your network IP address and mask. Run ifconfig:
$ ifconfig
enp0s3: flags=4163<UP,BROADCAST,RUNNING,MULTICAST>  mtu 1500
        inet 192.168.43.138  netmask 255.255.255.0  broadcast 192.168.43.255
        inet6 fe80::4024:2554:eea4:f97b  prefixlen 64  scopeid 0x20<link>
        ether 08:00:27:28:65:38  txqueuelen 1000  (Ethernet)
        RX packets 36560  bytes 42335654 (42.3 MB)
        RX errors 0  dropped 0  overruns 0  frame 0
        TX packets 8763  bytes 671459 (671.4 KB)
        TX errors 0  dropped 0 overruns 0  carrier 0  collisions 0

lo: flags=73<UP,LOOPBACK,RUNNING>  mtu 65536
        inet 127.0.0.1  netmask 255.0.0.0
        inet6 ::1  prefixlen 128  scopeid 0x10<host>
        loop  txqueuelen 1000  (Local Loopback)
        RX packets 947  bytes 82515 (82.5 KB)
        RX errors 0  dropped 0  overruns 0  frame 0
        TX packets 947  bytes 82515 (82.5 KB)
        TX errors 0  dropped 0 overruns 0  carrier 0  collisions 0
In this case, the IP address of my Ubuntu host is 192.168.43.138, and the mask is 255.255.255.0 (24 bits).
Now, with nmap and the data you just got:
$ sudo nmap -sP 192.168.43.0/24
Starting Nmap 7.80 ( https://nmap.org ) at 2023-04-26 13:50 CEST
Nmap scan report for _gateway (192.168.43.1)
Host is up (0.015s latency).
MAC Address: 8E:F5:A3:DB:03:27 (Unknown)
Nmap scan report for ubuntu (192.168.43.56)
Host is up (0.049s latency).
MAC Address: DC:A6:32:02:46:50 (Raspberry Pi Trading)
Nmap scan report for LAPTOP-27UBLNO7 (192.168.43.234)
Host is up (0.00057s latency).
MAC Address: 7C:B2:7D:9E:95:DA (Intel Corporate)
Nmap scan report for ed-vm (192.168.43.138)
Host is up.
Nmap done: 256 IP addresses (4 hosts up) scanned in 2.07 seconds
And we find the IP address: 192.168.43.56.
First ssh connection to the Raspberry Pi 4
If you’re on Windows older than Windows 10 with October 2018 update, use a program such as Putty.
Otherwise, for all updated Windows 10, Windows 11, Linux, MacOS, you can just open a terminal and access to the Pi with just one command. To open a terminal on Windows, just type “cmd” in the Windows search bar and launch a “Command Prompt”.
Type this command:
$ ssh pi@192.168.224.77
Replace “pi” with any other username you’ve chosen during the installation. Also use the IP address you just found in the previous step, not the one I’m using.
ssh pi@192.168.224.77
The authenticity of host '192.168.224.77 (192.168.224.77)' can't be established.
ED25519 key fingerprint is SHA256:WI67l/jru1i2vEnrHWLbzoV+1s71Dt0AJtg6JBP8faI.
This key is not known by any other names
Are you sure you want to continue connecting (yes/no/[fingerprint])? yes
Warning: Permanently added '192.168.224.77' (ED25519) to the list of known hosts.
pi@192.168.224.77's password:
You’ll have to type “yes” to the first question, then use the password that you previously set during the installation.
Then you’ll see something like that:
Welcome to Ubuntu 22.04.2 LTS (GNU/Linux 5.15.0-1024-raspi aarch64)

 * Documentation:  https://help.ubuntu.com
 * Management:     https://landscape.canonical.com
 * Support:        https://ubuntu.com/advantage

  System information as of Wed Apr 26 12:10:30 CEST 2023

  System load:  0.009765625       Temperature:            45.3 C
  Usage of /:   33.6% of 7.06GB   Processes:              134
  Memory usage: 12%               Users logged in:        0
  Swap usage:   0%                IPv4 address for wlan0: 192.168.224.77

Expanded Security Maintenance for Applications is not enabled.

0 updates can be applied immediately.

Enable ESM Apps to receive additional future security updates.
See https://ubuntu.com/esm or run: sudo pro status


The list of available updates is more than a week old.
To check for new updates run: sudo apt update


The programs included with the Ubuntu system are free software;
the exact distribution terms for each program are described in the
individual files in /usr/share/doc/*/copyright.

Ubuntu comes with ABSOLUTELY NO WARRANTY, to the extent permitted by
applicable law.

To run a command as administrator (user "root"), use "sudo <command>".
See "man sudo_root" for details.

pi@ubuntu:~$
This means that you’ve successfully connected to your Raspberry Pi using SSH!
Configure Ubuntu 22.04 on your Raspberry Pi 4
From now on, I will assume that you’re connected to your Pi via ssh. All the commands will be executed directly on the Pi.
Correctly synchronize date on Ubuntu
It is possible that the date is not correctly synchronized.
To check that, simply execute date:
$ date
Wed Apr 26 12:19:09 CEST 2023
If the date+time is not correct, first check that your Pi is connected to the Internet. Even if it is connected to a Wi-Fi network, maybe this network doesn’t have access to the Internet. For a very quick check, see if the command ping ubuntu.com gives you a positive result.
$ ping ubuntu.com
PING ubuntu.com (91.189.91.45) 56(84) bytes of data.
64 bytes from fautso.canonical.com (91.189.91.45): icmp_seq=1 ttl=49 time=164 ms
64 bytes from fautso.canonical.com (91.189.91.45): icmp_seq=2 ttl=49 time=236 ms
If you get that you can be sure your Pi has access to the Internet.
Now, if the date is still not synchronized, then you can simply solve that by installing htpdate: sudo apt install htpdate. After that, execute date again and you should have the current date. (you could solve that issue with a bunch of different solutions, but to keep things simple here I just used htpdate).
Note: here is a possible error output you can get with sudo apt update (which we’ll run later in this tutorial) if your date is not correct.
$ sudo apt update
Get:1 http://ports.ubuntu.com/ubuntu-ports focal InRelease [265 kB]
Get:2 http://ports.ubuntu.com/ubuntu-ports focal-updates InRelease [107 kB]
Get:3 http://ports.ubuntu.com/ubuntu-ports focal-backports InRelease [98.3 kB]
Get:4 http://ports.ubuntu.com/ubuntu-ports focal-security InRelease [107 kB]
Reading package lists... Done
E: Release file for http://ports.ubuntu.com/ubuntu-ports/dists/focal/InRelease is not valid yet (invalid for another 21d 23h 47min 19s). Updates for this repository will not be applied.
E: Release file for http://ports.ubuntu.com/ubuntu-ports/dists/focal-updates/InRelease is not valid yet (invalid for another 83d 17h 5min 42s). Updates for this repository will not be applied.
E: Release file for http://ports.ubuntu.com/ubuntu-ports/dists/focal-backports/InRelease is not valid yet (invalid for another 83d 17h 6min 1s). Updates for this repository will not be applied.
E: Release file for http://ports.ubuntu.com/ubuntu-ports/dists/focal-security/InRelease is not valid yet (invalid for another 83d 18h 16min 39s). Updates for this repository will not be applied.
Set your time zone
If you noticed that your timezone is not correct, run timedatectl list-timezones to list all available time zones.
Then, run timedatectl set-timezone your_time_zone to set the time zone, for example timedatectl set-timezone Europe/Paris.
Update/upgrade packages
One of the first thing you want to do with a fresh installation is to upgrade all the packages you have to the newest version.
$ sudo apt update
...
...
$ sudo apt upgrade
...
...

$ sudo apt autoremove
...
...
$ sudo reboot
And then reboot. Your Pi is fully ready now.
Optional: install a desktop
By default, when working with this Ubuntu server installation, you’ll connect to the Pi via ssh and always work like that.
But, if you ever need to use a desktop with a monitor for a specific application, you can get one.
If you have not flashed the image on the SD card yet, or if you’re OK doing it again, then you can follow the exact same steps, but instead of choosing the “Ubuntu Server” version you choose “Ubuntu Desktop”.
Or, if you have already installed Ubuntu Server, you can install a desktop on top of the base installation.
You can choose between:
- ubuntu-desktop
- xubuntu-desktop
- lubuntu-desktop
- kubuntu-desktop
To install a desktop for Ubuntu, simply use sudo apt install ubuntu-desktop for example.
However, note that the installation is quite big (2.7GB for ubuntu-desktop) and even if you still use your Pi headless (without a monitor), the RAM usage will be higher. So, only install a desktop if you truly need one.
Your Raspberry Pi4 is now ready with Ubuntu 22.04
Well done, your Pi is correctly configured!
Now you can start working on your projects. Before you do so, you may install your favorite text editors/debug tools/utilities/etc.
Then, well it depends on what you want to do.
If you are working with robots, the combination Raspberry Pi 4 + Ubuntu 22.04 server is great.
For example you can start playing with GPIOs using the RPi.GPIO Python module, or even work with ROS2 to build a complete and scalable application.