In this tutorial I will show you how to take a picture with the Raspberry Pi camera, from the Raspberry Pi OS (previously named Raspbian).
The Raspberry Pi camera module is a great addition to your Pi. It will allow you to develop more advanced applications with vision. And if you thought that taking pictures with the Pi camera would be hard, here you’ll see that it’s just the opposite.
>> Video version of the tutorial <<
If you like this video, subscribe to the Robotics Back-End Youtube channel so you don’t miss the next tutorials!
UPDATE: This tutorial only works for Raspberry Pi OS Buster and before. The new Raspberry Pi OS (Bullseye) has a new command named “libcamera-still”.
You are learning how to use Raspberry Pi to build your own projects?
Check out Raspberry Pi For Beginners and learn step by step.
Table of Contents
Setup and enable the Pi camera
First, make sure to shutdown and power off your Raspberry Pi.
Localize the camera port (don’t confuse it with the display port which has a similar connector). The camera port is between the HDMIs ports and the jack port. You can see “CAMERA” written next to it.
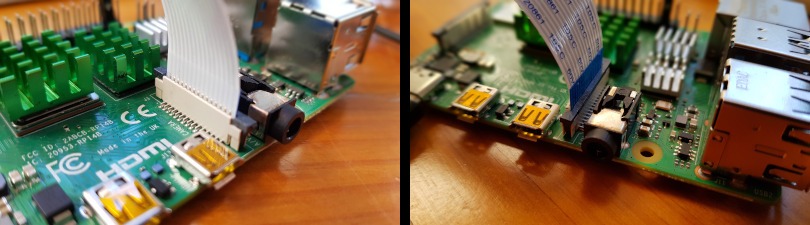
Once you’ve located the camera port, now make sure to plug the connector in the right way. The blue part should face the jack and USB ports.
Now, power on your Raspberry Pi. To open the settings for the Pi camera, click on the Raspberry Pi icon > “Preferences” > “Raspberry Pi Configuration”.

Select the “Interfaces” tab and click on “Enable” next to “Camera:”.
Then, click on OK and reboot your Pi so the change will be effective.
Take a picture with the Raspberry Pi camera
Now that the camera is plugged and enabled, you can start to take pictures. Here we’ll use the raspistill command in the terminal – already installed on the Raspberry Pi OS.
First, open a terminal. If you don’t have the terminal icon on the top bar, click on the Raspberry Pi icon > “Accessories” > “Terminal”.
First picture with Raspberry Pi and raspistill
To take a picture, you’ll need to use the raspistill command and also provide one argument: the name of the file for the output, so raspistill can save the photo into that file.
Let’s give it a try.
$ raspistill -o ~/Pictures/first_image.jpg
This command will take a few seconds to execute, because the camera functionality needs some time for initialization.
After writing raspistill, I have added -o ~/Pictures/first_image.jpg. What does it mean?
-ois the option to specify an output file name. Here o is the abbreviation for output.~/Pictures/first_image.jpgis the path + file name for saving the picture. “~” means that we’ll start from the home directory (from the user you’re connected as), then we have “/Pictures/” to go in the Pictures directory of that user, and finally “first_image.jpg” is the file name. I have used a “.jpg” extension here, you can also use other common image extensions such as “.png”. Don’t forget the extension otherwise you might have trouble opening the file if you share it for example on a Google Drive or on Windows.
Note: if you execute the same command again with the same file name, the previous file will be replaced. So, if you want to keep all pictures you take with the Pi camera, make sure to provide a different file name every time.
You can also provide a relative path to save the picture from where you are in the terminal.
$ cd ~/Pictures/
$ raspistill -o second_image.jpg
This will also create a new picture file in your “~/Pictures/” directory.
Open the image you’ve taken with raspistill
Now that you’ve taken a photo, you might want to actually see that photo. There are 2 main ways of doing that.
First, and this is the easiest way since you’re already in the terminal: use the xdg-open command, which is basically the same thing as double clicking on the file to execute it or open it.
$ xdg-open ~/Pictures/first_image.jpg
Or, if you’re already in the picture directory:
$ cd ~/Pictures/
$ xdg-open first_image.jpg
You should now be able to see the picture you’ve just taken with the Raspberry Pi camera!
The second way to open the picture, is to open a file manager (click on it on the top bar), and use your mouse to find the file + double click on it.
Customize the images you take with the Raspberry Pi camera
Change resolution and flip the picture
When you open an image in the image viewer, the resolution will be displayed on top. For example when I view the picture I see 3280 x 2464, which is quite big. Now let’s say you want to take pictures with a specific resolution: 1280 x 720.
Also, depending on how you placed your camera, you may see that the image is upside down.
It would be quite boring to have to resize and apply changes for all pictures you take.
Instead, you can provide some options with the raspistill command, to directly take pictures with the correct configuration. No need to do any post-processing.
And one more thing: by default the raspistill command will wait for 5 seconds before taking a photo. The camera needs about 2 seconds to initialize, so we could also reduce this timeout.
Let’s try one command to change the resolution, flip the image vertically, and wait 2 seconds instead of 5.
$ raspistill -o ~/Pictures/new_image.jpg -w 1280 -h 720 -vf -t 2000
Let’s break this command down:
raspistill: the command to take a picture.-o ~/Pictures/new_image.jpg: the option to add an output file name, as previously seen.-w 1280 -h 720: to set the resolution you have to provide 2 options. –w for the width in pixels, and –h for the height in pixels.-vf: this option will vertically flip the picture.-t 2000: this is the timeout option. Basically, once you execute the raspistill command in the terminal, it will wait for x amount of milliseconds before taking the picture and exiting. By default the amount is 5 seconds, or 5000 milliseconds. Here we choose 2000, which means 2000ms or 2 seconds. Make sure to always provide a duration in milliseconds for that option.
Here’s a video showing you how to to change the camera resolution for your Pi camera (same as instructions above).
And another one for how to fix the upside/down problem with images.
How to get the complete list of settings for raspistill?
At this point you might wonder: how could you find all those options by yourself, without having to search on the internet?
Well it’s pretty easy. If you just type and execute raspistill, or raspistill --help, you will get the complete list of all available options. As you’ll see the list is quite long.
Apply filters to the Pi camera
With the list of settings for the camera, you can completely customize the output image.
Let’s say you want to change some basic settings such as contrast, brightness, etc.
For example, if you add -co 10 -br 55 -sa -10 after the raspistill command and the other options, you will get an image with:
-co -10: this will reduce the contrast a little bit. The contrast setting goes from -100 to 100, default to 0 (no change).-br 55: increase the brightness a little bit. The brightness setting goes from 0 and 100, default to 50.-sa -10: decrease the saturation. The saturation setting goes from -100 to 100, default to 0.
If you want to add some text on your photo, you can do so with the -a option. For example: -a "Hello from the Pi camera".
And if you want to add complete image effect modes (similar to the modes you have when you take a photo with a phone), you can use the -ifx option, appended to the other options for raspistill.
For example, -ifx cartoon will make the picture look like a cartoon picture.
Conclusion – Going further with the Pi camera module
In this tutorial you have learnt how to setup and use the Raspberry pi camera module. If you use Raspberry Pi OS, there is almost no configuration to do, it just works out of the box.
With the raspistill command line tool, you can get access to all the camera functionalities, directly from the terminal. Execute raspistill alone to get access to the documentation with all the available options.
Now, to go further with the Pi camera, you can:
- Use the camera to take videos (raspivid command in the terminal) and why not do a video stream.
- Control the camera and take pictures/videos from Python.
- Use computer vision with OpenCV in your Python programs.