ROS Rate is a powerful ROS feature you can use for your control loops – be it for reading a sensor, controlling a motor, etc.
In this tutorial I’ll explain to you what is a ROS Rate, and you’ll see the code to use a rospy Rate and a roscpp Rate.
Let’s get started!
Table of Contents
ROS Rate explained
Let’s start with a simple example: you create a node to read data from a sensor. You want to read the data from this sensor at 10Hz exactly.
In this case, you need to use or implement a system that will read the data in a loop, and make the program sleep the correct amount of time until the next loop iteration.
10Hz means you need to read the data every 100ms. If it takes 17ms to read the data, then the program needs to sleep for 83ms until the next read. And you have to compute that for each iteration of the loop. Sometimes the reading will take 17ms, but maybe sometimes 19ms or 16ms.
You are learning ROS?
Check out ROS For Beginners and learn ROS step by step.
ROS Rate allows you to do that without any effort. You just create a ROS Rate with a given frequency in your code, and use the sleep() functionality to wait until the next iteration.
ROS Rate is different from a “simple” sleep functionality, because it will dynamically choose the correct amount of time to sleep to respect the given frequency.
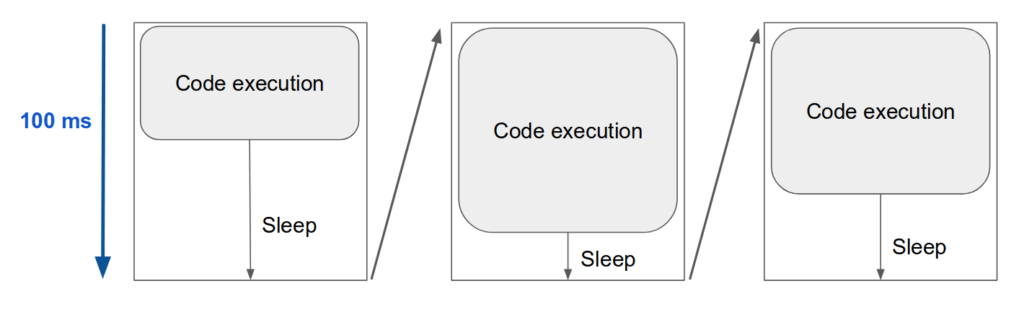
Here the ROS Rate will sleep for the amount of time needed to complete 100ms (at 10Hz). If the code takes longer, the sleep will be shorter.
Note that if the code execution takes more than 100ms, then the Rate will not sleep, and the program will directly go to the next iteration. In this case, the 10Hz frequency is not respected. You should make sure that the total execution time is lower than the frequency you give to the ROS Rate, or else it becomes totally useless.
rospy Rate
Here’s a basic Python code using a rospy Rate.
import rospy

if __name__ == '__main__':
    rospy.init_node("rospy_rate_test")
    rate = rospy.Rate(5) # ROS Rate at 5Hz

    while not rospy.is_shutdown():
        rospy.loginfo("Hello")
        rate.sleep()
In this node we just print “Hello” at 5 Hz.
Let’s check that the rospy Rate is correctly working.
$ rosrun my_ros_tests test_rate.py
[INFO] [1558936710.443315]: Hello
[INFO] [1558936710.643924]: Hello
[INFO] [1558936710.843957]: Hello
[INFO] [1558936711.043966]: Hello
[INFO] [1558936711.243989]: Hello
[INFO] [1558936711.443976]: Hello
[INFO] [1558936711.643984]: Hello
As you can see, a new log is printed every 0.2 seconds. The rospy Rate is doing its job!
You might also have noticed that the precision is not perfect. This is mostly due to your computer performance and the fact that Ubuntu is not a real-time OS. But be reassured: for most of the things you’ll do this will be just enough.
roscpp Rate
Here’s a basic Cpp code using a roscpp Rate.
#include <ros/ros.h>

int main (int argc, char **argv)
{
    ros::init(argc, argv, "roscpp_rate_test");
    ros::NodeHandle nh;
    ros::Rate rate(5); // ROS Rate at 5Hz

    while (ros::ok()) {
        ROS_INFO("Hello");
        rate.sleep();
    }
}
This code has the exact same behavior as the previous Python code.
Let’s check again that the roscpp Rate is correctly working.
$ rosrun my_tests roscpp_test_rate
[ INFO] [1558937423.955152460]: Hello
[ INFO] [1558937424.155266064]: Hello
[ INFO] [1558937424.355270572]: Hello
[ INFO] [1558937424.555265369]: Hello
[ INFO] [1558937424.755265186]: Hello
[ INFO] [1558937424.955257122]: Hello
“Hello” is printed every 0.2 seconds. The roscpp Rate is doing is job!
Publishing data at a fixed rate with a ROS Rate
A ROS Rate is very useful when you have a node publishing data. You often want to use a given frequency for your publishers, so that you can keep a certain level of “synchronization” between all your nodes.
For example, in your complete robot program you could have the following publishers:
- Joint states – 100Hz or more
- Hardware status – 10Hz
- Infra red sensor – 30Hz
- Temperature – 5Hz
- …
Publisher example with rospy Rate
import rospy
from std_msgs.msg import Int32

if __name__ == '__main__':
    rospy.init_node("rospy_rate_test")
    rate = rospy.Rate(5) # ROS Rate at 5Hz
    pub = rospy.Publisher("/counter", Int32, queue_size=10)
    counter = 0

    while not rospy.is_shutdown():
        counter += 1
        msg = Int32()
        msg.data = counter
        pub.publish(counter)
        rate.sleep()
Start the node and listen to the “/counter” topic. You’ll see the counter increment every 0.2 second.
You can also monitor the publishing rate of this topic thanks to the rostopic hz command line.
$ rostopic hz /counter
subscribed to [/counter]
average rate: 5.000
    min: 0.200s max: 0.200s std dev: 0.00002s window: 5
average rate: 5.000
    min: 0.200s max: 0.200s std dev: 0.00004s window: 10
average rate: 5.001
    min: 0.200s max: 0.200s std dev: 0.00009s window: 15
As you can see, with a ROS Rate we can easily make a publisher publish at 5Hz, not less, not more!
Publisher example with roscpp Rate
#include <ros/ros.h>
#include <std_msgs/Int32.h>

int main (int argc, char **argv)
{
    ros::init(argc, argv, "roscpp_rate_test");
    ros::NodeHandle nh;
    ros::Publisher pub = nh.advertise<std_msgs::Int32>("/counter", 10);
    ros::Rate rate(5); // ROS Rate at 5Hz
    int counter = 0;

    while (ros::ok()) {
        counter++;
        std_msgs::Int32 msg;
        msg.data = counter;
        pub.publish(msg);
        rate.sleep();
    }
}
ROS Rate and ROS spin
Even if ROS Rate is a powerful functionality to keep a node publishing at a fixed frequency, you might encounter some issues as your nodes grow in complexity.
How could you publish on 2 different topics at 2 different frequencies, in the same node?
What if you want to use the ROS spin functionality to trigger your subscriber callbacks?
Using a ROS Timer
A ROS Timer allows you to set a callback that will be triggered at a given rate. Sounds pretty similar to the functionality of a ROS Rate, right? And you can easily use multiple Timers at the same time, as well as spin, in the same node.
To learn how to use ROS Timers to publish data at a fixed rate, check out this Python tutorial, and this Cpp tutorial.
rospy Rate and rospy spin
If you still want to use ROS Rate while using spin (instead of Timers), here’s a solution for Python. Of course this is not the only solution, but it’s something that works quite well.
import rospy
from std_msgs.msg import Int32
import threading

counter = 0
pub = rospy.Publisher("/counter", Int32, queue_size=10)

def callback_temperature_sensor(msg):
    rospy.loginfo(msg.data)

def publisher_thread():
    rate = rospy.Rate(5) # ROS Rate at 5Hz
    while not rospy.is_shutdown():
        global counter
        counter += 1
        msg = Int32()
        msg.data = counter
        pub.publish(counter)
        rate.sleep()

if __name__ == '__main__':
    rospy.init_node("rospy_rate_test")

    sub = rospy.Subscriber("/temperature", Int32, callback_temperature_sensor)
    worker = threading.Thread(target=publisher_thread)
    worker.start()

    rospy.spin()
You can create one “threading.Thread” object per functionality which requires to run in a loop – be it a publisher, or anything else. If the loop has a fixed frequency, the Timer is more appropriate. But if the frequency of the loop is dynamically changing (or if there is no fixed frequency at all), a new thread makes more sense.
roscpp Rate and roscpp spin
With Cpp you can use std::thread to do the exact same thing.
#include <std_msgs/Int32.h>
#include <thread>

int counter = 0;
ros::Publisher pub;

void callbackTemperatureSensor(const std_msgs::Int32::ConstPtr& msg)
{
    ROS_INFO("%d", msg->data);
}

void publisherThread()
{
    ros::Rate rate(5); // ROS Rate at 5Hz

    while (ros::ok()) {
        counter++;
        std_msgs::Int32 msg;
        msg.data = counter;
        pub.publish(msg);
        rate.sleep();
    }
}

int main (int argc, char **argv)
{
    ros::init(argc, argv, "roscpp_rate_test");
    ros::NodeHandle nh;
    pub = nh.advertise<std_msgs::Int32>("/counter", 10);
    ros::Subscriber sub = nh.subscribe("/temperature", 10, callbackTemperatureSensor);

    std::thread worker(publisherThread);

    ros::spin();
    worker.join();
}
ROS Rate, a very useful functionality for robotics
Executing a loop at a fixed frequency is something you don’t find in every language or framework. But as you could see here, it’s very important when it comes to robotics.
That’s why it was a very good idea from the ROS designers to include ROS Rate in the core functionalities.
With ROS Rates, Spin, Timers, etc. (using rospy or roscpp), you will be able to quickly write efficient code for your robot!
