In this tutorial you will learn how to create your own ROS2 custom message (Msg). I will also cover how to create custom services (Srv), as the configuration and the process are the same.
In ROS2 the word “message” – when talking about the concept – has been replaced by “interface”.
So, to create your own ROS2 custom interface (for messages, services, etc.), you will first need to configure a few things, and then you will be able to create as many interfaces as you want, very quickly.
>> Watch this video as an additional resource to this article:
After watching the video, subscribe to the Robotics Back-End Youtube channel so you don’t miss the next tutorials!
You want to learn ROS2 efficiently?
Check out ROS2 For Beginners and learn ROS2 step by step, in 1 week.
Table of Contents
Using existing messages/interfaces
First, do you really need to create a custom interface?
Before you try to reinvent the wheel, check if there is not already an existing message you can use. In the ROS2 common interfaces page on GitHub you can find a collection of messages you can reuse in your application.
A good example is the sensor_msgs/msg/Image.Msg, which already contains all the info you need to send an image from a camera between nodes. First of all, you won’t need to re-create it yourself, and second, this interface is already used by many ROS2 plug-ins. So, if you manage to use this interface, then it’s all plug and play.
However, sometimes you’ll find that there is no available interface directly matching your needs. You may find interfaces that partly correspond to what you want. A bad practice here would be to use those existing messages in a way that was not intended. This might work but it will make your application less readable and more prone to errors in the future.
Sometimes, you’ll find the right message for your application, but the name doesn’t make much sense when you look at what you’re trying to achieve. In that case a ROS2 custom message would be appropriate.
Also, if you’re tempted to use messages such as Int64, String, etc., from the example_interfaces package (previously std_msgs), then as a best practice, don’t.
$ ros2 interface show example_interfaces/msg/Int64
# This is an example message of using a primitive datatype, int64.
# If you want to test with this that's fine, but if you are deploying
# it into a system you should create a semantically meaningful message type.
# If you want to embed it in another message, use the primitive data type instead.
int64 data
As you can see this package is only recommended to make tests. It’s also very handy when learning ROS2 from scratch, since you can first learn how to use topics/services before creating your custom interfaces. But for real application purposes, don’t use it.
So, as a general rule, if you don’t find an exact fit for your need in the available common interfaces, don’t hesitate too much and create your own.
Create a package dedicated to ROS2 custom messages
Best practices – naming
In theory you could create custom messages in any package you want, but this could lead to many problems. For example, if you create the message in package A and you need this message in package B, you’ll have to add a dependency to package A. This will quickly result in a dependency mess with unneeded and cycling dependencies.
So, the best practice here is to create a package dedicated to ROS2 custom messages, and only that. Then you’ll be able to add a dependency to this package, from any package requiring your custom interfaces.
How to name the package?
Well, a best practice is to:
- Start with the name of your robot/device/application. If your robot is named D4QP, then start with “d4qp”.
- End with “_interfaces” so it’s clear the package is an interface package. You’ll often see packages ending with “_msgs”, but this is the old convention.
Create the package
Go to your ROS2 workspace and create a new package. I’ll simply use “my_robot” for the name of the robot/device/etc.
$ cd ~/ros2_ws/src/
$ ros2 pkg create my_robot_interfaces
This will create a new C++ ROS2 package (default when you create a package, same as if you added the “–build-type ament_cmake” option). And now we’ll need to modify it to be able to build interfaces.
Configure the package for ROS2 custom messages
Navigate inside the package, and:
- Remove the include/ and src/ folders.
- Add msg/ folder (also srv/ if you want to create services).
$ cd ~/ros2_ws/src/my_robot_interfaces/
$ rm -rf include/
$ rm -rf src/
$ mkdir msg
$ mkdir srv
You’ll need to modify package.xml by adding 3 lines. Here’s the file, new lines are highlighted (lines 12-14).
<?xml version="1.0"?>
<?xml-model href="http://download.ros.org/schema/package_format3.xsd" schematypens="http://www.w3.org/2001/XMLSchema"?>
<package format="3">
  <name>my_robot_interfaces</name>
  <version>0.0.0</version>
  <description>TODO: Package description</description>
  <maintainer email="user@todo.todo">user</maintainer>
  <license>TODO: License declaration</license>

  <buildtool_depend>ament_cmake</buildtool_depend>

  <buildtool_depend>rosidl_default_generators</buildtool_depend>
  <exec_depend>rosidl_default_runtime</exec_depend>
  <member_of_group>rosidl_interface_packages</member_of_group>

  <test_depend>ament_lint_auto</test_depend>
  <test_depend>ament_lint_common</test_depend>

  <export>
    <build_type>ament_cmake</build_type>
  </export>
</package>
You’ll also need to modify CMakeLists.txt.
I have simplified the default CMakeLists.txt, and also highlighted the extra lines you need to add.
cmake_minimum_required(VERSION 3.5)
project(my_robot_interfaces)

# Default to C++14
if(NOT CMAKE_CXX_STANDARD)
  set(CMAKE_CXX_STANDARD 14)
endif()

if(CMAKE_COMPILER_IS_GNUCXX OR CMAKE_CXX_COMPILER_ID MATCHES "Clang")
  add_compile_options(-Wall -Wextra -Wpedantic)
endif()

find_package(ament_cmake REQUIRED)
find_package(rosidl_default_generators REQUIRED)

rosidl_generate_interfaces(${PROJECT_NAME}
  "your custom interfaces will be here"
  "one per line"
  "no comma for separating lines"
 )

ament_export_dependencies(rosidl_default_runtime)

ament_package()
If you want to compile the empty package just now, comment the rosidl_generate_interfaces command as it doesn’t contain any interface – otherwise you’ll get a compilation error with colcon.
Your package is now configured and ready!
This step only needs to be done once. After that, you can add custom interfaces.
Create your own ROS2 custom message (Msg)
Create the message file
In your newly created package, go inside the msg/ folder and create a new file there.
The rules/conventions for message files:
- Use CamelCase for the name of the interface. Ex: “MotorTemperature”.
- Don’t add “Msg” or “Interface” in the name, this will add redundancy.
- Use the .msg extension.
So, for example, let’s say we want our robot to reach a certain point, which is defined by a name and some coordinates to reach. The file name can be TargetCoordinates.msg.
$ cd ~/ros2_ws/src/my_robot_interfaces/msg/
$ touch TargetCoordinates.msg
Now, you’ll need to fill the message definition.
Write the message definition
You can use any number of:
- ROS2 primitive data types for messages (list available here).
- Or already existing messages – that you’ve created, or from other packages.
In this example, we need to use the primitive type “string” for the name of the target. And for the coordinates, we’ll use the “geometry_msgs/msg/Point” message which already contains what we need.
$ ros2 interface show geometry_msgs/msg/Point
# This contains the position of a point in free space
float64 x
float64 y
float64 z
If you get an error when trying to see the message, then you need to install the corresponding package with sudo apt install ros-<your_distro>-geometry-msgs.
And this is important: if your custom interfaces package depends on another package, you’ll need to add this dependency in both package.xml and CMakeLists.txt.
For package.xml:
...
  <buildtool_depend>ament_cmake</buildtool_depend>

  <depend>geometry_msgs</depend>

  <build_depend>rosidl_default_generators</build_depend>
...
For CMakeLists.txt:
...
find_package(ament_cmake REQUIRED)
find_package(geometry_msgs REQUIRED)
find_package(rosidl_default_generators REQUIRED)
...
All right, and now let’s write the content of TargetCoordinates.msg:
string name
geometry_msgs/Point coordinates
Add one field per line. First the data type, then the name.
Add the message in CMakeLists.txt
Once you’ve created your message file, it won’t build automatically. You need to add it inside the rosidl_generate_interfaces() function.
...
rosidl_generate_interfaces(${PROJECT_NAME}
  "msg/TargetCoordinates.msg"
 )
...
All the interfaces you create (message, service, action, etc) will all be written here in rosidl_generate_interfaces(). And because the file is inside the msg/ folder and has the .msg extension, ROS2 knows it’s a message, not something else.
You can add as many custom interfaces as you want here. Simply add one per line, and don’t put any comma to separate the lines.
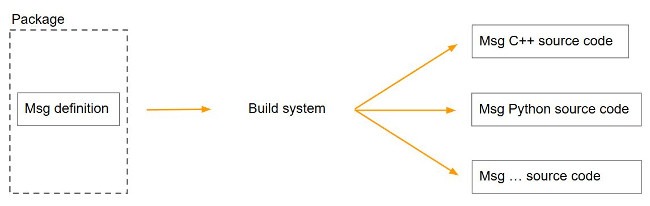
Build your custom message
Before being able to use a message, you need to build it. The ROS2 build system will create Python/C++/etc. source code for the message, so you can then import it directly in your code.
To build your new interface:
$ cd ~/ros2_ws/
$ colcon build --packages-select my_robot_interfaces
Starting >>> my_robot_interfaces
Finished <<< my_robot_interfaces [0.47s]

Summary: 1 package finished [0.56s]
If you get any error at this point, go back to the beginning and make sure you’ve done all the steps correctly.
Use your ROS2 custom message in your code – from another package
Now the message is built and ready to be used.
Before using it though make sure you have sourced your environment – or else you won’t be able to find it!
$ source ~/ros2_ws/install/setup.bash
Now you can see your message with the ros2 interface command line tool.
$ ros2 interface list | grep my_robot
    my_robot_interfaces/msg/TargetCoordinates
$ ros2 interface show my_robot_interfaces/msg/TargetCoordinates
string name
geometry_msgs/Point coordinates
To use your message in your code, the process is exactly the same as if you were using any other common ROS2 message.
So, let’s say that in package “my_robot_driver” you need to use the TargetCoordinates message from “my_robot_interfaces” package.
Note: the configuration to add now is inside the my_robot_driver package, not in the my_robot_interfaces package.
If my_robot_driver is a Python package:
- Add
<depend>my_robot_interfaces</depend>in package.xml. - In your code, to import the message:
from my_robot_interfaces.msg import TargetCoordinates.
If my_robot_driver is a C++ package:
- Add
<depend>my_robot_interfaces</depend>in package.xml. - Add
find_package(my_robot_interfaces REQUIRED)in CMakeLists.txt. - In your code, to import the message:
#include "my_robot_interfaces/msg/TargetCoordinates.hpp"(make sure to use .hpp).
Create/build/use your own ROS2 custom service (Srv)
The steps to create a new custom service (Srv) are the exact same as for custom messages (Msg).
Here we won’t start from the beginning, we’ll use the already configured my_robot_interfaces package.
Let’s say we want to create a service to set a color for an rgb LED. We want to send the color as an hexadecimal stored in a string, and we want to know if the operation was successful or not (simple boolean answer).
Create a new file in the srv/ folder of the package (create srv/ if not already here).
Follow the same conventions as for message file names, but this time use the .srv extension instead of .msg. Also, as a service reflects an action or computation to do, use a verb in the name. For example: “Set..”, “Trigger..”, “Activate..”, “Compute..”, “Turn..”, and so on.
$ cd ~/ros2_ws/src/my_robot_interfaces/srv/
$ touch SetRGBLed.srv
Here we’ll only use primitive data types, so no new dependency to add. Here’s the content of the service file.
string rgb_hex_color
---
bool success
Note that the request fields and the response fields are separated by 3 “-“. You should have those 3 dashes in every service file you create.
Now that the file is created, let’s add the new interface in the CMakeLists.txt.
...
rosidl_generate_interfaces(${PROJECT_NAME}
  "msg/TargetCoordinates.msg"
  "srv/SetRGBLed.srv"
 )
...
Let’s build the package.
$ cd ~/ros2_ws/
$ colcon build --packages-select my_robot_interfaces
And then, to use this new interface in your code (first don’t forget to source the environment: source ~/ros2_ws/install/setup.bash):
- From a Python package: same configuration as for messages. To import the service:
from my_robot_interfaces.srv import SetRGBLed. - From a C++ package: same configuration as for messages. To import the service:
#include "my_robot_interfaces/srv/SetRGBLed.hpp".
And that’s it!
Conclusion – Create custom ROS2 messages
You are now able to create your own custom ROS2 interfaces (messages and services).
Quick recap:
If you find the perfect match in an already existing message (ex: from geometry_msgs, sensor_msgs, etc.), then use it instead of reinventing the wheel. Otherwise, create your own ROS2 custom message.
After you’ve created a new package + initialized it, for each new interface you’ll need to:
- Create a new file under the appropriate directory (msg/, srv/).
- Write the interface inside the file.
- Add the file in the CMakeLists.txt of the interfaces packages.
- Build the interfaces package.
After you’ve created a few messages, you’ll see that it becomes quite simple and you’ll be able to create new messages in no time.
