In this tutorial you will learn how to run ROS2 on multiple machines, including a Raspberry Pi 4 board. As you’ll see, things will be quite easy and there is almost no configuration to do.
If you’re using a Raspberry Pi with ROS2 as one of the machines, make sure you have correctly installed ROS2 on your Pi. Then, as you’ll see, no extra setup is required.
For this tutorial I will personally use a laptop running Ubuntu on a virtual machine (with a bridged adapter), and a Raspberry Pi with ROS2 on Ubuntu Server.
>> Watch this video as an additional resource to this article:
After watching the video, subscribe to the Robotics Back-End Youtube channel so you don’t miss the next tutorials!
You want to learn ROS2 efficiently?
Check out ROS2 For Beginners and learn ROS2 step by step, in 1 week.
Table of Contents
Network configuration for ROS2 multi-machines
Before starting, obviously make sure you have installed ROS2 on each machine, preferably the same distribution.
Then, make sure you don’t have a firewall blocking your communications on the network. If you have a firewall, allow UDP multicasting, or disable the firewall at least during your first tests.
Connect all your machines in the same network. This is very important, otherwise they simply won’t be able to find each other.
Now, you can easily check if the machines can reach out to each other.
First, get the IP address of each machine inside the network by running hostname -I.
Example:
- Machine 1:
hostname -Ireturns 192.168.43.138 172.17.0.1 - Machine 2:
hostname -Ireturns 192.168.43.56
You may have multiple IP addresses on each machine, depending on what you’ve previously configured (ex: on Machine 1 I have Docker, this is why you see 172.17.0.1). Just find the IP addresses that are on the same network, here those who start with 192.168.43.xx.
If you can ping the machines from each other then the network configuration is done.
Machine 1:
$ ping 192.168.43.56
PING 192.168.43.56 (192.168.43.56) 56(84) bytes of data.
64 bytes from 192.168.43.56: icmp_seq=1 ttl=64 time=128 ms
64 bytes from 192.168.43.56: icmp_seq=2 ttl=64 time=136 ms
^C
Machine 2:
$ ping 192.168.43.138
PING 192.168.43.138 (192.168.43.138) 56(84) bytes of data.
64 bytes from 192.168.43.138: icmp_seq=1 ttl=64 time=8.75 ms
64 bytes from 192.168.43.138: icmp_seq=2 ttl=64 time=132 ms
^C
Run ROS2 on 2 machines
Now it’s very simple. All you have to do is to start some nodes in Machine 1, some other nodes in Machine 2, and they will all be able to communicate through topics, services and actions. Just like they were all in the same machine.
Machine 1:
$ source /opt/ros/your_ros2_distribution/setup.bash # You can put that line into your ~/.bashrc
$ ros2 run demo_nodes_cpp talker
Machine 2:
$ source /opt/ros/your_ros2_distribution/setup.bash # You can put that line into your ~/.bashrc
$ ros2 run demo_nodes_cpp listener
And you should see logs on both machines!
If you want to communicate with a third/fourth/… machine, simply follow the network configuration steps again, and you’ll be all set.
Use ROS_DOMAIN_ID to run multiple (separate) ROS2 applications on the same network
So, after you’ve configured the machines to be in the same network, they are all part of the same ROS2 application. This can be a problem: what if you want to run 2 different ROS2 applications on the same network and on multiple machines? Here you might want to completely separate the applications from each other.
Well, that’s possible, you just need to set one environment variable before you start your nodes.
Before you start any node in one session (= one terminal), you need to export a new environment variable, named ROS_DOMAIN_ID, using a number for the value (preferably a low number, between 1 and 232). Then, only the nodes started in sessions with the same ROS_DOMAIN_ID will be able to communicate with each other.
Example:
Machine 1 – session (terminal) A:
$ export ROS_DOMAIN_ID=5
$ source /opt/ros/your_ros2_distribution/setup.bash
$ ros2 run demo_nodes_cpp talker
Machine 2 – session (terminal) B:
$ export ROS_DOMAIN_ID=5
$ source /opt/ros/your_ros2_distribution/setup.bash
$ ros2 run demo_nodes_cpp listener
Try to set a different ROS_DOMAIN_ID (or don’t set one at all) on Machine 2 – session B, and you’ll see that the communication won’t work.
Now, you can have any number of configuration:
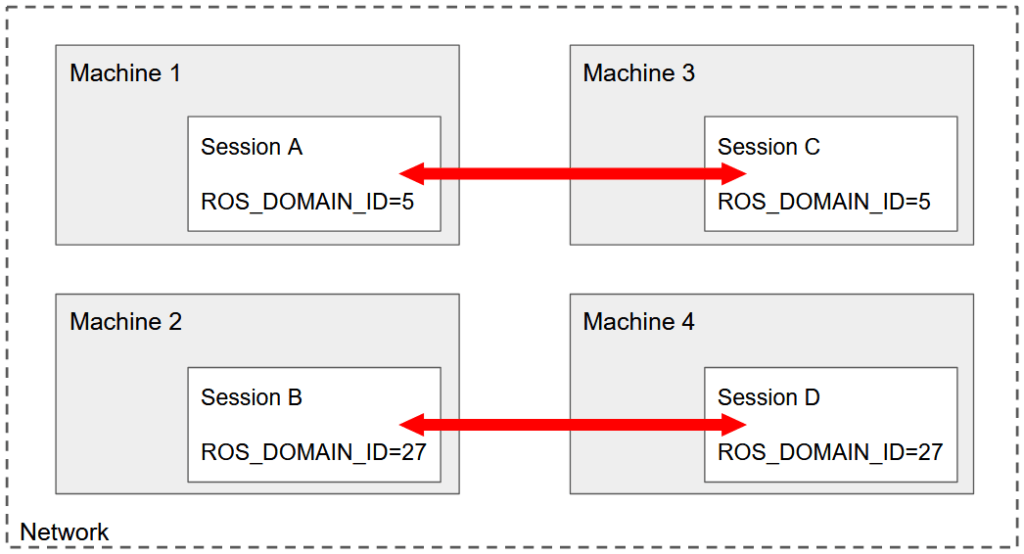
Here you have 4 different machines, each starting one session. This is a classic example of what you can setup in real life.
In the future, make sure you don’t forget the ROS_DOMAIN_ID. If you know that all your sessions inside one machine will be used for the same application, you can add export ROS_DOMAIN_ID=xx to your ~/.bashrc.

But… You can also run multiple ROS2 applications on just 2 machines! What’s important is to understand that the ROS_DOMAIN_ID configuration is working at the session level, not the machine level – because it’s an environment variable.
ROS2 multi-machine with Raspberry Pi
Running ROS2 across multiple machines is especially useful when you have a robot powered by a Raspberry Pi board, or any kind of embedded computer suitable for ROS2 (ex: Jetson Nano). Setting up your Pi for multi-machines communication is the same as setting up any other computer/laptop.
So, here is just an additional tip/best practice to keep in mind whenever you need to work with a robot powered by a Raspberry Pi.
If you want to make some experiments, or work with the robot simulation on the side, or do some heavy computing, etc., here is what you can do:
On your Raspberry Pi, just install the core packages, and run only the core nodes of your applications, which are responsible for talking to the hardware. Then, on your other (remote) computer, start any simulation tool such as RViz, Gazebo. Start your heavy nodes such as motion planning, etc.
This is a great way to minimize the CPU and RAM use on your Pi, and also to speed up your development time.
All in all, multiple machine communication is a really powerful ROS2 functionality. With ROS2 you can build a complete distributed system, not only on the software side, but also on the hardware side.