In this tutorial I will show you how to create a map for the Nav2 stack, using the ROS2 slam_toolbox package.
We are going to use a simulation of a robot, the Turtlebot3, but all the steps that are related to SLAM can be replicated for any other robot, as long as you have a lidar sensor publishing on a /scan topic.
Also I will use ROS2 Humble on Ubuntu 22.04 for this tutorial.
>> Here is a video version of this tutorial, as an additional resource:
After watching the video, subscribe to the Robotics Back-End YouTube channel so you don’t miss the next tutorials!
You are learning Navigation 2 with ROS2?
Check out this ROS2 Nav2 course, and learn step by step, from scratch.
Table of Contents
Setup for ROS2 slam_toolbox
ROS2 Installation
First of all, make sure that ROS2 is correctly installed on your computer, and that you have sourced the environment – with a line like “source /opt/ros/humble/setup.bash” in your .bashrc for example.
DDS configuration
To use the Nav2 stack and slam_toolbox correctly, we will need to change the DDS implementation used by ROS2. Don’t worry too much, the setup will be super simple.
The thing is, as you may know, ROS2 is based on DDS for the middleware. There are different DDS implementations, the default one (as for now) being Fast DDS.
Due to some issues with Fast DDS and Navigation in ROS2, it has been recommended to use Cyclone DDS instead. So, we need to tell ROS2 to use a different DDS.
To do that, first install Cyclone DDS with apt.
$ sudo apt install ros-humble-rmw-cyclonedds-cpp
Now that Cyclone DDS is installed, we need to tell ROS2 to use it instead of the default DDS.
To do this, you just need to export one environment variable named “RMW_IMPLEMENTATION”, that we will add into our .bashrc.
...
export RMW_IMPLEMENTATION=rmw_cyclonedds_cpp
source /opt/ros/humble/setup.bash
And that’s it! Now, just open a new terminal/session, or source the .bashrc, and Cyclone DDS will be used.
Install Nav2 and slam_toolbox
First, let’s install the Navigation 2 packages.
$ sudo apt install ros-humble-navigation2 ros-humble-nav2-bringup
We will also install the Turtlebot3 packages as we’ll use this robot as an example.
$ sudo apt install ros-humble-turtlebot3*
Once you have this, let’s install the ROS2 slam_toolbox package.
$ sudo apt install ros-humble-slam-toolbox
Everything is now correctly installed and setup.
Start the ROS2 stack for your robot
Now you can start your robot. In this tutorial I will use Turtlebot3. You can follow along with this example, and then you’ll have to use your own robot stack here. Note that adapting a robot to the Navigation 2 stack is not something trivial, and I’m not going to talk about this here, as it could fit an entire course.
So, when you want to use your own robot, make sure that you can start the robot, control it (with keyboard, joystick, …), and have a LaserScan message published on a /scan topic. Those are the main requirements for slam_toolbox to work.
Now, back to the Turtlebot3.
Start the robot
To start the Turtlebot3 stack, we first need to export an environment variable to specify which version we want to launch (burger, waffle, waffle pi). We’ll use the waffle version.
Run this command, or simply add it somewhere at the end of your .bashrc: export TURTLEBOT3_MODEL=waffle. Now, if you’ve just added the environment variable, make sure to either source the .bashrc or open a new terminal.
As I will do this tutorial without a real robot, I will use a Gazebo simulation of the robot. Let’s start this simulation.
$ ros2 launch turtlebot3_gazebo turtlebot3_world.launch.py
Making sure there is a /scan topic
If we list the topics:
$ ros2 topic list
/camera/camera_info
/camera/image_raw
/clock
/cmd_vel
/imu
/joint_states
/odom
/parameter_events
/performance_metrics
/robot_description
/rosout
/scan
/tf
/tf_static
As you can see, we have a /scan topic. And if we check the type:
$ ros2 topic info /scan
Type: sensor_msgs/msg/LaserScan
Publisher count: 1
Subscription count: 0
Great, we found the LaserScan message type from the sensor_msgs packages.
With this, we know that our robot is correctly configured for slam_toolbox.
Start Nav2 and ROS2 slam_toolbox
For this we will need 4 terminals.
In the first terminal you have already started the ROS2 stack for your robot. Using the Turtlebot3 example:
$ ros2 launch turtlebot3_gazebo turtlebot3_world.launch.py
In a 2nd terminal, start the Navigation 2 stack. Note: if you are using Gazebo, add “use_sim_time:=True” to use the Gazebo time. If using the real robot, skip this argument.
$ ros2 launch nav2_bringup navigation_launch.py use_sim_time:=True
In the 3rd terminal, start the slam_toolbox. Note: same as previously, if using Gazebo, add the argument to use the simulation time.
$ ros2 launch slam_toolbox online_async_launch.py use_sim_time:=True
Everything is launched correctly. Now, all you see is a bunch of logs in different terminals. In the 4th terminal we will start RViz, so that you can visualize what’s going on.
To make it easier, we can start with an already existing RViz configuration for Nav2. Otherwise you’d start with nothing and you’d have to configure everything by yourself.
$ ros2 run rviz2 rviz2 -d /opt/ros/humble/share/nav2_bringup/rviz/nav2_default_view.rviz
With this, you should see a window like that.
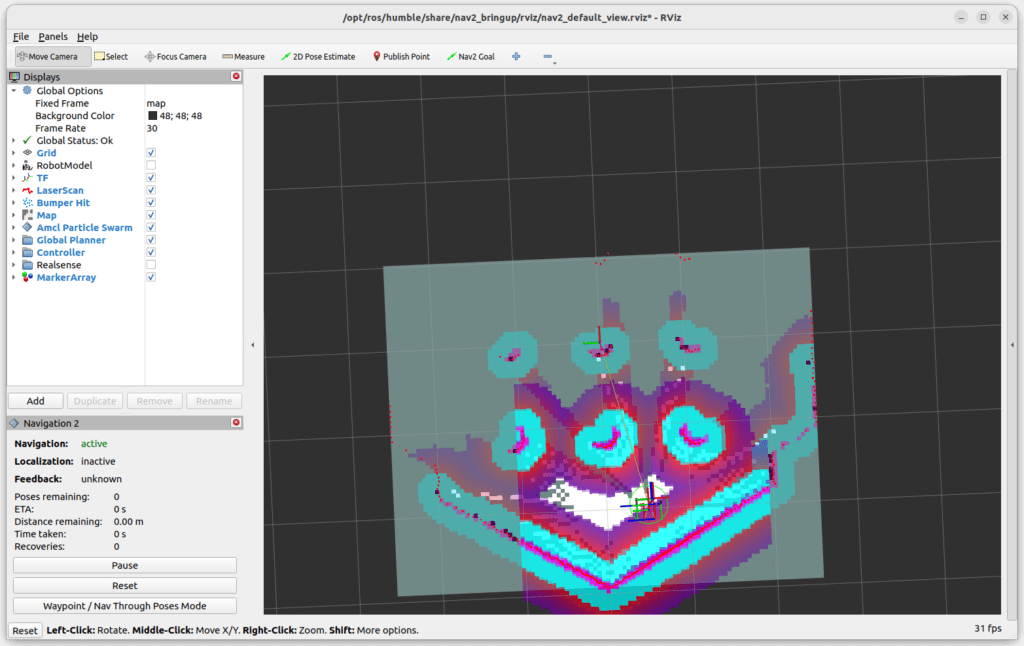
As you can see on the left menu, a lot of stuff is already configured: TF, LaserScan, AMCL, global and local planner, etc.
To get a better view for SLAM, I’ll uncheck the “Global Planner” and the “Controller” (local planner).

Generate a map with slam_toolbox
As you can see on the previous screenshot, we have 3 possible colors for any pixel in the map:
- white: free space.
- black: obstacle.
- grey: unknown.
Now all we need to do is to make the robot move in the map, so that the grey (unknown) pixels will turn white or black. When we have a result that satisfies us, we can save the map.
Make the robot move around
So, you need to start the node to move your robot, either with a keyboard, joystick, etc. This can also be a node to make the robot explore on its own. Basically, anything that will make the robot move around.
I will open another terminal (5th one). To make the Turtlebot3 move using the keyboard:
$ ros2 run turtlebot3_teleop teleop_keyboard
Now make the robot move around.
Here’s the map that I got after 20-30 seconds:
As you can see, all the free space is in white. For some of the obstacles in the middle/right, however, the shape of the circles is not complete – some black pixels are missing.
I could make the robot move everywhere to be sure all pixels are covered, but a result like this should not be a problem when using this map for Navigation. You don’t necessarily need to clear 100% of the pixels to get a good result.
Save the map
Once you get a good enough looking map, you can save it.
And before you save the map, make sure you don’t stop any of the first 4 terminals, otherwise you’d have to start everything again! (however you can stop the 5th terminal, in which you made the robot move.)
To save the map:
$ ros2 run nav2_map_server map_saver_cli -f my_map
You can provide an optional “-f” option to specify the path/name of the map. Make sure you don’t put any extension here, this will be done automatically.
When you run the command, you’ll see some logs in white and yellow.
$ ros2 run nav2_map_server map_saver_cli -f my_map
[INFO] [1683279024.448150393] [map_saver]:
    map_saver lifecycle node launched.
    Waiting on external lifecycle transitions to activate
    See https://design.ros2.org/articles/node_lifecycle.html for more information.
[INFO] [1683279024.448733586] [map_saver]: Creating
[INFO] [1683279024.449738718] [map_saver]: Configuring
[INFO] [1683279024.462418532] [map_saver]: Saving map from 'map' topic to 'my_map' file
[WARN] [1683279024.462503523] [map_saver]: Free threshold unspecified. Setting it to default value: 0.250000
[WARN] [1683279024.462927136] [map_saver]: Occupied threshold unspecified. Setting it to default value: 0.650000
[WARN] [map_io]: Image format unspecified. Setting it to: pgm
[INFO] [map_io]: Received a 112 X 103 map @ 0.05 m/pix
[INFO] [map_io]: Writing map occupancy data to my_map.pgm
[INFO] [map_io]: Writing map metadata to my_map.yaml
[INFO] [map_io]: Map saved
[INFO] [1683279024.596177677] [map_saver]: Map saved successfully
[INFO] [1683279024.602026082] [map_saver]: Destroying
If you have something that looks like that, all good! If you have some error logs in red however, I suggest you try to run the command a few more times.
Now, you should have 2 new files:
- my_map.yaml: this file contains the metadata for the map, as well as the path to the image file.
- my_map.pgm: this is the image file with white, black and grey pixels, representing the free, occupied, and unknown space.
Next steps with the generated map
Great, you have now successfully generated a map with the ROS2 slam_toolbox package. This package is usually working quite well and is quite fast to generate the map (compared to other packages such as cartographer).
The next steps for you are:
- Use the generated map with Navigation 2, to give navigation goals and make the robot move autonomously while avoiding obstacles.
- If you have a custom robot, adapt the robot for Nav2, so that you can use it with slam_toolbox.