In this tutorial you’ll see how to get started with Thonny IDE on Raspberry Pi OS.
So, you’ve installed Raspberry Pi OS on your Raspberry Pi 4 (also works for 2 & 3) to start programming with Python 3.
If you begin, you want to use tools that just work. You don’t want to waste time configuring stuff, thinking about which version you should use, or how to execute a program.
Thonny IDE is really great for that. You install Raspberry Pi OS, and then it just works. So now, let’s get a tour and see how you can best use this IDE.
Table of Contents
What is an IDE, and what are the benefits you get from Thonny IDE on Raspberry Pi OS?
IDE means Integrated Development Environment. This may not help you much, but it’s good to know.
When you program, you need to:
You are learning how to use Raspberry Pi to build your own projects?
Check out Raspberry Pi For Beginners and learn step by step.
- Write your code with a text editor.
- Have language support such as auto completion, syntax highlighting, etc.
- Compile the code – for compiled languages like C++. Python doesn’t need one since it’s an interpreted language: each instruction is executed at runtime, one by one.
- Save your programs, open them, edit them.
- Debug your programs so you can see what’s happening during the execution.
- And many more things, but we’ll stick to that for now.
An IDE will contain all those features in just one software. So you can focus on writing code, which is the most important thing you can do.
The Thonny IDE will then allow you to be more productive when you write Python programs. Also, when you begin with programming, using an IDE is great because you don’t have to think about all the configuration, you can just start and learn step by step directly by programming.
And the icing on the cake: after you install Raspberry Pi OS, there is no extra step to do. Thonny IDE is already here ready to be used.
Watch this video as an additional resource to this article:
After watching the video, subscribe to the Robotics Back-End Youtube channel so you don’t miss the next tutorials!
How to start Thonny IDE on Raspberry Pi OS
First, obviously, you need to install Raspberry Pi OS on a microSD card, for your Raspberry Pi board.
Once this is done, starting Thonny IDE is very simple.
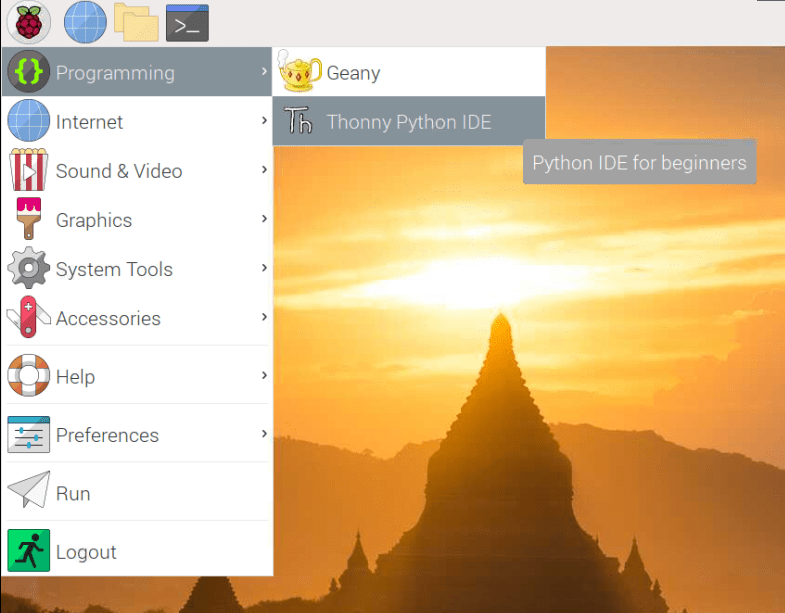
Click on the top left icon representing a raspberry > Programming > Thonny Python IDE.
You don’t need to configure anything related to Python. Just click on Thonny Python IDE and you can start programming.
By default, you might have a simplified interface. Click on “Switch to regular mode” on the upper right of the window, then restart Thonny IDE.
Run Python commands on the shell
As Python is an interpreted language, you can directly run Python commands one by one. To do that you’ll need to open a special environment (named Python shell, or Python interpreter). But in Thonny IDE, nothing to do, the shell is already here.

Just write commands on the “Shell” panel to start executing Python code.
This is very handy if you want to quickly test a 2-3 lines program, or if you want to test if a Python module is already installed on your environment. In this example, when you run the command import time, there is no error because the Python module time (which is a core module by the way), is already installed and available for you to use. If it was not, then you’d get an error.
Note: if you don’t have the “Shell” panel, or if you accidentally close it, you can reopen it by clicking on “View” > “Shell”.
And as you can see, you have syntax highlighting automatically done for you. Thonny IDE will recognize keywords (ex: import) and put a special font or color on them, so it becomes much more readable for you.
Write complete Python programs on Thonny IDE
Running Python commands directly on the shell is of course not a viable solution for the mid/long term. You want to be able to write longer programs, save them, execute them, reopen them, etc.
In this example, I’ve just run the same 2 lines I previously ran in the shell, but this time in the text editor.
This is how you’ll do:
- Write your Python program in the text editor area.
- Save the file (CTRL + S) and give it a name.
- Click on “play” button to execute the file. You will see the result in the “Shell” panel just below. If you haven’t saved the file yet, when you click on “play” you will first be asked to give a location and name for saving the program into a file.
- And then, repeat. Edit your file, execute it again, close your file, reopen it, replay it, etc.
Auto completion
Auto completion is one of the greatest feature you can get from an IDE.
When you start to write the name of a function or variable, you can press CTRL + SPACE, and Thonny IDE will give you a list of suggestions to finish what you’re currently writing. This is great, because this will save you a lot of time, and also will avoid you making mistakes.
In this example, when you start with time.ti, Thonny IDE gives you 3 possible words you can write. Then, use the arrows from your keyboard to choose what you want to write, and press either TAB or ENTER to auto complete.
Note: if there is only one possibility for auto completion, the word will automatically be written for you when you press CTRL + SPACE. If you’ve used the terminal before, the behavior is quite similar.
Debug your Python programs with the Thonny IDE debugger
Another great strength of an IDE is the integrated debugger.
So, basically, what can you do with a debugger?
A debugger will allow you to execute your program line by line, and make a pause between each command, so you can see:
- What is the order of the execution.
- What are the values stored in variables at any given time.
Your program may run without any error, but you might find that sometimes the behavior is not the one you want or expected. In this case, use the debugger. For example, maybe you’ll realize that one block of code is never executed because some variable is not correctly updated.
So, how to work with the Thonny IDE debugger on your Raspberry Pi?
First, click on “View”. If you want to be able to see what are the values inside the variables of your program, make sure to click on “Variables”.
Then, click on the icon next to the “play” button to start the execution of your program.
The IDE will wait for you to execute any line from the program. Click on the “Step over” button (second red arrow in the previous picture) to execute the next program instruction.
On the “Variables” panel you will see what are the values inside each variable existing in the program, at this specific moment and this specific line in the program. Click again on “Step over” to execute the next instruction, until the program is finished.
Getting errors in your programs
When you program you will often have errors that you have to fix – nobody is capable of writing a 100% perfect program on the first try!
If you have an error – syntax error, exception, etc. – in your program, then you’ll see this error in the “Shell” panel.
Sometimes the error will be very explicit, sometimes not and you’ll have to dig a little bit more, maybe by using the debugger functionality.
In the example on the picture, it’s quite clear that we forgot to end the string with a quote. You also have a nice explanation on the “Assistant” panel on the right, and some suggestions on what you can do.
Conclusion – Thonny IDE on Raspberry Pi OS
Thonny IDE is a great software to use when you write Python programs on Raspberry Pi OS.
As a beginner, this will help you focus on the most important thing: writing code.
Once you’ve made progress, this can make you more productive. Note however that at some point it will be good for you to understand each step of the process, and to be able to do them by yourself: how to handle files and execute scripts in the terminal, how to use different text editors (ex: How to use Vim on your Raspberry Pi), how to use the pip command to manage Python modules, etc.
And then, in the end it’s just a matter of preferences. Some people prefer using an IDE, some people don’t. There is no right and wrong solution. The best thing you can do is try a little bit of everything and see what really suits you and makes you the most productive.