So, you’re using the digitalWrite() function in most of your Arduino projects. But you may come to a point when this function is too slow, because you have to use it a lot, and with a high frequency. In this tutorial I’ll show you how to make a fast digitalWrite(), so you can speed up your programs.
First you’ll see how long a digitalWrite() operation takes, and then you’ll see how you can improve it.
Table of Contents
When you should optimize (and when you shouldn’t)
Before going any further, I want to emphasize this: don’t try to optimize a code too soon, especially if there’s nothing wrong with it.
If your application consists of switching a digital pin every 100 ms, and if you don’t have any real time constraints, then don’t bother optimizing, you’ll just waste your time.
As Donald Knuth said: “Premature optimization is the root of all evil.”
So, be sure you actually need to optimize before you do.
You are learning how to use Arduino to build your own projects?
Check out Arduino For Beginners and learn step by step.
Note that even if you don’t need to optimize your code, reading this tutorial can still be useful to understand a few things about Arduino. Applying the tips on all your Arduino projects though is not something I would recommend. Just use the tips when you really need them.
Why Arduino digitalWrite() is not fast
Measuring digitalWrite() speed
Optimizing stuff is cool, but if you don’t know what you’re optimizing, and by how much, then there’s no point.
So, let’s see how much time the digitalWrite() takes. Then we’ll be able to improve it, and measure it again to see how much time we save.
In order to get an accurate measurement, we’ll execute digitalWrite() 1000 times and then divide the result by 1000. It’s often better to take a large sample instead of just measuring only one action.
Here’s the test code.
#define TEST_PIN 8

void setup()
{
  Serial.begin(9600);
  pinMode(TEST_PIN, OUTPUT);

  unsigned long timeBegin = micros();

  for (int i = 0; i < 500; ++i)
  {
    digitalWrite(TEST_PIN, HIGH);
    digitalWrite(TEST_PIN, LOW);
  }

  unsigned long timeEnd = micros();
  unsigned long totalDuration = timeEnd - timeBegin;
  double duration = (double)totalDuration / 1000.0;

  Serial.print("Total duration: ");
  Serial.print(totalDuration);
  Serial.println(" µs");
  Serial.print("Duration for one digitalWrite(): ");
  Serial.print(duration);
  Serial.println(" µs");
}

void loop() {}
This code will print the total duration required to execute 1000 digitalWrite(), and then print the average duration for only one digitalWrite(). To get more details and explanations about this code, check out How to compute a duration with Arduino.
So, if you run this code, and open the Serial Monitor, you’ll get something like this (on Arduino Uno):
Total duration: 3396 µs
Duration for one digitalWrite(): 3.40 µs
We have the answer: a digitalWrite() will take 3.40 microseconds to execute on an Arduino Uno board.
Note: here we used micros() to get the time. micros() can only be precise up to 4 microseconds, so that’s another good reason to compute an average, so we can have a much better precision.
3.40 microseconds can be quite a long time to just change one pin’s state.
digitalWrite() behind the hood
The digitalWrite() function does a lot of things. If you want to check the full code, it’s available on Github.
Really quickly, the digitalWrite() will (not necessarily in the code’s order):
- Check if the pin exist, and if not, return.
- Check if there is a PWM running for this pin. If yes, it will stop the PWM.
- Find the bit mask for the pin.
- Find the port associated to the pin number.
- Check the current pin’s state, and change the state accordingly.
That’s a lot of steps for just changing the pin’s state. In the following we’ll basically skip all those steps and directly change the corresponding port to the state we want.
As long as you don’t use PWM on digital pins, using digitalWrite() is kind of overkill. You can skip all the steps without any problem.
Arduino Fast digitalWrite()
Let’s now try to optimize this function so it takes much less time.
Direct port manipulation
Instead of using the digitalWrite() function, we’ll directly manipulate the port to change a pin’s state.
Here is the pin mapping for Atmega168 and Atmega328 Arduino boards. Depending on your Arduino board, you might have to search on Google for “Arduino X pin mapping”. The pin mapping above works on boards such as Arduino Uno or Nano (if needed: more info on Arduino Uno pins).
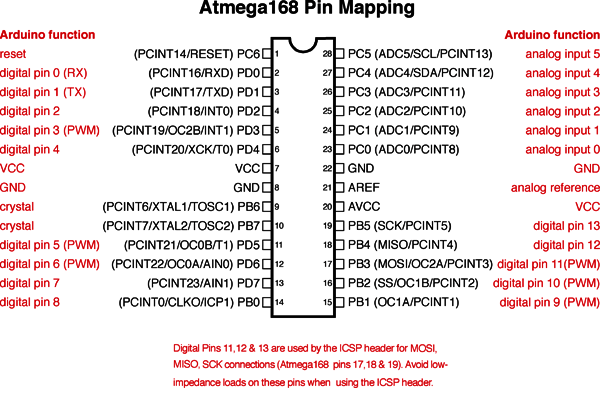
This schematics might look over complicated, but be reassured, it’s not!
For example, if you want to get access to the digital pin 8, then you’ll use port B0.
Basically you have 3 ports:
- B: for digital pins 8-13.
- C: for analog input pins 0-5.
- D: for digital pins 0-7.
So, all you need to do for a given digital pin, is to find which port (B, C, D) and which number is associated to that pin. Then, knowing that information, there’s a way to directly change the pin’s state in your Arduino code.
Let’s see how to do that.
Using direct port manipulation instead of digitalWrite()
We’ll keep the same code as before (using digital pin 8). The only thing we’ll change is the for loop.
  for (int i = 0; i < 500; ++i)
  {
    PORTB = B00000001;
    PORTB = B00000000;
  }
How to actually write this code?
First, to change a pin’s state, you have to use “PORT”. You then add the letter corresponding to the port. In this case the port associated to digital pin 8 is B0 so we use B, so it becomes PORTB. For any pin on port C you’ll use PORTC, and for port D you’ll use PORTD.
Then, we assign a byte to this port. For that we use the binary notation, starting with B and followed by 8 numbers (0 or 1). Each bit corresponds to a different pin’s state. So, to change PB0 state, we simply modify the first bit from the right. Using 1 means that the pin will be HIGH, and 0 means that the pin will be LOW.
I’ll give some more explanations a little bit later, for now, let’s see if this makes the digitalWrite functionality faster or not. Here’s the result from the Serial Monitor.
Total duration: 192 µs
Duration for one digitalWrite(): 0.19 µs
That’s way much faster! From 3.4 µs to 0.19µs. The execution duration has been divided by almost 18.
Now if you want to modify another pin’s state you simply have to repeat the same process. For example, to modify digital pin 11 (port B3) you’ll have to modify the 4th bit from the right: PORTB = B00001000; for HIGH, and PORTB = B00000000; for LOW.
Direct port manipulation changes all the pin’s states
When you use direct port manipulation to set a pin’s state, in fact, you’re setting all states for the port. When using PORTB, you’re setting all states for pins 8-13.
If you write PORTB = B00100000;, you’re not just telling “Set digital pin 13 to HIGH”, you’re also telling “Set digital pins 8, 9, 10, 11, 12, to LOW”.
This can be very convenient to save even more execution time and set multiple pin’s states at the same time. For example, with PORTB = B00100111; you’re setting digital pins 8, 9, 10, and 13 to HIGH, and you’re setting pin 11 and 12 to LOW.
But maybe you don’t want to set all pins at the same time. Maybe you only want to set one pin’s state. And also, you may not know in which state all the pins from the port are at the present moment.
So, how to deal with that?
You can use the operator AND or the operator OR. Let’s see with an example.
Modifying only one pin’s state
If you write PORTB = PORTB | B00100000;, then you’ll only set the pin 13 to HIGH. All other pins will keep the same state.
Simply because:
- 1 OR 0 = 1
- 0 OR 0 = 0
So, making an OR with 0 does not modify the value. Making an OR with 1 will make the result 1 every time, so that’s perfect to set one pin’s state to HIGH.
And now, to set the pin 13 to LOW (and only this one), you can write PORTB = PORTB & B11011111;. All other pins will keep the same state.
Because:
- 1 AND 1 = 1
- 0 AND 1 = 0
So, making an AND with 1 does not modify the value. Making an AND with 0 will make the result 0 every time, so it’s the correct thing to do to set one pin’s state to LOW.
You can use this technique to also set multiple pin’s states, while keeping all the other ones to their previous state.
Now, if we apply that to our previous code example with the for loop (digital pin 8):
  for (int i = 0; i < 500; ++i)
  {
    PORTB = PORTB | B00000001;
    PORTB = PORTB & B11111110;
  }
Here’s the result from the Serial Monitor:
Total duration: 256 µs
Duration for one digitalWrite(): 0.26 µs
As you can see, it’s a little bit slower when using the OR and AND operators. However, that’s still 13 times faster than the digitalWrite() function.
You should try to use this way to handle direct port manipulation as often as possible. Unless you really know what you’re doing.
Make sure you know what you’re doing
A few words of caution:
- When manipulating ports directly, you have more chances to break things. The digitalWrite() function is quite safe, with a lot of verification that makes it hard to mess up. When you bypass this function, you take your own responsibility with that you do with the pins. So, before you execute a code where you’re manipulating ports directly, make sure to double check and be sure about what you’re doing.
- Some bits should not be modified like that. Only modify the bits that you’re sure about. For example, PB6 and PB7 are used for crystal. So, try not to touch those. Use OR and AND operators.
- Serial on Arduino uses digital pins 0 and 1, which correspond to port D0 and D1. When modifying a pin from port D, make sure to use
PORTD = PORTD | Bxxxxxx00;orPORTD = PORTD & Bxxxxxx11;so you don’t mess up with the serial communication.
Now, don’t be afraid with those words of cautions. Using the fast digitalWrite() with direct port manipulation is a really useful improvement when you need it. Just make sure you know what you’re doing – and if not, get educated about that – and everything will be fine!
Arduino Blink LED example using fast digitalWrite()
Let’s re-write the classic Blink LED example, using the built-in LED on pin 13.
void setup()
{
  pinMode(13, OUTPUT);
}

void loop()
{
  PORTB = PORTB | B00100000;
  delay(500);
  PORTB = PORTB & B11011111;
  delay(500);
}
To power on the LED, we set pin 13 to HIGH with PORTB = PORTB | B00100000;. This will only set pin 13’s state and leave the other ones to their current state.
To power off the LED, we set pin 13 to LOW with PORTB = PORTB & B11011111;. Again, all other pins will keep their state.
Note: using direct port manipulation here is maybe not a great idea, since the application doesn’t require high performances. Using digitalWrite() for such a simple application would be more appropriate. The only reasons why I did this is to show you an example. Now, if you need to increase the frequency, or do many other things at the same time (multitasking), then you might need to optimize your code at some point, and this could come in quite handy.
Going further with Arduino fast digitalWrite()
You can now write a fast digitalWrite() on your Arduino programs. This tutorial also gave you an introduction on manipulating ports directly. As you progress with Arduino, it’s a good practice to try to find what’s behind the hood of the standard Arduino functions. This will give you a better understanding and help you progress faster, especially if you plan on writing code for other micro-controllers in the future.
To go even further with this tutorial you could also optimize the pinMode() function with direct port manipulation, but usually a pin’s mode will stay the same for a long time. So, the trade-off between “having chances to break things” and “getting more speed” is not really good here. Keep using pinMode() in the setup() function, and optimize digitalWrite() if needed.
