Let’s say you have an Arduino project where you want to execute several actions at the same time: read data from a user input, blink some LEDs, monitor a potentiometer, etc. So, basically you want to do some multitasking with Arduino.
And that’s where things get a little bit complicated, especially if you’re already used to spawn new threads whenever you need to start a new parallel program.
True multithreading on Arduino is not possible.
But, I have some good news for you: you can still multitask with Arduino. All you need is a little bit of understanding to make things work smoothly!
Before I explain you how to do multitasking with Arduino, let’s see why you can’t do “standard” parallel programming in the first place.
Table of Contents
Why multithreading is not possible on Arduino
You have to understand the difference between a computer such as a laptop or web server, and an electronic board with a microcontroller (Arduino).
You are learning how to use Arduino to build your own projects?
Check out Arduino For Beginners and learn step by step.
A classic computer has multi cores and tons of RAM. You can install an operating system (such as Windows, Ubuntu, Debian, etc), and spawn hundreds of threads. For example when you start Firefox or Chrome, new threads will be created, so you can still execute all your programs while launching new ones.
With Arduino, things are completely different.
The “brain” of an Arduino board is a microcontroller (ATmega328 for Arduino Uno). A microcontroller has only one core, and is only capable of executing one instruction at a time.
So, if you decide to make a pause inside a function, then all your program is stuck waiting. Every time you write something, you have to think about its impact on the whole code.
How to multitask with Arduino
If you take small actions and do them very fast, one after the other, you’ll get a feeling of multitasking. That’s the principle behind multitasking with Arduino.
Let’s illustrate this with an optical illusion. If you take one blue paper and one red paper, and alternate them very quickly in front of your eyes (at least 10 times a seconds), you’ll see the color purple.
Because the change between colors happens so fast, you’ll get the illusion that all colors are mixed into another color. That’s roughly what is multitasking with Arduino, but at a much higher frequency.
Here is a video you can use as an additional resource to this tutorial (just using 2 LEDs).
After watching the video, subscribe to the Robotics Back-End Youtube channel so you don’t miss the next tutorials!
Let’s start multitasking
You may have heard that Arduino is not really powerful. Well, this is related to the global computation power. In fact, the execution speed is still rather high for handling hardware.
For example, the ATmega328 microcontroller in Arduino Uno has a 16MHz frequency.
In order to multitask with Arduino, follow those tips:
- Keep the execution time of all your functions very short. I’m not saying that your functions should have x lines of code maximum. What I’m saying is that you should monitor the execution time and make sure it is quite low.
- Don’t use delay(). This function will completely block your program. As we’ll see just below with a code example, there are other ways to get the same behavior as with the delay() function. Well, this one is worth repeating: don’t use delay().
- Never hang to wait for something. If your program is listening to a user input, for example a text message over serial communication, then it means that you don’t control when this event will happen, because it’s from an external source. The easiest way to get the user input is to wait for it, and then continue the execution of the program when you get the data. Well, don’t do that. As we’ll see later there are other ways to keep external communication non-blocking for the rest of the program.
- Use something like a state machine for longer processes. Let’s say you have a process that really requires a lot of different actions, and a certain amount of time to wait between 2 actions. In this case, you’d better separate this process into several small functions (see first point above), and create a state machine in your main program to call them one by one, when needed. This will allow you to also compute any other part of the program between 2 steps of the process.
A code example
Schematics
Here I’ll show you a real example using an Arduino Uno board.
Here’s the schematics:
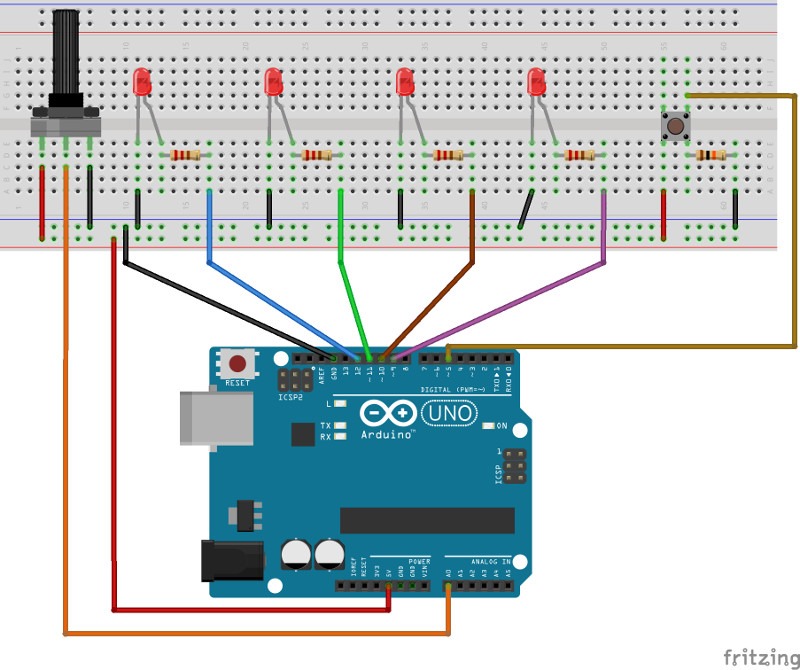
On this circuit we have:
- 4 LEDs connected to 4 digital pins (as output). Resistors are 220 Ohm.
- 1 push button connected to 1 digital pin (as input). Resistor is 10k Ohm.
- 1 potentiometer connected to 1 analog pin (as input).
- And (not displayed) one serial communication through a USB cable with a computer.
What we want to do:
- Blink LED 1 every second.
- Read user input from Serial (number between 0 and 255) and write the data to LED 2.
- Power on LED 3 if the push button is pressed.
- Power on LED 4 if the potentiometer value is greater than 512.
- Print the potentiometer value via Serial every 2 seconds.
Oh, and as you’ve guessed, we’ll do everything at the same time. That’s what I call a great multitasking program!
On the program we have 5 tasks to do. We’ll simply separate the code into small chunks of code, which are very fast to execute. One small chunk of code for one task.
For more info on each component, check out those tutorials:
The code
#define LED_1_PIN 9
#define LED_2_PIN 10
#define LED_3_PIN 11
#define LED_4_PIN 12

#define POTENTIOMETER_PIN A0

#define BUTTON_PIN 5

unsigned long previousTimeLed1 = millis();
long timeIntervalLed1 = 1000;
int ledState1 = LOW;

unsigned long previousTimeSerialPrintPotentiometer = millis();
long timeIntervalSerialPrint = 2000;

void setup() {
  // put your setup code here, to run once:
  Serial.begin(9600);

  pinMode(LED_1_PIN, OUTPUT);
  pinMode(LED_2_PIN, OUTPUT);
  pinMode(LED_3_PIN, OUTPUT);
  pinMode(LED_4_PIN, OUTPUT);
  pinMode(BUTTON_PIN, INPUT);
}

void loop() {
  // put your main code here, to run repeatedly:
  unsigned long currentTime = millis();

  // task 1
  if(currentTime - previousTimeLed1 > timeIntervalLed1) {
    previousTimeLed1 = currentTime;

    if (ledState1 == HIGH) {
      ledState1 = LOW;
    }
    else {
      ledState1 = HIGH;
    }

    digitalWrite(LED_1_PIN, ledState1);
  }

  // task 2
  if (Serial.available()) {
    int userInput = Serial.parseInt();
    if (userInput >= 0 && userInput < 256) {
      analogWrite(LED_2_PIN, userInput);
    }
  }

  // task 3
  if (digitalRead(BUTTON_PIN) == HIGH) {
     digitalWrite(LED_3_PIN, HIGH);
  }
  else {
    digitalWrite(LED_3_PIN, LOW);
  }

  // task 4
  int potentiometerValue = analogRead(POTENTIOMETER_PIN);
  if (potentiometerValue > 512) {
    digitalWrite(LED_4_PIN, HIGH);
  }
  else {
    digitalWrite(LED_4_PIN, LOW);
  }

  // task 5
  if (currentTime - previousTimeSerialPrintPotentiometer > timeIntervalSerialPrint) {
    previousTimeSerialPrintPotentiometer = currentTime;
    Serial.print("Value : ");
    Serial.println(potentiometerValue);
  }
}
Let’s break down the code step by step so you can understand what I’m talking about.
Setup code
#define LED_1_PIN 9
#define LED_2_PIN 10
#define LED_3_PIN 11
#define LED_4_PIN 12

#define POTENTIOMETER_PIN A0

#define BUTTON_PIN 5

unsigned long previousTimeLed1 = millis();
long timeIntervalLed1 = 1000;
int ledState1 = LOW;

unsigned long previousTimeSerialPrintPotentiometer = millis();
long timeIntervalSerialPrint = 2000;
Just for clarity, I’ve used some #define to use names instead of numbers for all hardware pins. Also I’ve declared some variables to keep track of the time.
void setup() {
  // put your setup code here, to run once:
  Serial.begin(9600);

  pinMode(LED_1_PIN, OUTPUT);
  pinMode(LED_2_PIN, OUTPUT);
  pinMode(LED_3_PIN, OUTPUT);
  pinMode(LED_4_PIN, OUTPUT);
  pinMode(BUTTON_PIN, INPUT);
}
As you know, the setup() function is called first on Arduino. Here we just initialize the Serial communication and set the correct mode for digital pins (analog pins don’t require a setup, as they are automatically set as input pins).
void loop() {
  // put your main code here, to run repeatedly:
  unsigned long currentTime = millis();
And… we jump right in the loop() function! This function will be called again and again, for as long as your program lasts.
The first thing we do here is to get the current time with millis(). This is very important. For most of the program sub-tasks, we’ll use some time tracking techniques to trigger an action, and thus avoiding to use the delay() function.
Task 1: Blink LED 1 every second
// task 1
if(currentTime - previousTimeLed1 > timeIntervalLed1) {
  previousTimeLed1 = currentTime;

  if (ledState1 == HIGH) {
    ledState1 = LOW;
  }
  else {
    ledState1 = HIGH;
  }

  digitalWrite(LED_1_PIN, ledState1);
}
Here we compute the duration between the current time and the last time we triggered the LED 1. If the duration is greater than the interval we have previously set (1 second here), we can actually do the action!
Note that when we enter the if block, we set the previous time as current time. This way, we say to the program : “don’t come back here before the next time interval has passed”.
Using this code structure is pretty common in Arduino. If you’re not familiar with that, take the time to write the code and try a few examples by yourself. Once you understand how it works, you’ll use it everywhere in your Arduino programs!
Task 2: Read user input from Serial (number between 0 and 255) and write the data to LED 2
// task 2
if (Serial.available()) {
  int userInput = Serial.parseInt();
  if (userInput >= 0 && userInput < 256) {
    analogWrite(LED_2_PIN, userInput);
  }
}
We need to listen to the Serial so we can get the user input. Instead of blocking, well, we just call the Serial.available() method each time we are in the main loop() function.
As all other blocks of code are pretty small and fast, we can expect the Serial to be monitored quite frequently. This way, we are sure that we don’t miss any data, while doing any other action on the side.
Task 3: Power on LED 3 if the push button is pressed
// task 3
if (digitalRead(BUTTON_PIN) == HIGH) {
   digitalWrite(LED_3_PIN, HIGH);
}
else {
  digitalWrite(LED_3_PIN, LOW);
}
This one is pretty straightforward. We just monitor the push button every time we run the loop() function (Note that this code could be improved with a debounce functionality).
Task 4: Power on LED 4 if the potentiometer value is greater than 512
// task 4
int potentiometerValue = analogRead(POTENTIOMETER_PIN);
if (potentiometerValue > 512) {
  digitalWrite(LED_4_PIN, HIGH);
}
else {
  digitalWrite(LED_4_PIN, LOW);
}
Same as for the button, we just read the value and update a LED depending on that value. Note that we use analogRead() for the potentiometer, and the value we get is between 0 and 1023 (the Arduino analog converter has a 10 bits resolution, and 2^10 = 1024).
Task 5: Print the potentiometer value via Serial every 2 seconds
// task 5
if (currentTime - previousTimeSerialPrintPotentiometer > timeIntervalSerialPrint) {
  previousTimeSerialPrintPotentiometer = currentTime;
  Serial.print("Value : ");
  Serial.println(potentiometerValue);
}
Same as for task 1, we compute the time difference (duration) to check if we can execute the action or not. This is a nice alternative to the delay() function.
And here, instead of triggering a LED, we just send a value with Serial communication.
Well, it seems that all the code is running very fast, and if you actually build this circuit and run this program, you’ll have a real feeling of multithreading.
Multitasking is finally not that hard
It starts to become easier, isn’t it?
Every time it’s the same thing.
Once you know how to create one small block of code to run very fast (you can also put this code into a function), all you need to do is repeat this structure for each step of the complex process you want to do. It doesn’t need to be complicated.
Some other ways to multitask
The method I showed you is very efficient and I personally use it on my Arduino projects.
There are also some other ways to “fake” multithreading. Among them:
Interrupt functions
Some Arduino pins (not all, pay attention to that) support hardware interrupt. Basically, you create a function which is triggered by a push button or other actuator on a hardware pin.
When the interrupt is triggered, the program will be interrupted, and your function will be executed. Once the function has finished, the program continues where it was. Of course, your function should be very fast, so it doesn’t stop the main execution “thread” for too long.
This can be great to execute some code depending on some external inputs, and make sure that you don’t miss any input if the frequency of the incoming signal is very high.
As an example, check out the task 3 of the example code above. We monitor the push button by pulling its state very fast. Here we could also use interrupts to trigger the LED whenever the button is pressed.
Although be careful with that because there is one major drawback: you can’t predict when the function will be triggered.
It’s like the difference between a push and a pull notification on your phone. You don’t know when you’ll receive push notifications, but you can choose to manually check for pull notifications.
Arduino interrupts are like push notifications. It can happen anytime.
If you choose not to use interrupts, then you’ll have to manually check (pull) for the input to see if you can trigger the action. Only the difference is that with Arduino, if you make a “pull” for a notification, and the notification is gone, you won’t see it. But this is not necessarily a bad thing: if you don’t need to be extra-precise on when a pin has been triggered, you can just pull the state whenever you want. In this case you have total control over when you check the input.
Check out this tutorial to learn how to use Arduino Interrupts.
Protothreads
Protothreads is a pure C library. It requires more knowledge and is more complex to handle for beginners and mid-level programmers.
With Protothreads you can also “fake” multithreading for event-driven systems, so it’s quite useful for more complex Arduino programs.
Although, note that using Protothreads is absolutely not mandatory. You can totally write a complete multitask program with the basic tips I gave you earlier in this post.
Check out this tutorial to learn how to use Protothreads with Arduino.
Don’t forget to keep things simple
Multitasking with Arduino can become pretty simple.
You may feel overwhelmed by all the things you read about multithreading, and how it should be a “complex thing to handle”.
While in fact, by following some pretty simple rules, you can go quite far with Arduino.
And when you’re programming, always remember: simple is better. You don’t want to write complicated things.
