Arduino protothreads, when to use them, how to use them, and why?
In this tutorial I’ll show you, step by step, how to use protothreads in your Arduino programs.
First I’ll give you a template that you can use for any protothread you create. Then you’ll see more complex examples and how to use multiple protothreads at the same time.
Table of Contents
What are protothreads?
Explaining what are protothreads is quite hard without an example. If you don’t grasp the idea behind protothreads right now, don’t worry. Continue reading and get through the code examples, this will help you make more sense of it.
Protothreads allow you to create multiple “threads”. Basically this is a C library, which has also been packaged as a library for Arduino. The main goal of the library is to provide a simpler way to write programs for event-driven systems in memory constrained environments (like micro-controllers).
Note that you can’t achieve true multi-threading with Arduino, all the code is executed in one thread, line by line. With protothreads you’ll just have the “feeling” of multi-threading.
You are learning how to use Arduino to build your own projects?
Check out Arduino For Beginners and learn step by step.
Why to use Arduino protothreads? Well, if you happen to have a giant state machine in your code, where you also want to execute multiple tasks at the same time, protothreads might be a nice alternative for you.
Install the Protothreads library for Arduino
Protothreads is a C library. If you download it from the main protothreads website (written by Adam Dunkels), it won’t work directly because it’s not packaged as an Arduino library.
Do the following steps to install the library:
- Open the Library Manager tab, or just click on Tools > Manage Libraries.
- On the search bar, type “protothreads”.
- There you should find the Protothreads library (packaged by Ben Artin), click on “Install”.
- That should be it! You might need to restart the Arduino IDE.
The Arduino Protothreads library is now installed. To test that, simply create a new program and include this line:
#include <pt.h>

void setup() {}

void loop() {}
Compile using Arduino Uno or Mega as the chosen board. If you get no error, the library is successfully installed! If, however, you have some errors at this point, go back to the installation bullet points and make sure you do each one correctly, and in the right order.
Create your first Arduino Protothread
A simple example
Let’s start by writing a simple protothread. For this example we’ll just redo the blink LED example, so it will be easy for you to understand.
Here’s the code with protothreads:
#include <pt.h>
#define LED_1_PIN 9

static struct pt pt1;

static int protothreadBlinkLED1(struct pt *pt)
{
  static unsigned long lastTimeBlink = 0;
  PT_BEGIN(pt);
  while(1) {
    lastTimeBlink = millis();
    PT_WAIT_UNTIL(pt, millis() - lastTimeBlink > 1000);
    digitalWrite(LED_1_PIN, HIGH);
    lastTimeBlink = millis();
    PT_WAIT_UNTIL(pt, millis() - lastTimeBlink > 1000);
    digitalWrite(LED_1_PIN, LOW);
  }
  PT_END(pt);
}

void setup() {
  pinMode(LED_1_PIN, OUTPUT);
  PT_INIT(&pt1);
}

void loop() {
  protothreadBlinkLED1(&pt1);
}
Breaking down the code
#include <pt.h>
#define LED_1_PIN 9
You need to include <pt.h> to use the protothread library. Also we define the LED to be on the digital pin number 9.
static struct pt pt1;
Here we declare a protothread using the struct “pt”.
static int protothreadBlinkLED1(struct pt *pt)
{
  ...
}
This is the function related to the blink LED functionality. When creating a function which uses a protothread, you need to give a pointer to a protothread as a parameter. You can also give more parameters to the function, you’re not limited to one.
static unsigned long lastTimeBlink = 0;
We need to save the last time the LED blinked. But with protothreads, you can’t use local variables. Those will not be preserved when the protothread blocks. So what we do here is using the “static” keyword, to tell the program to only create the variable once, and reuse it later. Note that with “static”, the scope of the variable is not global though, it’s restricted to the protothreadBlinkLED1() function.
  PT_BEGIN(pt);
  while(1) {
    ...
  }
  PT_END(pt);
We then have PT_BEGIN() to start the “thread”, and PT_END() to finish it. You need to use those 2 lines every time you create a new “thread” with protothreads. As you notice here, there is an infinite loop in the function. It means we want this “thread” to always run. This while(1) is not mandatory, you could create a protothread that does one action and then exits immediately.
But if the thread always runs, then will it take all the resources of the Arduino micro-controller? Well, that’s why there is PT_WAIT_UNTIL().
    lastTimeBlink = millis();
    PT_WAIT_UNTIL(pt, millis() - lastTimeBlink > 1000);
    digitalWrite(LED_1_PIN, HIGH);
    lastTimeBlink = millis();
    PT_WAIT_UNTIL(pt, millis() - lastTimeBlink > 1000);
    digitalWrite(LED_1_PIN, LOW);
PT_WAIT_UNTIL() takes 2 arguments: the protothread you’re using, and a condition. The program will pause the execution of this thread until the condition is true. And that’s where the magic of protothreads is: your global program won’t be stopped here, only this thread will block.
Arduino Protothread template
Here’s a template you can use to create your protothreads with Arduino.
#include <pt.h>

// Create your protothread(s)
static struct pt pt1;

// A protothread function
static int protothreadFunction(struct pt *pt)
{
  // Start a protothread
  PT_BEGIN(pt);

  /* Your code inside this thread */

  // Stop a protothread
  PT_END(pt);
}

void setup() {
  // Init your protothread(s)
  PT_INIT(&pt1);
}

void loop() {
  // Execute your protothread(s)
  protothreadFunction(&pt1);
}
For each new protothread – we’ll see later in this tutorial how to do that, you just need to duplicate the code you wrote for your first protothread.
Important things to know about Protothreads
Protothreads are great, and with Arduino they bring a new set of nice features to achieve something close from multi-threading, with a very low overhead.
However, you have to be aware of some important information and limitations:
- Basically a protothread overhead is only 2 bytes, so you don’t need to worry about hidden memory costs during the program execution.
- You can’t use local variables inside protothreads. Those are not preserved when the program blocks. Use global variables or “static” keyword instead.
- The execution of your code inside a protothread must be fast (between two PT_WAIT_UNTIL), or else you will block the rest of the program. Remember: true multi-threading doesn’t exist on Arduino, only one line of code is executed at a time. So, don’t use delay() or any other blocking function, ever.
- Call all your protothreads in your loop() function, as fast as possible (see point above).
- Under the hood, protothreads are just C macros. When you write a protothread the code will be transformed into a switch statement, nothing more. Protothreads are just here to make your programming life simpler, but it won’t do everything for you.
- To get more advanced knowledge about protothreads, read the notes from Adam Dunkels, the library author.
Multiple Protothreads in the same Arduino Program
If you chose to start using Arduino protothreads, it’s certainly not to execute only one action. You want to achieve something close from multi-threading, with different actions happening at the same time.
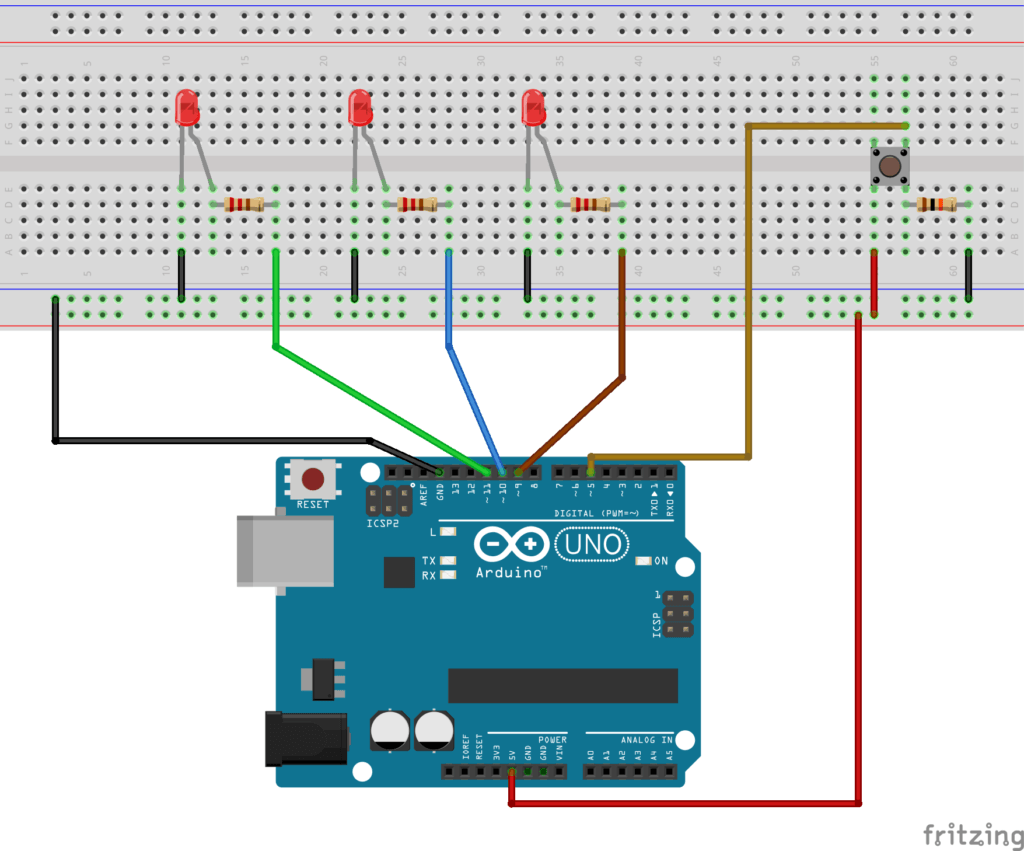
Let’s add 2 more protothreads to the previous example. For that we’ll add some hardware components:
- LED 1 will blink every 1 second
- LED 2 will blink every 0.5 seconds
- and LED 3 will be ON when a push button is pressed
The code
#include <pt.h>
#define LED_1_PIN 9
#define LED_2_PIN 10
#define LED_3_PIN 11
#define BUTTON_PIN 5

// Declare 3 protothreads
static struct pt pt1, pt2, pt3;

// First protothread function to blink LED 1 every 1 second
static int protothreadBlinkLED1(struct pt *pt)
{
  static unsigned long lastTimeBlink = 0;
  PT_BEGIN(pt);
  while(1) {
    lastTimeBlink = millis();
    PT_WAIT_UNTIL(pt, millis() - lastTimeBlink > 1000);
    digitalWrite(LED_1_PIN, HIGH);
    lastTimeBlink = millis();
    PT_WAIT_UNTIL(pt, millis() - lastTimeBlink > 1000);
    digitalWrite(LED_1_PIN, LOW);
  }
  PT_END(pt);
}

// Second protothread function to blink LED 2 every 0.5 second
static int protothreadBlinkLED2(struct pt *pt)
{
  static unsigned long lastTimeBlink = 0;
  PT_BEGIN(pt);
  while(1) {
    lastTimeBlink = millis();
    PT_WAIT_UNTIL(pt, millis() - lastTimeBlink > 500);
    digitalWrite(LED_2_PIN, HIGH);
    lastTimeBlink = millis();
    PT_WAIT_UNTIL(pt, millis() - lastTimeBlink > 500);
    digitalWrite(LED_2_PIN, LOW);
  }
  PT_END(pt);
}

// Third protothread function to power on LED 3 if
// the push button is pressed.
static int protothreadPushButton(struct pt *pt)
{
  static unsigned long lastTimeCheck = 0;
  PT_BEGIN(pt);
  while (1) {
    lastTimeCheck = millis();
    PT_WAIT_UNTIL(pt, digitalRead(BUTTON_PIN) == HIGH);
    digitalWrite(LED_3_PIN, HIGH);
    PT_WAIT_UNTIL(pt, digitalRead(BUTTON_PIN) == LOW);
    digitalWrite(LED_3_PIN, LOW);
  }
  PT_END(pt);
}

// In setup, set all LEDs as OUTPUT, push button as INPUT, and
// init all protothreads
void setup() {
  pinMode(LED_1_PIN, OUTPUT);
  pinMode(LED_2_PIN, OUTPUT);
  pinMode(LED_3_PIN, OUTPUT);
  pinMode(BUTTON_PIN, INPUT);
  PT_INIT(&pt1);
  PT_INIT(&pt2);
  PT_INIT(&pt3);
}

// In the loop we just need to call the protothreads one by one
void loop() {
  protothreadBlinkLED1(&pt1);
  protothreadBlinkLED2(&pt2);
  protothreadPushButton(&pt3);
}
Once you know how to create and use one Arduino protothread, adding a few more won’t be complicated. As you see here, for each protothread we just add a new function, we initialize the protothread in the setup(), and we run it in the loop().
As you can see in the protothread for the push button, the condition inside the PT_WAIT_UNTIL is not about the time. Instead, we check if the button is pressed to continue the execution of the thread. This way, you get a very fast polling system for your button.
Note: as an exercise you could improve this code by using interrupts. You would need to use a special pin for interrupt (ex: 2 or 3 for Arduino Uno), and set a flag as soon as the push button triggers an interrupt. In the protothread function you can check this flag and power on the LED accordingly.
A complete application with Arduino protothreads
In a previous tutorial on Arduino multitasking I explained how to achieve something close to multi-threading, while using nothing but the basic features of the C language. Here I’ll rewrite the complete code used in this tutorial, but using protothreads.
As a reminder here’s the schematics of the circuit:

What we want to do:
- Blink LED 1 every second.
- Read user input from Serial (number between 0 and 255) and write the data to LED 2.
- Power on LED 3 if the push button is pressed.
- Power on LED 4 if the potentiometer value is greater than 512.
- Print the potentiometer value via Serial every 2 seconds.
The Arduino code
Click here to see the complete code without protothreads. And now, here’s the code using Arduino protothreads.
#include <pt.h>
#define LED_1_PIN 9
#define LED_2_PIN 10
#define LED_3_PIN 11
#define LED_4_PIN 12
#define POTENTIOMETER_PIN A0
#define BUTTON_PIN 5

// Declare 5 protothreads
static struct pt pt1, pt2, pt3, pt4, pt5;

// 1st protothread function to blink LED 1 every second
static int protothreadTask1(struct pt *pt)
{
  static unsigned long lastTimeBlink = 0;
  PT_BEGIN(pt);
  while(1) {
    lastTimeBlink = millis();
    PT_WAIT_UNTIL(pt, millis() - lastTimeBlink > 1000);
    digitalWrite(LED_1_PIN, HIGH);
    lastTimeBlink = millis();
    PT_WAIT_UNTIL(pt, millis() - lastTimeBlink > 1000);
    digitalWrite(LED_1_PIN, LOW);
  }
  PT_END(pt);
}

// 2nd protothread function to write number from
// Serial to LED 2
static int protothreadTask2(struct pt *pt)
{
  static unsigned long lastTimeCheck = 0;
  PT_BEGIN(pt);
  while(1) {
    lastTimeCheck = millis();
    PT_WAIT_UNTIL(pt, millis() - lastTimeCheck > 5);
    if (Serial.available()) {
      int userInput = Serial.parseInt();
      Serial.println(userInput);
      if (userInput >= 0 && userInput < 256) {
        analogWrite(LED_2_PIN, userInput);
      }
    }
  }
  PT_END(pt);
}

// 3rd protothread function to power on LED 3 if
// the push button is pressed.
static int protothreadTask3(struct pt *pt)
{
  static unsigned long lastTimeCheck = 0;
  PT_BEGIN(pt);
  while(1) {
    lastTimeCheck = millis();
    PT_WAIT_UNTIL(pt, digitalRead(BUTTON_PIN) == HIGH);
    digitalWrite(LED_3_PIN, HIGH);
    PT_WAIT_UNTIL(pt, digitalRead(BUTTON_PIN) == LOW);
    digitalWrite(LED_3_PIN, LOW);
  }
  PT_END(pt);
}

// 4th protothread function to power on LED 4 if
// the potentiometer value is greater than 512
static int protothreadTask4(struct pt *pt)
{
  static unsigned long lastTimeCheck = 0;
  PT_BEGIN(pt);
  while(1) {
    lastTimeCheck = millis();
    PT_WAIT_UNTIL(pt, analogRead(POTENTIOMETER_PIN) > 512);
    digitalWrite(LED_4_PIN, HIGH);
    PT_WAIT_UNTIL(pt, analogRead(POTENTIOMETER_PIN) <= 512);
    digitalWrite(LED_4_PIN, LOW);
  }
  PT_END(pt);
}

// 5th protothread function to print the potentiometer
// value to Serial every 2 seconds
static int protothreadTask5(struct pt *pt)
{
  static unsigned long lastTimePrint = 0;
  PT_BEGIN(pt);
  while(1) {
    lastTimePrint = millis();
    PT_WAIT_UNTIL(pt, millis() - lastTimePrint > 2000);
    int potentiometerValue = analogRead(POTENTIOMETER_PIN);
    Serial.print("Potentiometer value: ");
    Serial.println(potentiometerValue);
  }
  PT_END(pt);
}

// In setup, set all LEDs as OUTPUT, push button as INPUT, and
// init all protothreads
void setup() {
  Serial.begin(9600);

  pinMode(LED_1_PIN, OUTPUT);
  pinMode(LED_2_PIN, OUTPUT);
  pinMode(LED_3_PIN, OUTPUT);
  pinMode(LED_4_PIN, OUTPUT);
  pinMode(BUTTON_PIN, INPUT);
  PT_INIT(&pt1);
  PT_INIT(&pt2);
  PT_INIT(&pt3);
  PT_INIT(&pt4);
  PT_INIT(&pt5);
}

// In the loop we just need to call the protothreads one by one
void loop() {
  protothreadTask1(&pt1);
  protothreadTask2(&pt2);
  protothreadTask3(&pt3);
  protothreadTask4(&pt4);
  protothreadTask5(&pt5);
}
This code does the exact same thing as the code we wrote in the Arduino Multitasking tutorial.
Arduino protothreads or not: it’s up to you
In this tutorial you’ve seen how to create and use multiple protothreads in your Arduino program.
Protothreads do not provide you with new functionalities. Instead, they allow you to write your code in a different way, which may be optimized when you have a lot of tasks to execute, or a state machine you want to simplify.
Now, using Arduino protothreads in your programs is really up to you. You might use them everywhere, or not at all.
The most important thing here is not whether you want to use protothreads or not. The most important thing is that you are familiar with how to achieve multi-tasking with Arduino. You must first understand what is multi-threading and how to fake it with Arduino. This is the hard part. After that, using protothreads is almost just a matter of taste.