In this tutorial I will show you how to make the Arduino pulseIn() function non blocking, using interrupts. Actually what we’ll try to do is to reproduce the behavior of pulseIn() without using it.
I will not explain what is pulseIn() and how it works here, for that please check this pulseIn() tutorial first.
Table of Contents
The issue with pulseIn()
Let’s first understand why we’re even doing this, because optimizing for the sake of optimizing is not worth it.
The problem with pulseIn() is that it’s going to block your entire program for a certain amount of time. This amount of time can be different every time, and can also be quite big. To see that let’s use a basic circuit and a basic code.
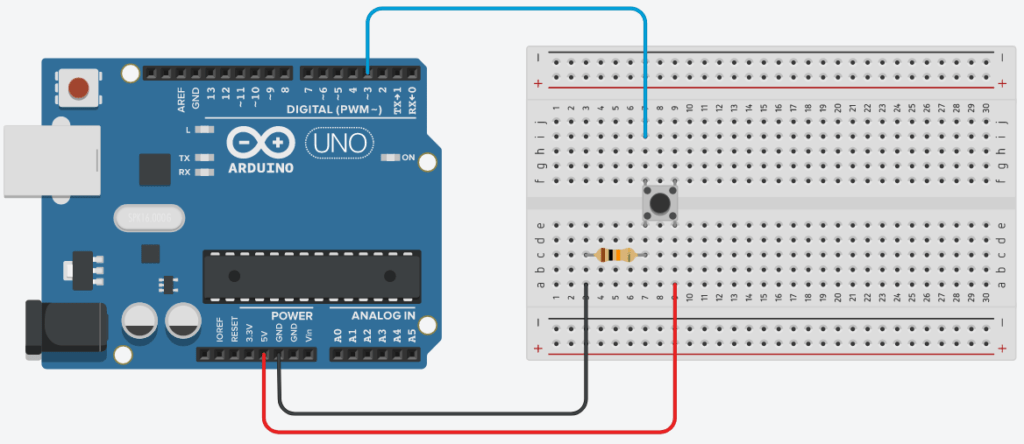
This circuit contains a push button with a 10kOhm resistor which will act as a pull down resistor. On pin 3, we will be able to read LOW when the button is not pressed, and HIGH when the button is pressed.
You are learning how to use Arduino to build your own projects?
Check out Arduino For Beginners and learn step by step.
With this code we will measure the duration of the pulseIn() function, with a 10 seconds timeout (10 millions microseconds):
#define BUTTON_PIN 3

void setup() {
  Serial.begin(9600);
  pinMode(BUTTON_PIN, INPUT);
}

void loop() {
  unsigned long timeBegin = micros();
  unsigned long pulseResult = pulseIn(BUTTON_PIN, HIGH, 10000000);
  unsigned long timeEnd = micros();
  unsigned long duration = timeEnd - timeBegin;
  Serial.println(duration);
}
When you run this code with the previous circuit, and depending on what you do, you’ll have different results:
- if you press and release on the button, you will see how long you’ve pressed on the button.
- if the pulseIn() function reaches the timeout, you will see the timeout (note: it’s possible that the pulseIn() timeout is not super accurate).
So, basically, with a 10 seconds timeout, you can expect the pulseIn() function to block from 0 to 10 seconds. And this is definitely something you want to avoid in your programs.
What we’re going to do with interrupts
There are 2 waiting times we want to get rid of: the waiting time between when we call pulseIn() and the start of the pulse, and then the duration of the pulse.

So, instead of using pulseIn(), we will attach an interrupt on pin 3, so we can now when the pulse starts and when the pulse ends.
Note: it’s very important you choose a pin compatible with interrupts! For Arduino Uno, you have digital pins 2 and 3.
And here is what’s going to happen in the code, in 3 steps:
- When the pulse starts: the interrupt will be triggered. We get and store the current time (starting time).
- When the pulse ends: the interrupt will also be triggered. We get and store the current time (ending time), and also set a flag (boolean)
- In the void loop(), all we need to do is to check for the flag. When the flag is set, we compute the difference between the starting and ending time. This gives us the duration of the pulse, without having to block the program.
The “pulseIn()” code with interrupts
#define BUTTON_PIN 3

volatile unsigned long pulseInTimeBegin = micros();
volatile unsigned long pulseInTimeEnd = micros();
volatile bool newPulseDurationAvailable = false;

void buttonPinInterrupt()
{
  if (digitalRead(BUTTON_PIN) == HIGH) {
    // start measuring
    pulseInTimeBegin = micros();
  }
  else {
    // stop measuring
    pulseInTimeEnd = micros();
    newPulseDurationAvailable = true;
  }
}

void setup() {
  Serial.begin(9600);
  pinMode(BUTTON_PIN, INPUT);

  attachInterrupt(digitalPinToInterrupt(BUTTON_PIN),
                  buttonPinInterrupt,
                  CHANGE);
}

void loop() {
  if (newPulseDurationAvailable) {
    newPulseDurationAvailable = false;
    unsigned long pulseDuration = pulseInTimeEnd - pulseInTimeBegin;
    Serial.println(pulseDuration);
  }

  // do your other stuff here
}
Code explained
A few global variables
#define BUTTON_PIN 3

volatile unsigned long pulseInTimeBegin = micros();
volatile unsigned long pulseInTimeEnd = micros();
volatile bool newPulseDurationAvailable = false;
We start by creating 3 global variables:
- pulseInTimeBegin: this will be updated with the current time when the pulse starts.
- pulseInTimeEnd: this will be updated with the current time when the pulse ends.
- newPulseDurationAvailable: a simple boolean variable (that I call a “flag” here) to know when a pulse has ended, so we can compute the duration.
One important note: as we are going to modify those variables in an interrupt function, it’s a best practice to add the “volatile” keyword in front of them.
The interrupt function – detect the pulse
void buttonPinInterrupt()
{
  if (digitalRead(BUTTON_PIN) == HIGH) {
    // start measuring
    pulseInTimeBegin = micros();
  }
  else {
    // stop measuring
    pulseInTimeEnd = micros();
    newPulseDurationAvailable = true;
  }
}
When we get into the interrupt, to know where we are, we first check if the current signal on the button’s pin in HIGH or LOW.
If it’s HIGH, we know that the pulse has just started (signal went from LOW to HIGH), and we store the current time.
If it’s LOW, we know that the pulse has just ended (signal went from HIGH to LOW). In this case, we do 2 things: we store the current time and we set the flag.
void setup() – attach the interrupt
void setup() {
  Serial.begin(9600);
  pinMode(BUTTON_PIN, INPUT);

  attachInterrupt(digitalPinToInterrupt(BUTTON_PIN),
                  buttonPinInterrupt,
                  CHANGE);
}
In the void setup() we attach the interrupt function to the button’s pin. Here we use the mode CHANGE, which is the combination of RAISING (signal going from LOW to HIGH), and FALLINg (signal going from HIGH to LOW). So, for both events the interrupt will be triggered – and we’ll need to check the state again when the interrupt function is called.
void loop() – check for the flag
void loop() {
  if (newPulseDurationAvailable) {
    newPulseDurationAvailable = false;
    unsigned long pulseDuration = pulseInTimeEnd - pulseInTimeBegin;
    Serial.println(pulseDuration);
  }

  // do your other stuff here
}
The void loop() is now super simple: you just need to check for the flag. If the flag is set, you can compute the duration with the 2 time variables you have. Also, don’t forget to unset the flag (put the boolean value to false).
After this very small (and quick) block of code, you can do any other action you want in the void loop(). Nothing is stuck anymore.
What to do to measure pulse in LOW mode
Everything we’ve done in this tutorial is for when the signal is LOW by default, and the pulse is happening when the signal is HIGH. If, however, you have a pull up resistor for your button, the pulse will be reversed: signal HIGH by default, and LOW during the pulse.
And the good news here is that the code will be almost exactly the same, all you have to do is to change one line.
if (digitalRead(BUTTON_PIN) == HIGH) {
becomes
if (digitalRead(BUTTON_PIN) == LOW) {
And that’s it! You just measure the start of the pulse when the signal goes from HIGH to LOW, and you measure the end of the pulse when the signal goes from LOW to HIGH.
Conclusion – pulseIn() with interrupts
In this tutorial you’ve seen how to reproduce the behavior of the Arduino pulseIn() function, using interrupts. This method might seem a bit more complicated but once you’ve understood it, you can replicate it very quickly.
On top of the main advantage of not blocking your code, it’s also a more robust way to measure a pulse. Whatever is the pulse duration (very short or very long), you will be able to measure it. Also, the pulseIn() function may not be super accurate with the timeout and longer pulses. No problems when you use interrupts.
The only limitation here is that you have to use interrupt pins on your circuit. On Arduino Uno you only have 2 of those pins, so if you already depend on interrupts for other functionalities of your circuit, you might be short of pins and need to use a board with more interrupts (for example Arduino Mega).