The Arduino pulseIn() function may be quite hard to grasp at first. However, this function can be very useful to be able to read data from certain sensors.
In this tutorial I will explain what is a pulse, how the pulseIn() function works, and how to use it in your own programs.
>> Watch this video as an additional resource to this article:
After watching the video, subscribe to the Robotics Back-End Youtube channel so you don’t miss the next tutorials!
Table of Contents
What is a pulse?
First, a pulse will be measured for a digital signal. A digital signal can have just 2 states: HIGH or LOW. HIGH means that the voltage is close to the power supply, for example 5V on the Arduino Uno, or 3.3V on the Arduino Due. LOW means that the signal is close to 0V.
You are learning how to use Arduino to build your own projects?
Check out Arduino For Beginners and learn step by step.
So, a pulse can have 2 representations:
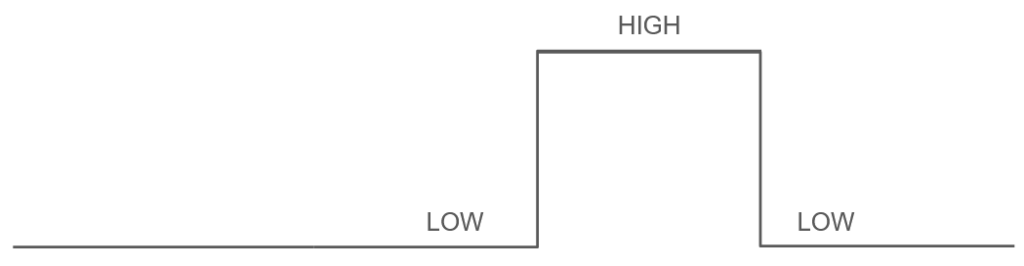
Either a signal that goes from LOW to HIGH and then from HIGH to LOW (see image below). In this case the pulse is the HIGH signal, and I will call that a pulse with HIGH mode.
Or, a signal that goes from HIGH to LOW and then from LOW to HIGH (see image below). In this case the pulse is the LOW signal, and I will call that a pulse with LOW mode.

So, basically, a pulse is a change in the signal, for a (usually) short period of time.
And now that you understand what is a pulse, well what could you want to do when you have a pulse? One of the possibilities is to measure the duration of that pulse. The pulse can be proportional to a value you want to read. For example, when using an ultrasonic sensor with Arduino, the ultrasonic sensor will return the distance from the closest obstacle. This distance will actually be represented by a pulse, with a length proportional to the distance. You then need to read that pulse, and measure its duration so you can compute the distance.
The Arduino pulseIn() function explained
Let’s continue with our pulse example to understand the Arduino pulseIn() function. And then we’ll write the Arduino code.
Here’s an illustration to better understand the following explanations (pulse in HIGH mode).
So, the pulseIn() function will simply return the duration of a pulse. Here is what’s happening with pulseIn() – in HIGH mode (like in the image above):
- You call pulseIn() in your code with the HIGH mode. While doing that the voltage must be LOW.
- pulseIn() will wait for the signal to change from LOW to HIGH, with a timeout. During all that time, the program execution is blocked.
- When the signal changes from LOW to HIGH, pulseIn() will start measuring the duration of the pulse.
- When the signal goes back from HIGH to LOW, pulseIn() will compute the duration of the pulse, and return it so you can use it in your code.
For the pulseIn() in LOW mode:
- You call pulseIn() with LOW mode. At this time the voltage must be HIGH.
- pulseIn() will block the program and wait for the signal to change from HIGH to LOW, with a timeout.
- It will start measuring the duration of the pulse when the signal changes from HIGH to LOW.
- And when the signal goes back to HIGH, pulseIn() returns the duration of the pulse.
In both scenarios, if the pulse didn’t happen after the specified timeout, pulseIn() will simply return 0.
The circuit we’ll use to test pulseIn()
To make a very simple test, we will create an Arduino circuit with a push button.
On this circuit we have:
- A push button that you plug in the middle of your breadboard.
- A 10kOhm resistor connected between one leg of the button and the ground (GND). This resistor will act as a pull down resistor, and make sure the signal of the button is LOW when not pressed.
- A wire between a leg of the button (important: on the same side as where you’ve connected the resistor) and a digital pin, for example 4.
- A wire between another leg of the button (different side than the resistor and the digital pin) and 5V.
(check this if you want more info about Arduino pins)
The push button will help us create a pulse. With the pull down resistor, the signal will be LOW by default. When you press on the button, the signal will change from LOW to HIGH, and when you release the button, the signal will change from HIGH to LOW. This is a pulse. The longer we’ll press the button, the longer the pulse. And this pulse will be in HIGH mode.
Note: if you want a pulse in LOW mode, you’ll have to make the resistor act as a pull up resistor – connected to 5V and not GND, and also change the wire connected to digital pin 4 to the other side of the button. This way the signal will be HIGH by default, and LOW when you press on the button. For this option, instead of using an external pull up resistor, you can also use the INPUT_PULLUP mode.
For the following, we’ll keep the configuration with the pull down resistor, and we’ll use pulseIn() with HIGH mode.
Code with Arduino pulseIn()
Using pulseIn() in your code is actually very simple. The hardest part is to understand what it does.
The code
#define BUTTON_PIN 4

void setup()
{
  Serial.begin(9600);
  pinMode(BUTTON_PIN, INPUT);
}

void loop()
{
  unsigned long duration = pulseIn(BUTTON_PIN, HIGH);
  Serial.println(duration);
}
Here’s what we do in the code:
Setup
#define BUTTON_PIN 4

void setup()
{
  Serial.begin(9600);
  pinMode(BUTTON_PIN, INPUT);
}
Nothing special here, we just set the digital pin for the button to INPUT, in the setup() function. This is a mandatory step: if you want to use pulseIn() you have to set the pin mode as INPUT.
We also initialize Serial communication so we can later print the duration of the pulse.
Measure and print the pulse
void loop()
{
  unsigned long duration = pulseIn(BUTTON_PIN, HIGH);
  Serial.println(duration);
}
Our test is simple: in the loop() function we call pulseIn(), which will be executed over and over again, until we power off the Arduino board.
When using pulseIn(), you have to give at least 2 arguments: first the pin you want to work on, and then the mode for the pulse – either HIGH or LOW. Here, because we want to measure the duration when the pulse is HIGH (with default state LOW), we use the HIGH mode.
pulseIn() will return the duration of the pulse in microseconds, and the data type for that is unsigned long.
Then, we print the duration on the Serial monitor.
Run the code
If you run that code on your Arduino with the push button circuit, you will first see some 0 printed every second. This is because the Arduino pulseIn() function has a default timeout of 1 second. When called, pulseIn() will wait for the signal to go from LOW to HIGH. If it doesn’t happen after the 1 second timeout (basically the pulse didn’t start), pulseIn() will simply return 0, so it doesn’t block the program too long for nothing. If you press on the button, the timeout does not play any role anymore.
So, if you press + release the button, then you will see a number – just after you release – which corresponds to the duration of the pulse in microseconds.
This value here, with this push button circuit, will tell you for how long you have pressed on the button. For other sensors, the value might mean something else, and you’ll have to make some computations on your code.
Change the pulseIn() timeout
If you want to set a custom timeout for pulseIn(), you can do so by adding a third (optional) argument to the function.
For example:
unsigned long duration = pulseIn(BUTTON_PIN, HIGH, 5000000);
The 2 first arguments are still the pin, and the mode for the pulse.
The third argument is the timeout in microseconds. Here I used 5 000 000, which corresponds to 5 seconds. It means that when called, pulseIn() will wait a maximum of 5 seconds for the pulse to start. If the pulse didn’t start after the 5 seconds, pulseIn() returns 0.
Best practices when using the Arduino pulseIn() function
In this article you have learnt what is a pulse, how the pulseIn() function works, and how to use it in your code.
As you have seen, the function completely blocks the program. If your pulse is 10 seconds long, then the pulseIn() function will keep your program blocked for 10 seconds. And if no pulse is detected, it will block the program for the duration of the timeout – one second by default.
So, a best practice is to only use pulseIn() when you are going to need it. For example, when using an ultrasonic sensor, you first have to trigger the sensor, and then wait for the response. In this case, you will use pulseIn() just after triggering the sensor, and not every time you enter the void loop().
Also, don’t use a too big timeout if you don’t need to. In some situations it might be tempting to increase the timeout a lot so you don’t miss the pulse, but by doing that you’re going to delay everything else in your program.
And finally – more as an improvement – you could replicate the behavior of pulseIn(), just by using interrupts on the pin. This is a bit more complex to do, but can be worth it. You’d have to attach an interrupt on the pin, and keep the time when the pulse starts (signal changes from LOW to HIGH for example). Then you’d also save the time when the pulse ends, and compute the difference between the 2 times. This difference will give you the duration of the pulse, and the whole process won’t block anything in your program. This can be useful when you have very long pulses, or if you need to call pulseIn() frequently.