In this Arduino tutorial you will learn how to work with a push button and multiple LEDs.
We will first build the circuit, and then write some code for different applications, each time adding a bit more complexity.
In this tutorial, in order to not bloat the instructions too much, I will not explain every detail from scratch. If you’re not already confident working with LEDs and push button, check out how to control an LED with a push button first.
And then, let’s get started!
Table of Contents
Arduino circuit with a push button and 3 LEDs
Let’s first build the circuit we’re going to use throughout the tutorial.
You will need:
You are learning how to use Arduino to build your own projects?
Check out Arduino For Beginners and learn step by step.
- Arduino board (I use Arduino Uno but you can choose any other Arduino board).
- Breadboard.
- Female to male wires.
- Push button.
- LEDs.
- 220 Ohm resistors.
Here is the circuit.
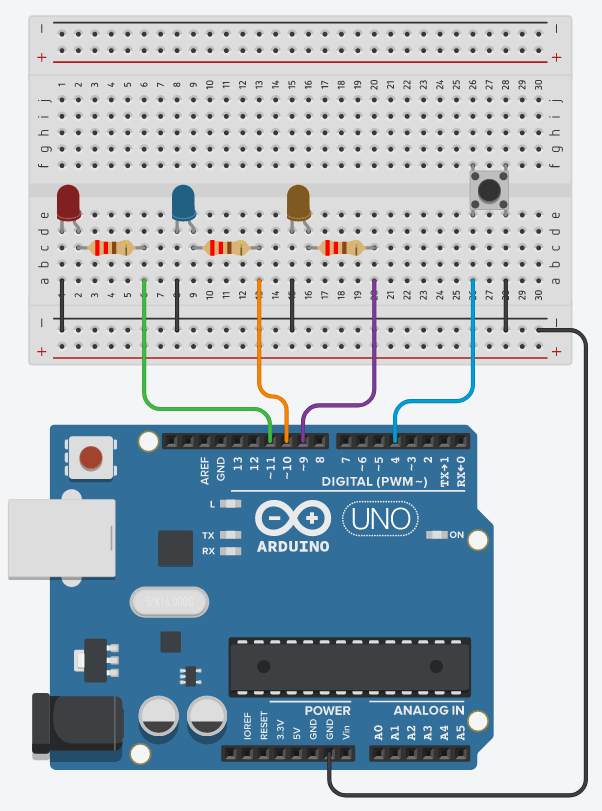
And here is how to build this circuit:
- An LED has 2 legs. Connect the shorter one to GND and the longer one to a digital pin, with a 220 Ohm resistor in between in order to reduce the current that goes through the LED.
- For the push button: plug it in the middle of the breadboard like on the picture. Connect one side to GND, and the other side to a digital pin. Here we don’t use any pull up or pull down resistor, as we’re going to use the internal Arduino pull up resistor.
Check everything twice, and then you’re ready to write the code.
All LEDs on when button is pressed, all LEDs off otherwise
Let’s start with a very simple application, so we can get a good base for the code, which will help us for the following apps.
Here is what we want to do: by default all LEDs are powered off. When you press the button, all LEDs are turned on, and when you don’t press the button, all LEDs are turned off.
Let’s write the Arduino code.
#define LED_1_PIN 11
#define LED_2_PIN 10
#define LED_3_PIN 9
#define BUTTON_PIN 4

void setup()
{
  pinMode(LED_1_PIN, OUTPUT);
  pinMode(LED_2_PIN, OUTPUT);
  pinMode(LED_3_PIN, OUTPUT);
  pinMode(BUTTON_PIN, INPUT_PULLUP);
}

void loop()
{
  byte buttonState = digitalRead(BUTTON_PIN);

  if (buttonState == LOW) {
    digitalWrite(LED_1_PIN, HIGH);
    digitalWrite(LED_2_PIN, HIGH);
    digitalWrite(LED_3_PIN, HIGH);
  }
  else {
    digitalWrite(LED_1_PIN, LOW);
    digitalWrite(LED_2_PIN, LOW);
    digitalWrite(LED_3_PIN, LOW);
  }
}
Let’s now see what this code does.
Setup pins
#define LED_1_PIN 11
#define LED_2_PIN 10
#define LED_3_PIN 9
#define BUTTON_PIN 4
First we create some defines so we can easily use the pin numbers later in the code. Also this makes things easier if you want to physically change an LED to a different pin.
void setup()
{
  pinMode(LED_1_PIN, OUTPUT);
  pinMode(LED_2_PIN, OUTPUT);
  pinMode(LED_3_PIN, OUTPUT);
  pinMode(BUTTON_PIN, INPUT_PULLUP);
}
In the void setup(), we set the mode for all the pins we’re going to use:
- OUTPUT for all LEDs.
- INPUT_PULLUP for the push button. This allows us not to put an additional external resistor. In this configuration, when we read the button’s state, HIGH will mean “released”, and LOW will mean “pressed”.
Power on/off LEDs depending on button’s state
void loop()
{
  byte buttonState = digitalRead(BUTTON_PIN);

  if (buttonState == LOW) {
    digitalWrite(LED_1_PIN, HIGH);
    digitalWrite(LED_2_PIN, HIGH);
    digitalWrite(LED_3_PIN, HIGH);
  }
  else {
    digitalWrite(LED_1_PIN, LOW);
    digitalWrite(LED_2_PIN, LOW);
    digitalWrite(LED_3_PIN, LOW);
  }
}
In the void loop(), we first read the push button’s state with digitalRead(), which we put inside a byte variable.
Then, we check which value we got. If LOW, it means the button has been pressed (in our configuration with INPUT_PULLUP). In this case, we power on all 3 LEDs with digitalWrite(). Else (button is not pressed), we power off all LEDs.
Improve the code with arrays and functions
Here we just have 3 LEDs, and you can already see a lot of duplicate code. Now imagine if we have to do the same program for 17 LEDs. This will quickly become a giant mess.
By using arrays and functions, we will be able to make the code clean and scalable, without too much effort. And this base will also be useful for the rest of the tutorial.
For more details on the LED part, check out: how to handle multiple LEDs with arrays and functions.
#define LED_1_PIN 11
#define LED_2_PIN 10
#define LED_3_PIN 9
#define BUTTON_PIN 4

#define LED_NUMBER 3

byte LEDPinArray[LED_NUMBER] = { LED_1_PIN,
                                 LED_2_PIN,
                                 LED_3_PIN };

void initAllLEDs()
{
  for (int i = 0; i < LED_NUMBER; i++) {
    pinMode(LEDPinArray[i], OUTPUT);
  }
}

void powerOnAllLEDs(bool powerOn)
{
  for (int i = 0; i < LED_NUMBER; i++) {
    if (powerOn) {
      digitalWrite(LEDPinArray[i], HIGH);
    }
    else {
      digitalWrite(LEDPinArray[i], LOW);
    }
  }
}

void setup()
{
  initAllLEDs();
  pinMode(BUTTON_PIN, INPUT_PULLUP);
}

void loop()
{
  byte buttonState = digitalRead(BUTTON_PIN);

  powerOnAllLEDs(buttonState == LOW);
}
Let’s quickly see the differences we have with the previous code.
Create defines and a global array
#define LED_1_PIN 11
#define LED_2_PIN 10
#define LED_3_PIN 9
#define BUTTON_PIN 4
This first part is the same, we create one define per pin.
#define LED_NUMBER 3

byte LEDPinArray[LED_NUMBER] = { LED_1_PIN,
                                 LED_2_PIN,
                                 LED_3_PIN };
We add another define to keep the number of LEDs, and we create an array which contains all the pins for the LEDs. If you want to add more LEDs to your circuit, this part of the code is the only one you’ll need to change.
For the button, as we only have one, we keep it like this. If you have multiple buttons you may also want to create a button pin array.
Init the pins
void initAllLEDs()
{
  for (int i = 0; i < LED_NUMBER; i++) {
    pinMode(LEDPinArray[i], OUTPUT);
  }
}
and
void setup()
{
  initAllLEDs();
  pinMode(BUTTON_PIN, INPUT_PULLUP);
}
To init all LEDs, we go through a for loop and we use pinMode() on each element (each LED pin). We put this for loop inside a function, that we call in the void setup().
After calling this, we also setup the pin for the button. No need for arrays as we have just one.
Read the button’s state and power on/off all LEDs
void powerOnAllLEDs(bool powerOn)
{
  for (int i = 0; i < LED_NUMBER; i++) {
    if (powerOn) {
      digitalWrite(LEDPinArray[i], HIGH);
    }
    else {
      digitalWrite(LEDPinArray[i], LOW);
    }
  }
}
and
void loop()
{
  byte buttonState = digitalRead(BUTTON_PIN);

  powerOnAllLEDs(buttonState == LOW);
}
We create a function in which we go through all the LED pins. For each pin we use digitalWrite() to power it on/off, depending on a boolean parameter we receive.
In the void loop(), the mechanism is the same as before, but to power on/off the LEDs, we call powerOnAllLEDs(). This function receives a boolean, so we directly compute it when passing the argument. “(buttonState == LOW)” will be evaluated to true if the button is pressed, false otherwise.
Toggle between all LEDs on/off when releasing the button
Here we want to achieve something different.
Before, the LEDs’ state was directly linked to the state of the button. Now, we want to modify the state of the LEDs only when we receive a specific event: when the button is released.
So, by default, all LEDs will be powered off. When we press + release the button, at this exact moment, the LEDs will be powered on. The next time we press + release, all LEDs will be powered off, etc.
#define LED_1_PIN 11
#define LED_2_PIN 10
#define LED_3_PIN 9
#define BUTTON_PIN 4

#define LED_NUMBER 3

byte LEDPinArray[LED_NUMBER] = { LED_1_PIN,
                                 LED_2_PIN,
                                 LED_3_PIN };

unsigned long debounceDuration = 50; // millis
unsigned long lastTimeButtonStateChanged = 0;

byte lastButtonState = HIGH;

byte LEDState = LOW;

void initAllLEDs()
{
  for (int i = 0; i < LED_NUMBER; i++) {
    pinMode(LEDPinArray[i], OUTPUT);
  }
}

void powerOnAllLEDs(bool powerOn)
{
  for (int i = 0; i < LED_NUMBER; i++) {
    if (powerOn) {
      digitalWrite(LEDPinArray[i], HIGH);
    }
    else {
      digitalWrite(LEDPinArray[i], LOW);
    }
  }
}

void setup()
{
  initAllLEDs();
  pinMode(BUTTON_PIN, INPUT_PULLUP);
}

void loop()
{
  unsigned long timeNow = millis();
  if (timeNow - lastTimeButtonStateChanged > debounceDuration) {
    byte buttonState = digitalRead(BUTTON_PIN);
    if (buttonState != lastButtonState) {
      lastTimeButtonStateChanged = timeNow;
      lastButtonState = buttonState;
      if (buttonState == HIGH) { // button has been released
        LEDState = (LEDState == LOW) ? HIGH : LOW;
        powerOnAllLEDs(LEDState == HIGH);
      }
    }
  }
}
As you can see, many parts of the code are the same as before:
- Defines for all the pins.
- Global array to keep all pins for all LEDs.
- initAllLEDs() function, and also the void setup().
- powerOnAllLEDs() function.
Let’s now focus on the additional code for this new application.
Detect when button is released (with debounce)
unsigned long debounceDuration = 50; // millis
unsigned long lastTimeButtonStateChanged = 0;

byte lastButtonState = HIGH;
and
void loop()
{
  unsigned long timeNow = millis();
  if (timeNow - lastTimeButtonStateChanged > debounceDuration) {
    byte buttonState = digitalRead(BUTTON_PIN);
    if (buttonState != lastButtonState) {
      lastTimeButtonStateChanged = timeNow;
      lastButtonState = buttonState;
      if (buttonState == HIGH) { // button has been released
In order to detect a change of state, we need to keep the previous state and compare it to the current one.
So, whenever we read the button’s state, we compare it to the previous one. If it’s different, we save the current state as the previous one. And we also check if the state is HIGH, which means, with our configuration, that the button has just been released (change of state + state is HIGH).
To that, we also add a few lines for the debounce mechanism. Every time, we compute the duration between now and the last time the button’s state has changed. If this is greater than the debounce duration – here 50 milliseconds, we can read the state again.
If you want a more in-depth explanation about this part, check out this Push button + LED tutorial.
Toggle the LEDs
byte LEDState = LOW;
and
        LEDState = (LEDState == LOW) ? HIGH : LOW;
        powerOnAllLEDs(LEDState == HIGH);
      }
    }
  }
}
We add a global variable to keep the current state for all LEDs.
When we detect that the button is released, we then change the state. If the state was HIGH, we set it to LOW, and if it was LOW, we set it to HIGH.
After modifying this global variable, we just call powerOnAllLEDs() with this state.
Toggle next LED when push button is released
Here is yet another application, and another improvement for the code we wrote.
This time, we will only power on 1 LED at a time. When we press + release the button, we will power off this LED, and power on the next one. After we get to the last LED, we come back to the first one.
#define LED_1_PIN 11
#define LED_2_PIN 10
#define LED_3_PIN 9
#define BUTTON_PIN 4

#define LED_NUMBER 3

byte LEDPinArray[LED_NUMBER] = { LED_1_PIN,
                                 LED_2_PIN,
                                 LED_3_PIN };

unsigned long debounceDuration = 50; // millis
unsigned long lastTimeButtonStateChanged = 0;

byte lastButtonState = HIGH;

int LEDIndex = 0;

void initAllLEDs()
{
  for (int i = 0; i < LED_NUMBER; i++) {
    pinMode(LEDPinArray[i], OUTPUT);
  }
}

void powerOnSelectedLEDOnly(int index)
{
  for (int i = 0; i < LED_NUMBER; i++) {
    if (i == index) {
      digitalWrite(LEDPinArray[i], HIGH);
    }
    else {
      digitalWrite(LEDPinArray[i], LOW);
    }
  }
}

void setup()
{
  initAllLEDs();
  pinMode(BUTTON_PIN, INPUT_PULLUP);
  digitalWrite(LEDPinArray[LEDIndex], HIGH);
}

void loop()
{
  unsigned long timeNow = millis();
  if (timeNow - lastTimeButtonStateChanged > debounceDuration) {
  	byte buttonState = digitalRead(BUTTON_PIN);
    if (buttonState != lastButtonState) {
      lastTimeButtonStateChanged = timeNow;
      lastButtonState = buttonState;
      if (buttonState == HIGH) { // button has been released
        LEDIndex++;
        if (LEDIndex >= LED_NUMBER) {
          LEDIndex = 0;
        }
        powerOnSelectedLEDOnly(LEDIndex);
      }
    }
  }
}
Here again, many things are similar to the previous code:
- Defines for all the pins.
- Global array to keep all pins for all LEDs.
- initAllLEDs() function.
- Change of button’s state detection in the void loop() + debounce mechanism.
Let’s focus on what has changed.
Function to power on selected LED only
void powerOnSelectedLEDOnly(int index)
{
  for (int i = 0; i < LED_NUMBER; i++) {
    if (i == index) {
      digitalWrite(LEDPinArray[i], HIGH);
    }
    else {
      digitalWrite(LEDPinArray[i], LOW);
    }
  }
}
In this function, we go through each pin of the array. If the given index (from the parameter) corresponds to the index in the array, we power on the LED. For all other pins, we power off the LED.
Mechanism to toggle next LED when button has been released
int LEDIndex = 0;
and
void setup()
{
  initAllLEDs();
  pinMode(BUTTON_PIN, INPUT_PULLUP);
  digitalWrite(LEDPinArray[LEDIndex], HIGH);
}
and
      if (buttonState == HIGH) { // button has been released
        LEDIndex++;
        if (LEDIndex >= LED_NUMBER) {
          LEDIndex = 0;
        }
        powerOnSelectedLEDOnly(LEDIndex);
      }
    }
  }
}
First, we create a global variable to keep the current index (= currently powered on LED).
In the void setup(), after initializing the pins, we power on the first LED.
Then, in the void loop(), we monitor the button’s state. When the button has just been released, we increment the LED index by one. Also we make sure that the index doesn’t go outside of the array. If we have reached the max possible index, we go back to the beginning.
Once we get this new index, we can now call the powerOnSelectedLEDOnly() function, and of course, we provide the index as an argument.
Conclusion – Arduino push button with multiple LEDs
You can now control multiple LEDs with a push button. As you can see, once you have the basics written, you can create many different applications with just a few variations in the code.
To improve from there and get more practice, you could focus on the following (just a few ideas):
- Make the LEDs blink independently, and stop/restart the blink with the push button.
- Create a complete christmas tree application, with different modes for the LEDs. The push button will toggle between the modes.
