In this tutorial I will show you how to improve your Arduino code when using multiple LEDs, with the help of arrays, and also with functions to make those arrays more dynamic.
When you get started with Arduino you usually do small projects, with for example one LED. After some time you add more components and write more complex programs. But now, what’s going to happen if you have a project with 5 LEDs? Your code will contain a lot of repetitions and you will be limited when wanting to scale the app.
With arrays (and functions), you can solve this issue. And that’s what I’m going to show you in this tutorial.
Note that I’m using LEDs as an example, but this could also be replicated with push buttons, potentiometers, or any other kind of Arduino-compatible component.
Table of Contents
Arduino circuit with 3 LEDs
Let’s build a simple circuit with 3 LEDs.
Why 3?
You are learning how to use Arduino to build your own projects?
Check out Arduino For Beginners and learn step by step.
Usually, using arrays is a good strategy when you have at least 3 elements. With just one, no need as it would complicate the code for nothing. With 2, it depends. Duplicating the code only once may not be a problem, if you know that you won’t have more than 2 elements in the future. But with 3, 4, or more elements, arrays are really useful.
So, here is the circuit with 3 LEDs.
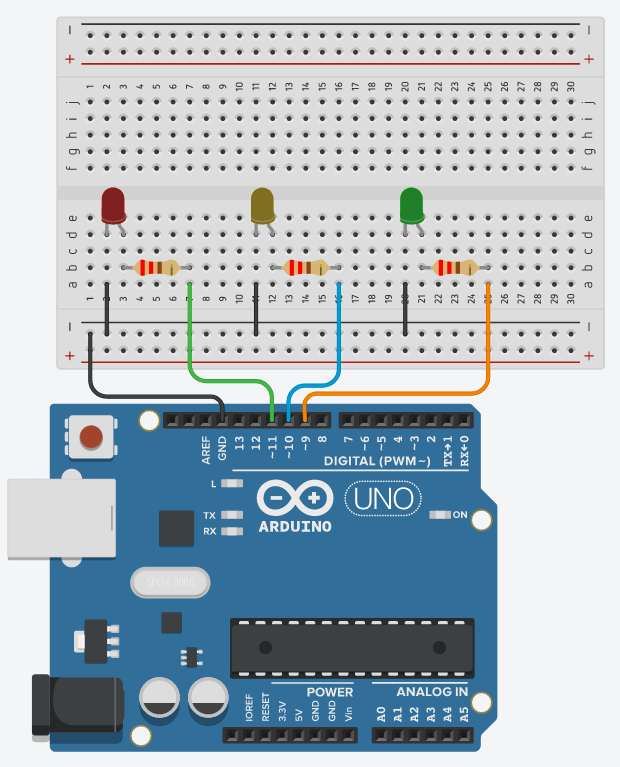
To build the circuit:
- Add a black wire between a GND pin of the Arduino and the “-” (minus) line of the breadboard, as to create a common ground in the breadboard. This will make things easier when you add more components.
- For each LED:
- Connect the shorter leg to the ground (the minus line on the breadboard).
- Connect the longer leg to a digital pin – doesn’t matter which one – and add a 220 Ohm resistor in between, as to reduce the current which goes through the LED.
And now that the circuit is done, let’s focus on the programming part.
The issue explained: A simple blink application, without arrays
Just to illustrate what I previously wrote about duplicate code, let’s first make a very simple blink application, without using arrays.
Here is the code.
#define LED_PIN_1 11
#define LED_PIN_2 10
#define LED_PIN_3 9

void setup()
{
  pinMode(LED_PIN_1, OUTPUT);
  pinMode(LED_PIN_2, OUTPUT);
  pinMode(LED_PIN_3, OUTPUT);
}

void loop()
{
  digitalWrite(LED_PIN_1, HIGH);
  digitalWrite(LED_PIN_2, HIGH);
  digitalWrite(LED_PIN_3, HIGH);
  delay(1000);
  digitalWrite(LED_PIN_1, LOW);
  digitalWrite(LED_PIN_2, LOW);
  digitalWrite(LED_PIN_3, LOW);
  delay(1000);
}
This application is super, super simple. We just power on all LEDs, then power off all LEDs, then repeat. And even with that very simple app, you can see a lot of redundant code.
Keeping things like this will bloat your code, and make it harder for you to scale your application.
Now, let’s come back to an empty Arduino program, and go step by step to build it again, with arrays this time.
Init multiple LEDs with array + function
Let’s just focus on the initialization of the pins, which happens in the void setup() of your Arduino program.
Here is how to do the same as before, but with an array.
Arduino code with array
#define LED_PIN_1 11
#define LED_PIN_2 10
#define LED_PIN_3 9

#define LED_NUMBER 3

byte LEDPinArray[LED_NUMBER] = { LED_PIN_1,
                                 LED_PIN_2,
                                 LED_PIN_3 };

void setup()
{
  for (int i = 0; i < LED_NUMBER; i++) {
    pinMode(LEDPinArray[i], OUTPUT);
  }
}

void loop() {}
We keep the first defines, one for each LED pin.
Then, we also add a new define, LED_NUMBER, so that if we ever add more LEDs later on, we just need to modify the number here.
We create a global array LEDPinArray which will contain all the pin numbers. We will be able to use this array everywhere in the code to do various operations on the LEDs – mostly with pinMode() and digitalWrite().
In the void setup(), instead of repeating pinMode() 3 times, we use a for loop. The for loop will start with the index at 0, and go up to LED_NUMBER – 1. In this specific example, the loop will execute the code for the following values: 0, 1, 2. Those values correspond exactly to the indexes of the LEDPinArray, so we will be able to do something with each pin.
This loop structure + array combination is very common, and it’s going to be the same every time. So, once you’ve understood it, using it in your programs will be super quick and easy.
Finally, we have nothing in the void loop(), as this code example was just to init all the LEDs.
The code we have now is much better, and if we want to add one more LED, we just need to:
- Add a define for the pin number.
- Increase the LED_NUMBER.
- Add the pin in the LEDPinArray.
Nothing to do in the rest of the code.
Arduino code with array and function
Working with arrays is a very good first step when you want to have a clean and scalable code. Adding functions is yet another step, that we’re going to take now.
What we want to do is to make the void setup() and void loop() functions as minimal as possible, and create functions that can be reused later on.
#define LED_PIN_1 11
#define LED_PIN_2 10
#define LED_PIN_3 9

#define LED_NUMBER 3

byte LEDPinArray[LED_NUMBER] = { LED_PIN_1,
                                 LED_PIN_2,
                                 LED_PIN_3 };

void initAllLEDs()
{
  for (int i = 0; i < LED_NUMBER; i++) {
    pinMode(LEDPinArray[i], OUTPUT);
  }
}

void setup()
{
  initAllLEDs();
}

void loop() {}
Here, what we did is simply to put the for loop code inside a function named initAllLEDs(). Then, in the void setup(), instead of writing the complete code, we just call initAllLEDs().
The void setup() is now super small. And the initAllLEDs() function can be called from anywhere.
Blink multiple LEDs with array + function
Now let’s rewrite the previous application we did – which just makes all LEDs blink at the same time.
Arduino code with array
#define LED_PIN_1 11
#define LED_PIN_2 10
#define LED_PIN_3 9

#define LED_NUMBER 3

byte LEDPinArray[LED_NUMBER] = { LED_PIN_1,
                                 LED_PIN_2,
                                 LED_PIN_3 };

void initAllLEDs()
{
  for (int i = 0; i < LED_NUMBER; i++) {
    pinMode(LEDPinArray[i], OUTPUT);
  }
}

void setup()
{
  initAllLEDs();
}

void loop()
{
  for (int i = 0; i < LED_NUMBER; i++) {
    digitalWrite(LEDPinArray[i], HIGH);
  }
  delay(1000);
  for (int i = 0; i < LED_NUMBER; i++) {
    digitalWrite(LEDPinArray[i], LOW);
  }
  delay(1000);
}
All the code before the void loop() is the same as what we did in the previous section of the tutorial.
Now, in the void loop(), instead of repeating digitalWrite() 3 times, we use a for loop. As you can see, the for loop structure is the exact same every time. What we do inside the loop, however, depends on the application.
The first for loop here will power on all LEDs. The second will power them all off.
And now, this code is OK, but we can improve it – using a function. You will see that it will reduce duplicate code even more, and make the for loop more dynamic.
Arduino code with array and function
#define LED_PIN_1 11
#define LED_PIN_2 10
#define LED_PIN_3 9

#define LED_NUMBER 3

byte LEDPinArray[LED_NUMBER] = { LED_PIN_1,
                                 LED_PIN_2,
                                 LED_PIN_3 };

void initAllLEDs()
{
  for (int i = 0; i < LED_NUMBER; i++) {
    pinMode(LEDPinArray[i], OUTPUT);
  }
}

void powerOnAllLEDs(bool powerOn)
{
  for (int i = 0; i < LED_NUMBER; i++) {
    if (powerOn) {
      digitalWrite(LEDPinArray[i], HIGH);
    }
    else {
      digitalWrite(LEDPinArray[i], LOW);
    }
  }
}

void setup()
{
  initAllLEDs();
}

void loop()
{
  powerOnAllLEDs(true);
  delay(1000);
  powerOnAllLEDs(false);
  delay(1000);
}
We add a new function, called powerOnAllLEDs(). This function takes one parameter of type boolean. Basically, if you call the function with “true”, you ask the function to power on all LEDs. If you call the function with “false”, you ask the function to power off all LEDs. As simple as that.
And now, in the function, we have the for loop. Not 2 for loops, just one. And in the for loop, we add an if structure so we can power on or off the LEDs. This is a good thing because it reduces duplicate code, and makes this functionality more dynamic.
Also, the void loop() now only contains 4 lines of code! And this code is fairly explicit. You don’t need additional comments to understand what’s going on.
As you can see, arrays + functions is a quite powerful combination, and I encourage you to use it whenever you can (and whenever it makes sense, of course).
Toggle between multiple LEDs with array + function
To complete this tutorial, let’s create a slightly more complex application with our LEDs. This time, instead of powering on/off all LEDs at the same time, we will power on only one LED, and then toggle the next one.
So, when the program begins, LED 1 will be powered on. After some time, we power it off and power on LED 2. We continue until we reach the last LED. Let’s call it LED N. After powering on LED N, we go back to LED 1.
Let’s write the code for this application. And this time I will directly use the array + function combination.
#define LED_PIN_1 11
#define LED_PIN_2 10
#define LED_PIN_3 9

#define LED_NUMBER 3

byte LEDPinArray[LED_NUMBER] = { LED_PIN_1,
                                 LED_PIN_2,
                                 LED_PIN_3 };

int LEDIndex = 0;

void initAllLEDs()
{
  for (int i = 0; i < LED_NUMBER; i++) {
    pinMode(LEDPinArray[i], OUTPUT);
  }
}

void powerOnSelectedLEDOnly(int index)
{
  for (int i = 0; i < LED_NUMBER; i++) {
    if (i == index) {
      digitalWrite(LEDPinArray[i], HIGH);
    }
    else {
      digitalWrite(LEDPinArray[i], LOW);
    }
  }
}

void toggleNextLED()
{
  LEDIndex++;
  if (LEDIndex >= LED_NUMBER) {
    LEDIndex = 0;
  }
  powerOnSelectedLEDOnly(LEDIndex);
}

void setup()
{
  initAllLEDs();
  digitalWrite(LEDPinArray[LEDIndex], HIGH);
}

void loop()
{
  delay(1000);
  toggleNextLED();
}
Here is what we added in this code:
- Global integer to keep the current index in the LEDPinArray, named LEDIndex.
- We power on the first LED in the void setup(), just after initializing all pins.
- powerOnSelectedLEDOnly(). This function receives a parameter, which is the LED index to power on. With a for loop, we go through all pins. If the index of the for loop matches the given index (parameter), then we power on this LED. For all other indexes, we power off the LED.
- toggleNextLED(). This function will increment the LEDIndex by one, and make sure the index stays inside the array. As the size of the array is LED_NUMBER (Here: 3), the max possible index is LED_NUMBER – 1 (Here: 2). If we reach a number greater than that, we simply put the index back to 0. And then, once we have the new index, we call the powerOnSelectedLEDOnly() function, passing of course this new index.
As a result, we now have a very clean and scalable code. Adding new LEDs will take you 10 seconds.
Also, the void setup() contains 2 lines, and the void loop() also 2 lines. This will make it much easier for you to add other functionalities to your program, because you don’t need to deal with a code that is already bloated and hard to read/modify.
Conclusion – Using arrays and functions with multiple LEDs on Arduino
As you’ve seen in this tutorial, as soon as you have 3 or more elements to work on with Arduino, using arrays will help you to keep a clean code and also make it easier to scale. On top of that, using functions will allow you to make your for loops more dynamic, reduce the code even more, and increase the scalability.
Now, we’ve seen how to work specifically with LEDs. If you have 4 push buttons, potentiometers, or any other components, well, the same rules apply! As long as you are doing a similar action on all the components, using arrays + functions will be more helpful than harmful.
For more examples of using arrays and functions with LED, check out:
