In this tutorial I’ll show you how to write an Arduino String to the EEPROM memory, and then read it again.
The EEPROM memory lets you save values on your Arduino board so you can retrieve them even after you reboot the board. This is very handy when you want to save some settings/data to reuse later.
If you are not familiar with Arduino and EEPROM, first check out: How to save values on Arduino with EEPROM.
>> Watch this video as an additional resource to this article:
After watching the video, subscribe to the Robotics Back-End Youtube channel so you don’t miss the next tutorials!
You are learning how to use Arduino to build your own projects?
Check out Arduino For Beginners and learn step by step.
Table of Contents
How we’re going to write a String into EEPROM
Writing an Arduino String into the EEPROM memory is not something that you can do out of the box.
You can only write bytes into the EEPROM. A String is an object which may contain many bytes. Also, be sure to understand that the String data type is specific to the Arduino language. It’s different from std::string and any other string data type you may find elsewhere.
To save a String into the EEPROM, we’ll have to write each byte separately, one by one.
Also, when you write the String, you know how long it is. But if you upload another program to read a String you previously stored, how can you know how many bytes you have to read from EEPROM?
To solve this issue, every time we’ll write a String to EEPROM, we’ll first save the length of the String.
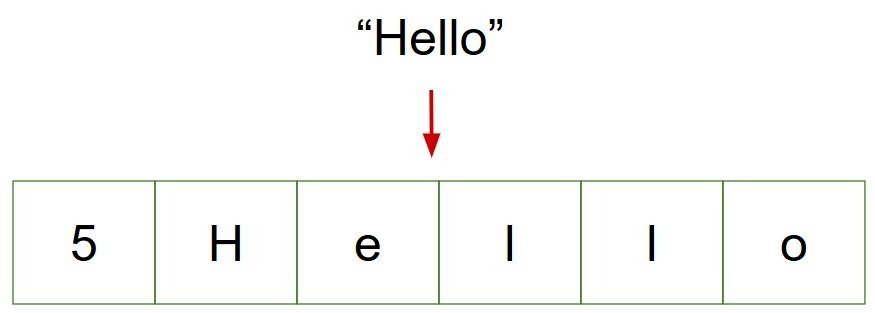
This will make things easier to handle:
- When you write a String, first you write the length, and then you write each byte in a different address – incrementing the address for each byte.
- When you read a String, first you get the first byte which gives you the length. Then you know how many bytes to read, and from that you can retrieve the String from all the following bytes.
Write a String into EEPROM: The code
Write the String
Let’s create a function to write a String into EEPROM.
void writeStringToEEPROM(int addrOffset, const String &strToWrite)
{
  byte len = strToWrite.length();
  EEPROM.write(addrOffset, len);

  for (int i = 0; i < len; i++)
  {
    EEPROM.write(addrOffset + 1 + i, strToWrite[i]);
  }
}
The function takes 2 parameters:
- An offset. The offset is the starting EEPROM address from which we’ll write the String.
- A const reference to a String object. Using a const reference here means that we’ll get the reference (without having to copy the object) of the String to write, and we’ll be unable to modify the object.
Now that we have the parameters, first we get the length of the String with the length() function. We can write the length directly to the first address (the offset parameter).
After that, we iterate on the bytes of the String. We write each byte into a different and incremental address.
Note that for the address parameter of the EEPROM.write() function, we use “addrOffset + 1 + i”. We have to add 1 because we’ve written the length before. So, a String with a length of 7 will actually take 8 slots.
Read the String
Let’s now create a function to read a String from EEPROM.
String readStringFromEEPROM(int addrOffset)
{
  int newStrLen = EEPROM.read(addrOffset);
  char data[newStrLen + 1];

  for (int i = 0; i < newStrLen; i++)
  {
    data[i] = EEPROM.read(addrOffset + 1 + i);
  }
  data[newStrLen] = '\ 0'; // !!! NOTE !!! Remove the space between the slash "/" and "0" (I've added a space because otherwise there is a display bug)

  return String(data);
}
The function takes one parameter: the offset.
First, we start by getting the length of the String, with the value stored into the offset address.
We create a char array, which we’ll use as a buffer to store each char before transforming them into a String.
Then, we use a for loop (as we know how many characters we need to read) to get all required bytes.
Note: just after getting all the char, we add one more character: ‘\0’, which is a null character. This will help functions like Serial.print() to know where the String ends.
Now, you can create a String object directly by passing the char array into the String() constructor, and return this newly created object.
Try the code
Here is the complete code with a working test.
#include <EEPROM.h>

void writeStringToEEPROM(int addrOffset, const String &strToWrite)
{
  byte len = strToWrite.length();
  EEPROM.write(addrOffset, len);

  for (int i = 0; i < len; i++)
  {
    EEPROM.write(addrOffset + 1 + i, strToWrite[i]);
  }
}

String readStringFromEEPROM(int addrOffset)
{
  int newStrLen = EEPROM.read(addrOffset);
  char data[newStrLen + 1];

  for (int i = 0; i < newStrLen; i++)
  {
    data[i] = EEPROM.read(addrOffset + 1 + i);
  }
  data[newStrLen] = '\ 0'; // !!! NOTE !!! Remove the space between the slash "/" and "0" (I've added a space because otherwise there is a display bug)

  return String(data);
}

void setup() {
  Serial.begin(9600);

  writeStringToEEPROM(0, "Hello Arduino");

  String retrievedString = readStringFromEEPROM(0);

  Serial.print("The String we read from EEPROM: ");
  Serial.println(retrievedString);
}

void loop() {}
Don’t forget to include the EEPROM library at the top of your file.
If you run this code on your Arduino, and open the Serial Monitor from the Arduino IDE, you should see “The String we read from EEPROM: Hello Arduino” printed on the screen.
Improvements to write multiple Strings to EEPROM
The previous code is working great to write and then read one String. But if you need to write and read 2+ Strings, things start to get more complicated.
You will have to compute the offset for the next String you read. Also, as we add the length of the String into the EEPROM, you have to be aware of that and add 1 for the second String offset, add 2 for the third, etc. It’s not a great solution, as it requires you (the client of the function) to know the internal details of the function.
Improved code
Let’s improve the write and read function so it becomes easier when using multiple Strings.
#include <EEPROM.h>

int writeStringToEEPROM(int addrOffset, const String &strToWrite)
{
  byte len = strToWrite.length();
  EEPROM.write(addrOffset, len);

  for (int i = 0; i < len; i++)
  {
    EEPROM.write(addrOffset + 1 + i, strToWrite[i]);
  }

  return addrOffset + 1 + len;
}

int readStringFromEEPROM(int addrOffset, String *strToRead)
{
  int newStrLen = EEPROM.read(addrOffset);
  char data[newStrLen + 1];

  for (int i = 0; i < newStrLen; i++)
  {
    data[i] = EEPROM.read(addrOffset + 1 + i);
  }
  data[newStrLen] = '\ 0'; // !!! NOTE !!! Remove the space between the slash "/" and "0" (I've added a space because otherwise there is a display bug)

  *strToRead = String(data);
  return addrOffset + 1 + newStrLen;
}

void setup() {
  Serial.begin(9600);

  int eepromOffset = 0;

  // Writing

  String str1 = "Today's tutorial:";
  String str2 = "Save String to EEPROM.";
  String str3 = "Thanks for reading!";

  int str1AddrOffset = writeStringToEEPROM(eepromOffset, str1);
  int str2AddrOffset = writeStringToEEPROM(str1AddrOffset, str2);
  writeStringToEEPROM(str2AddrOffset, str3);

  // Reading

  String newStr1;
  String newStr2;
  String newStr3;

  int newStr1AddrOffset = readStringFromEEPROM(eepromOffset, &newStr1);
  int newStr2AddrOffset = readStringFromEEPROM(newStr1AddrOffset, &newStr2);
  readStringFromEEPROM(newStr2AddrOffset, &newStr3);

  Serial.println(newStr1);
  Serial.println(newStr2);
  Serial.println(newStr3);
}

void loop() {}
Try to run this code, as a result you should see the 3 Strings printed on the Serial Monitor.
Explanations
As you can see, both read and write functions now return an integer offset.
The write function is the same, we simply return the current new offset, which is (the offset we got as a parameter + the length of the String + 1 because we also added one byte to store the length).
So, when you use the writeStringToEEPROM() function, you get a new offset that you can directly use for the next writeStringToEEPROM() call. And you don’t need to compute the offset yourself.
The read function is slightly different. Instead of returning the String object we got from EEPROM, we return the current new offset. The String is now a pointer you give as a parameter.
The readStringFromEEPROM() function will simply write the new String value into the String object, and then return the offset (previous offset + length of String + 1 for the byte used to store the length).
Using this technique has a few advantages, you can:
- Avoid doing any offset computation yourself, and thus you have less risk to mess up your code.
- Use the read/write functions without having to know the internal details anymore.
- Easily “chain” the functions. The returned offset you get is the offset you use as a parameter in your next function call.
Going further with storing Arduino String into EEPROM
In this tutorial you have seen how to store a String into the EEPROM memory and get it back.
Here are a few things for you to consider – about the previous code and EEPROM in general:
- String max size: here I have (implicitly) supposed that the String length will be less than 256. If you have a String containing 300 bytes, then you may need to store the length on 2 bytes (max value: 65535) instead of 1 byte (max value: 255). In this case you’d have to modify the write/read functions to handle 2 bytes for the length, and add 2 to the offset instead of 1.
- EEPROM max size: EEPROM is not an infinite storage! Usually it’s pretty small so you have to make sure you know the EEPROM size for your Arduino board. For example, the Arduino Uno EEPROM size is 1024 bytes. For the previous code, you could for example add a length test and return an error if the String length is too big.
- And finally, something worth repeating: there is a finite number of write operations possible for each address of the EEPROM memory. After about 100 000 write operations on a specific address (read operations do not count), you can consider that this EEPROM address is dead. So, make sure you don’t write without any blocking code in the loop() function of your program!
With those remarks, you can work on the previous code example and try to solve the String max size and EEPROM max size problems. That’s a good way to practice and progress with Arduino!
