Inside your computer, you have one or several hard drive to store all your data. But what about an Arduino board ? How can you save values directly on the Arduino board without an external storage device ?
Here comes the EEPROM memory.
Table of Contents
What is the EEPROM memory ?
The EEPROM memory allows you to keep values inside your Arduino board, even if you power it off and on.
But it’s a real different kind of memory from what you can find on your own computer.
Here are some characteristics:
- The EEPROM is very limited. While a hard drive can store up to several terabytes of data, you can only store a few bytes, sometimes kilobytes on the EEPROM.
- Not all Arduino boards have EEPROM. On Arduino Uno and Mega, you have 1024 bytes, but if you have an Arduino Zero, you have no EEPROM available.
- There is a limit to how many times you can write to a single location on the EEPROM memory. After about 100 000 write operations, the memory location might be dead. That’s why you need to manipulate this memory with precautions.
- To store numbers on multiple bytes (int, long, double, …) you need to know how many bytes each value will take, so you can space the values accordingly in the memory.
So, don’t expect to store a camera output, or even an image on the EEPROM memory. This memory is really suited for small values, for example a default settings to apply on boot, or a user preference.
You are learning how to use Arduino to build your own projects?
Check out Arduino For Beginners and learn step by step.
Saving a value to EEPROM
Time to write some code!
#include <EEPROM.h>

void setup() {
  EEPROM.write(0, 7);
  EEPROM.write(3, 50);
}

void loop() { }
First, you have to include the EEPROM library at the top of your file.
We write here 2 values in the EEPROM memory:
- Number 7 at the address number 0
- Number 50 at the address number 3
Now, the values are stored, and even if you reboot your Arduino board with a totally different program, those values will still be here, at the addresses 0 and 3.
A few important points:
- Don’t write multiple values on the same address, otherwise you will lose the previously written number (unless that’s what you want to do)
- A memory location can only store one byte of data. So, for numbers between 0 and 255, that’s fine, but for other numbers you’ll have to split the number in several bytes, and store each byte separately. For example, a double value in Arduino Uno takes 4 bytes. Also, that means that you can only store 1024/4 = 256 double values in the EEPROM memory.
- Don’t write a value to the EEPROM inside an infinite loop without any delay or check for user input. Remember, you only have about 100 000 write cycles available per address. If you just write to EEPROM in the loop() function with no other code, you might destroy your EEPROM storage pretty fast.
Reading a value from EEPROM
After you’ve written some values to the EEPROM, you can now reboot your Arduino or simply reset your program. The values will still be there, and reading them is quite easy.
#include <EEPROM.h>

void setup() {
  Serial.begin(9600);

  int value1 = EEPROM.read(0);
  Serial.println(value1);

  int value2 = EEPROM.read(3);
  Serial.println(value2);
}

void loop() { }
Note that the 100 000 rule is only for writing. You can read from EEPROM as much as you want without any problem.
If you have saved a number that requires more than one byte (ex: double), then you’ll need to read all the addresses for this number, and reconstruct the number back with all the bytes.
Complete application code: Save a value given by a user to blink a LED
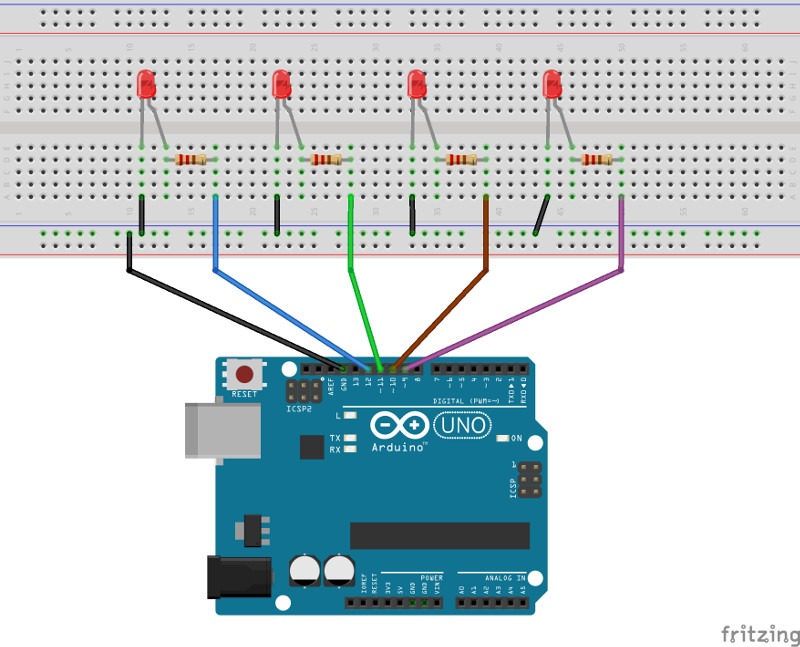
I’ll show you a real example using an Arduino Uno board and 4 LEDs connected to digital pins (with 220 Ohm resistors).
Here’s the schematics:
What we want to do:
- Choose which LED to power on depending on the user input (from Serial communication)
- Save the last choice from user
- When the board reboots, power on the last LED chosen by the user
The code
#include <EEPROM.h>

#define LED_1_PIN 9
#define LED_2_PIN 10
#define LED_3_PIN 11
#define LED_4_PIN 12

#define ARRAY_SIZE 4
#define LAST_SELECTED_LED_EEPROM_ADDR 10

int ledPinArray[4] = { LED_1_PIN, LED_2_PIN, LED_3_PIN, LED_4_PIN };

int i;

void setLedPinModes()
{
  for (i = 0 ; i < ARRAY_SIZE ; i++) {
    pinMode(ledPinArray[i], OUTPUT);
  }
}

void setInitialLedStates()
{
  for (i = 0 ; i < ARRAY_SIZE ; i++) {
    digitalWrite(ledPinArray[i], LOW);
  }
}

void powerOnLed(int ledIndex)
{
  for (i = 0; i < ARRAY_SIZE; i++) {
    if (i == ledIndex) {
      digitalWrite(ledPinArray[i], HIGH);
    }
    else {
      digitalWrite(ledPinArray[i], LOW);
    }
  }
}


void setup() {
  // put your setup code here, to run once:
  Serial.begin(9600);
  setLedPinModes();
  int lastSelectedLedIndex = EEPROM.read(LAST_SELECTED_LED_EEPROM_ADDR);
  powerOnLed(lastSelectedLedIndex);
}

void loop() {
  // put your main code here, to run repeatedly:

  if (Serial.available() > 0) {
    int ledIndex = Serial.parseInt();
    if (ledIndex >= 0 && ledIndex < ARRAY_SIZE) {
      powerOnLed(ledIndex);
      // write on the eeprom
      EEPROM.write(LAST_SELECTED_LED_EEPROM_ADDR, ledIndex);
    }
  }
}
Now let’s break down the code step by step so you can understand what I’m talking about.
The code explained – step by step
#include <EEPROM.h>

#define LED_1_PIN 9
#define LED_2_PIN 10
#define LED_3_PIN 11
#define LED_4_PIN 12

#define ARRAY_SIZE 4
#define LAST_SELECTED_LED_EEPROM_ADDR 10

int ledPinArray[4] = { LED_1_PIN, LED_2_PIN, LED_3_PIN, LED_4_PIN };
First we include the EEPROM library and define some names for the pins used for all the hardware components. This is a good practice that I encourage you to follow from now on (if you’re not already doing that).
We declare an array for the 4 LEDs so we can easily manage them later.
int i;

void setLedPinModes()
{
  for (i = 0 ; i < ARRAY_SIZE ; i++) {
    pinMode(ledPinArray[i], OUTPUT);
  }
}

void setInitialLedStates()
{
  for (i = 0 ; i < ARRAY_SIZE ; i++) {
    digitalWrite(ledPinArray[i], LOW);
  }
}

void powerOnLed(int ledIndex)
{
  for (i = 0; i < ARRAY_SIZE; i++) {
    if (i == ledIndex) {
      digitalWrite(ledPinArray[i], HIGH);
    }
    else {
      digitalWrite(ledPinArray[i], LOW);
    }
  }
}
We write some functions to make the code clearer.
The setLedPinModes() function will be used to set the mode (output for LEDs) in the setup() function.
The setInitialLedStates() function will power off all LEDs.
The powerOnLed() function takes one parameter: the LED index in the array we previously declared. It will power on the chosen LED and power off all the other LEDs.
void setup() {
  // put your setup code here, to run once:
  Serial.begin(9600);
  setLedPinModes();
  int lastSelectedLedIndex = EEPROM.read(LAST_SELECTED_LED_EEPROM_ADDR);
  powerOnLed(lastSelectedLedIndex);
}
Here we initialize the Serial communication and set all LED pins to output.
Then, we read from the EEPROM memory to find which LED was last chosen by the user. Once we know what LED it was, we can now power it on.
void loop() {
  // put your main code here, to run repeatedly:

  if (Serial.available() > 0) {
    int ledIndex = Serial.parseInt();
    if (ledIndex >= 0 && ledIndex < ARRAY_SIZE) {
      powerOnLed(ledIndex);
      // write on the eeprom
      EEPROM.write(LAST_SELECTED_LED_EEPROM_ADDR, ledIndex);
    }
  }
}
We do only one thing in the loop() function: we wait for a user input.
When the user sends a number, we power on the LED that corresponds to the given index, and save this index in the EEPROM memory. This way, we can then retrieve this value on next boot, and that’s precisely what we’re doing inside the setup() function.
How to add more safety for the EEPROM memory
Important note: previously I said not to write to EEPROM inside an infinite loop. The loop() function is infinite, so why am I doing that ?
Well, we are waiting for a user input, and the block of code where we use EEPROM.write() will only be called when the user sends something. So we can consider it much safer for the memory.
It’s very unlikely that the user will send 100 000 values in a very short amount of time. But you can’t always trust what the user will do. An improvement here could be to add a minimum interval of time between 2 write operations, for example half a second. That way, even if the user sends thousands of values, the EEPROM memory will be preserved.
You can also use the EEPROM.update() function instead of EEPROM.write(). This will first read the current stored value and check if it’s different from what you want to write. If the value is different, it will be written. If not, then nothing is written and you just saved one write cycle. Note that this takes more time, as there is more computation involved, so it’s not always a good idea.
Your turn
Using the EEPROM memory with Arduino will allow you to build more complex applications. You can save some default settings or user preferences to start with when you reboot your Arduino.
This could also be a position, for example if you are building a lawn mower. The position could be the last coordinates (x,y) before the robot shut down. Then, when the lawn mower boots, it will go back to those coordinates and continue to work from there.
There are thousands of use case where EEPROM memory is useful.
To go further, you can start looking at how to store bigger numbers with a different data type, such as :
