In this tutorial I will show you how to control your Arduino board using only JavaScript (with Node.js) and the Johnny-Five npm library.
The Johnny-five library will communicate with your Arduino board using the Firmata protocol.
It’s a great way to quickly write code for your Arduino directly from your computer, and integrate it with your other JavaScript applications and libraries.
Alright, let’s get started!
Table of Contents
Setup your Arduino board with StandardFirmata
First you need to upload the StandardFirmata program on Arduino. This is the only step you’ll do on your Arduino board for this tutorial.
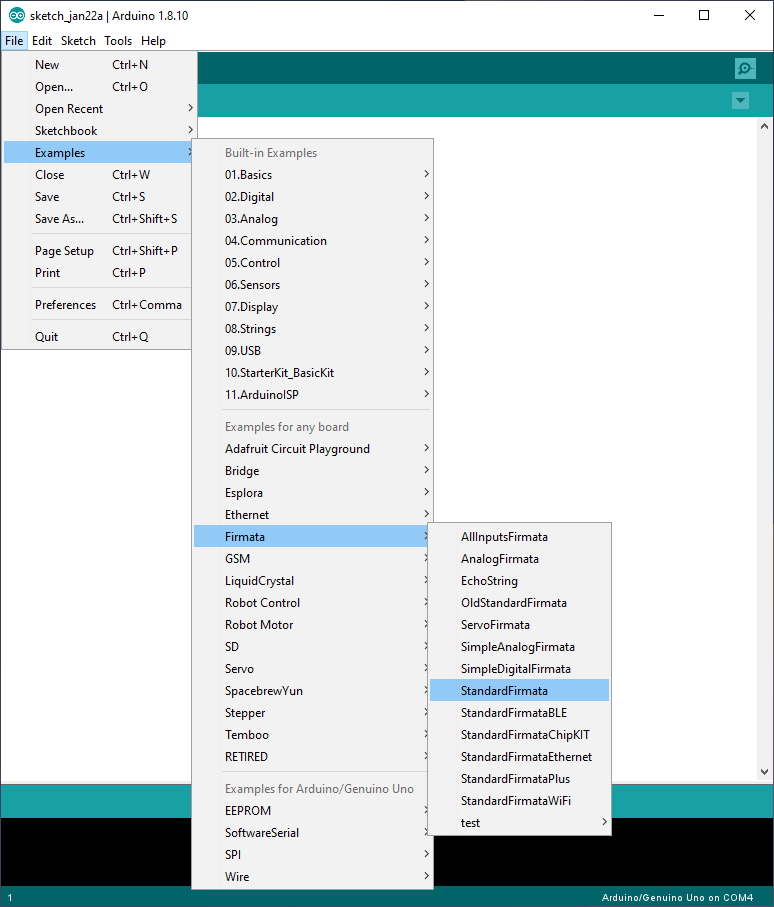
Plug your Arduino board to your computer. Open the Arduino IDE. Make sure you see the Arduino port in “Tools” > “Port”. Then select the StandardFirmata code from “Examples” > “StandardFirmata”.
You are learning how to use Arduino to build your own projects?
Check out Arduino For Beginners and learn step by step.
Click on “upload”. That’s it!
(Check out this StandardFirmata tutorial if you want to know more about Firmata on Arduino.)
Setup Node.js and the Johnny-Five library with npm
The next step is to install the Johnny-Five library.
First make sure you have Node.js and npm running on your computer.
To simply install and use the latest LTS Node.js and npm versions (through nvm):
$ curl -o- https://raw.githubusercontent.com/creationix/nvm/v0.34.0/install.sh | bash

# !!! After this command, open a new terminal/window !!!

$ nvm install lts/*
Then you can check which versions are installed with node --version and npm --version.
Now install Johnny-Five with npm.
$ npm install johnny-five
You can see which version was installed with npm view johnny-five version.
Control your Arduino with JavaScript (Node.js) and Johnny-Five
As a first example, and to get something running quickly, let’s build the famous Blink LED example.
Create a file (for example “blink_led.js”) and write this code.
let five = require("johnny-five");
let board = new five.Board();

board.on("ready",() => {
  let led = new five.Led(9);
  led.blink(500);
});
Make sure your Arduino board is plugged to your computer with a USB cable.
Execute the script with node blink_led.js. You should see the built-in LED blink every 0.5 second! To stop the execution, press CTRL+C twice.
Note: it can take a few seconds for the connection to be established. You’ll see a log message when the communication is initiated.
Let’s now break the code line by line.
let five = require("johnny-five");
First you include the Johnny-Five library.
let board = new five.Board();
This line automatically finds your Arduino board and starts a connection. Quite magic right?
It’s very convenient, but if you want to specify the port yourself (for example you have multiple boards connected to your computer), then you can use new five.Board({ port:"YOUR_PORT_HERE" }). You can easily find the port: it’s the name you see inside the Arduino IDE, under “Tools” > “Port”.
board.on("ready", () => {
This block of code will be executed as soon as the connection with the Arduino board is made. That’s where you can run the code you would write inside void setup() and void loop() in a typical Arduino program.
  let led = new five.Led(13);
  led.blink(500);
});
Johnny-Five contains many useful objects you can use for almost all standard components. Here, instead of specifying you want to use a digital pin and set it to OUTPUT mode, you can simply create a Led object with the pin number. The JavaScript library will know what to do and handle everything under the hood using Firmata.
The blink(duration) method is pretty straightforward: blink(500) will blink the LED every 500 ms.
Application example using Johnny-Five and Firmata on Arduino
Let’s create something a little bit more complex. We’ll use a breadboard and some common hardware components here: 1 push button and 4 LEDs.
The goal is to check when the button is released. When it happens we want to power on one LED, while powering off the previous LED. Each time we release the button we switch to the next LED. When the last LED is reached we go back to the first LED. This will make a LED rotation.
This application is the same as the one we used in the pyFirmata tutorial, which allows you to control your Arduino with Python and Firmata.
Hardware setup

How to build this circuit:
- Use a 220Ohm resistor between the longer leg of each LED and the associated pin (9, 10, 11, 12). Connect the shorter leg to the ground.
- Use a 10kOhm resistor between one leg of the button and the ground. Connect another leg to pin 5, and another one to 5V.
Make sure you’ve correctly connected all the grounds before you power on your Arduino board (more info on Arduino Uno pinout), by plugging it to your computer.
The Arduino JavaScript code
let five = require("johnny-five");
let board = new five.Board();

// Communication successful
board.on("ready", () => {

  // Create bunch of useful variables
  let button = new five.Button(5);
  let led1 = new five.Led(9);
  let led2 = new five.Led(10);
  let led3 = new five.Led(11);
  let led4 = new five.Led(12);

  let leds = [led1, led2, led3, led4];
  let ledIndex = 0;

  // Setup Leds
  leds.forEach(led => led.off());

  // When button is released
  // Power off current Led and
  // Power on next Led
  button.on("release", () => {
    console.log("Button released");
    leds[ledIndex].off();
    ledIndex++;
    if (ledIndex >= leds.length) {
      ledIndex = 0;
    }
    leds[ledIndex].on();
  });
});
Run it and press+release the push button after the communication is setup. You’ll see the second LED powered on. Press and release again to change the powered on LED, and so on.
Code explanation
Let’s break down this code step by step.
let five = require("johnny-five");
let board = new five.Board();

// Communication successful
board.on("ready", () => {
As we already did before, we import the Johnny-Five library, and start the communication with Arduino. Once done, we execute the code inside this block.
  // Create bunch of useful variables
  let button = new five.Button(5);
  let led1 = new five.Led(9);
  let led2 = new five.Led(10);
  let led3 = new five.Led(11);
  let led4 = new five.Led(12);

  let leds = [led1, led2, led3, led4];
  let ledIndex = 0;
So now we have 4 LEDs and 1 button to create. For the button, you can use the Johnny-Five Button class, with the pin number as a parameter. It will automatically set this pin mode as INPUT.
We also create a LED array containing all 4 LEDs, and create a LED index variable to keep track of which LED was powered on last.
  // Setup Leds
  leds.forEach(led => led.off());
The first action we do is to power off all LEDs. With the LEDs array it becomes very easy.
If you want to compare this code to the “typical” code inside an Arduino program, well all the actions until now is what you’d have done in the void setup() Arduino function, and all the following actions would go inside the void loop() function.
  // When button is released
  // Power off current Led and
  // Power on next Led
  button.on("release", () => {
    console.log("Button released");
In order to know when the button is released, we can just wait for the “released” event triggered by Johnny-Five. No need to manually check the button’s state.
    leds[ledIndex].off();
    ledIndex++;
    if (ledIndex >= leds.length) {
      ledIndex = 0;
    }
    leds[ledIndex].on();
  });
});
What we do here is to power off current Led, switch to the next Led, and power it on.
Going further with Johnny-Five and Arduino
There is much, much more stuff you can do with Johnny-Five and the StandardFirmata sketch on Arduino.
You can actuate many components, read data from many sensors, and even use protocols such as I2C to make your Arduino board communicate with other small devices.
You can find the complete Johnny-Five API for all available components here on the library website. Just a quick note: you’ll see they use var everywhere to create variables. Please don’t do that and use let instead, it will save you some hair loss in the future.
Here I’ll show you 2 more small code examples.
Analog output
Let’s use a single LED, attached to a pin compatible with analog output (for example: pin 9, 10, 11 on Arduino Uno).
let five = require("johnny-five");
let board = new five.Board();

board.on("ready", () => {
  let led = new five.Led(11);
  led.pulse(500);
});
This code is really similar to the Blink LED example. Instead, we use the pulse(duration) function from Johnny-Five. This will change the brightness from 0% to 100% in 500ms, then from 100% to 0% in 500ms, an so on.
If you want to give one specific brightness value to the LED, you can use the brightness(value) function, with value between 0 and 255: for example led.brightness(128);.
Analog input
If you add a potentiometer you can also use Johnny-Five to get the analog value from the attached pin. Let’s write an example with analog pin A0.
let five = require("johnny-five");
let board = new five.Board();

board.on("ready", () => {
  let potentiometer = new five.Sensor("A0");

  potentiometer.on("change", () => {
    console.log(potentiometer.value);
    console.log(potentiometer.scaleTo(0, 255));
    console.log(potentiometer.fscaleTo(0,1));
    console.log("---");
  });
});
Here you can create a Sensor(pin) object. The Johnny-Five Sensor class is used to read analog sensors.
The value you’ll get – with the “value” property – is a number between 0 and 1023. This is the raw data from Arduino. You can use methods like scaleTo(min int, max int) or fscaleTo(min float, max float) to change the range of the read value.
In this code example, first we print the raw value. Then we print an int value between 0 and 255. And finally a float value between 0 and 1, quite useful to get a percentage.
If you want to practice more from there, you can combine the 2 previous examples together: change the brightness of the LED depending on the potentiometer value. You can see here that scaleTo(0, 255) will become quite useful.
Conclusion: save time with Arduino and JavaScript
In this tutorial you have seen how to run Arduino programs directly from your computer with the Johnny-Five JavaScript library, using the Firmata protocol.
This setup can save you a lot of time if you want to test programs quickly. You don’t need to write any code on Arduino and you don’t need to handle the Serial communication between your computer and the board. Also, Johnny-Five brings a lot of useful abstractions which will reduce your code even more.
However, note that if your application requires advanced Arduino programming, or high performances, you might become limited with Johnny-Five and Firmata. You’ll see as you make progress!