Have you ever wanted to control your Arduino board from a Raspberry Pi (or your computer), using only Python and not the Arduino language? Here comes pyFirmata, a Python library based on the Firmata protocol.
In this tutorial I’ll show you how to setup pyFirmata and write complete programs using real hardware.
You’ll need:
- An Arduino board.
- Computer with Arduino IDE.
- USB cable for Arduino.
- Raspberry Pi 4 (will also work with 3B, 3B+) using Raspbian or Ubuntu.
Even if the tutorial is for Arduino with Raspberry Pi, it will also work without a Raspberry Pi, if you just want to use your computer directly with Arduino. In this case, you can use pyFirmata from Windows, Linux, or MacOS.
Table of Contents
Step 1: Run StandardFirmata on your Arduino board
First you have to configure your Arduino. This is really a quick step.
Plug your Arduino to your computer with the USB cable, launch the Arduino IDE, and upload the StandardFirmata sketch to your board.
You are learning how to use the combo Raspberry Pi + Arduino to build your own projects?
Check out Raspberry Pi and Arduino and learn step by step.
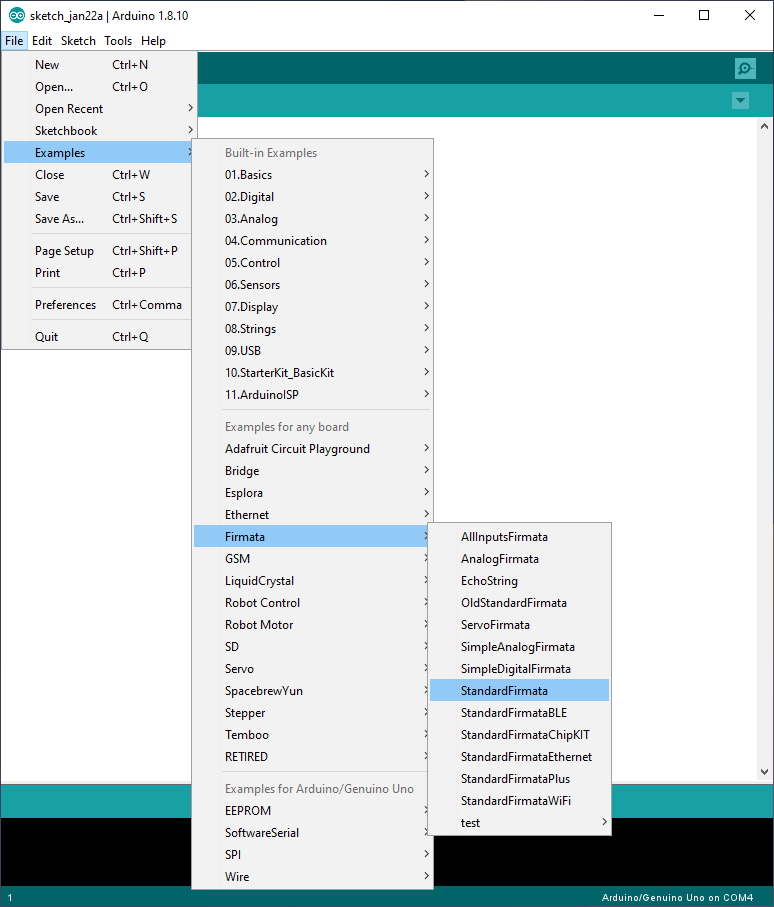
Make sure your Arduino board is selected in “Tools” > “Port”.
(Check out this StandardFirmata tutorial if you want to know more about Firmata on Arduino.)
Now that the program is uploaded, you can remove the USB cable and disconnect your Arduino.
Step 2: Setup pyFirmata on your Raspberry Pi (or computer)
Install pyFirmata from pip
From your computer, connect to your Raspberry Pi via ssh (or any other way you want).
Execute this command on a terminal inside your Pi.
$ pip3 install pyfirmata
If you’re using your computer instead of your Pi, the command is the same. Make sure you have installed pip3.
Setup hardware permission for Serial
Behind the hood, pyFirmata will start a Serial communication with Arduino (when you install pyFirmata via pip, you can see that pySerial is also installed as a dependency). So, you need to have the hardware permission to use Serial on your Raspberry Pi (or computer).
$ sudo adduser $USER dialout
After you’ve executed this command, you have to logout/login (or restart).
Then, to see if the permission was successfully set, run groups in a terminal. If you see “dialout” in the list, it worked.
Find the Arduino board on your Raspberry Pi
In order to use pyFirmata you’ll need to know the name of the USB port used by Arduino.
This is not a problem if you’re using only your computer. The Arduino port will simply be the port you selected inside the Arduino IDE.
But if you upload the Arduino code on your computer, and then plug your Arduino to your Raspberry Pi, then the port’s name is likely to be different.
However, that’s not really a problem, the port is pretty easy to find.
Run ls /dev/tty* in a terminal with your Arduino board unplugged. You’ll see a quite long list of device names. Now, plug your Arduino board and run ls /dev/tty* again. You can quickly compare the list and see that there is one more device: this is the Arduino device name!
Hint: the name if often something like “/dev/ttyACM0”, “/dev/ttyACM1”, “/dev/ttyUSB0”. For a quick search, just write ls /dev/ttyACM and press TAB to see if a name is auto completed. If yes, you have your port.
Step 3: Control your Arduino with pyFirmata
Now everything is configured and ready to work.
Plug your Arduino directly to your Raspberry Pi board, using the USB cable. Your hardware setup will be something like: computer -> ssh -> Raspberry Pi -> USB cable -> Arduino. If you’re not using a Raspberry Pi board, you’ll simply have: computer -> USB cable -> Arduino.
From now on, when I write something like “on your Raspberry Pi”, it means “on your Raspberry Pi via ssh, or on your computer if you’re not using a Pi”.
Write the Python code with pyFirmata
So, on your Raspberry Pi, create a new Python file, and use your favorite text editor (ex: how to use Vim on Raspberry Pi) to write the following code.
#!/usr/bin/env python3

import pyfirmata
import time

if __name__ == '__main__':
    board = pyfirmata.Arduino('YOUR_PORT_HERE')
    print("Communication Successfully started")

    while True:
        board.digital[13].write(1)
        time.sleep(1)
        board.digital[13].write(0)
        time.sleep(1)
This program will have the exact same behavior as the Arduino Blink LED example.
Let’s break the code line by line.
#!/usr/bin/env python3

import pyfirmata
import time
First we import the pyfirmata module.
if __name__ == '__main__':
    board = pyfirmata.Arduino('YOUR_PORT_HERE')
    print("Communication Successfully started")
When starting the execution of the program, we try to connect to the Arduino board. Don’t forget to replace ‘YOUR_PORT_HERE’ with the Arduino USB port connected to your Pi, for example ‘/dev/ttyACM0’.
The pyfirmata.Arduino(device_name) constructor returns an object that you will use to perform all Arduino operations. Here we name this object “board”.
    while True:
        board.digital[13].write(1)
        time.sleep(1)
        board.digital[13].write(0)
        time.sleep(1)
This infinite loop will behave just as the void loop() function in Arduino.
You can access digital pins directly from the pyFirmata Arduino object .
board.digital[13].write(1) will give the following command: set digital pin number 13 to HIGH.
And with board.digital[13].write(0), you can set digital pin 13 to LOW.
Test your pyFirmata program
Save and exit your file.
Make it executable and run it (don’t forget to plug your Arduino to your Raspberry Pi with the USB cable!).
$ chmod +x blink_led.py
$ python3 blink_led.py
Communication Successfully started
It can take a few seconds for pyFirmata to initiate the communication with your Arduino board. Once done, you’ll see the success log appear.
Now look at your Arduino board and see the built-in LED blink every second!
Alright, you have successfully created your first pyFirmata program. Now let’s add some real hardware to your Arduino and see how we can have a human interaction with the program.
Push button – LEDs interaction with pyFirmata
In this application we have one push button and 4 LEDs.
Here’s the goal we want to achieve:
- Trigger an action when the button is released.
- The action is to power off current LED and power on next LED, as to make a rotation with all LEDs.
This application is the same as the one we used in the JavaScript Firmata tutorial, which allows you to control your Arduino with JavaScript, from your computer or Raspberry Pi.
Hardware setup

Quick steps to build this circuit:
- Power off any device.
- Make a common ground between the Arduino board and all components: LEDs (shorter leg) + the push button (add a 10kOhm resistor for the button).
- Add 220Ohm resistors to the longer leg of each LED and connect each LED to a different pin: 9, 10, 11, 12.
- Connect one leg of the button to the 5V pin on Arduino, and one other leg to pin 5.
- Finally connect the Arduino and Raspberry Pi using a USB cable.
- Only then you can power on your Raspberry Pi. It will also power on the Arduino and the circuit on the breadboard.
Application code
#!/usr/bin/env python3

import pyfirmata
import time

if __name__ == '__main__':
    # Initiate communication with Arduino
    board = pyfirmata.Arduino('YOUR_PORT_HERE')
    print("Communication Successfully started")

    # Create bunch of useful variables
    button = board.digital[5]
    LED1 = board.digital[9]
    LED2 = board.digital[10]
    LED3 = board.digital[11]
    LED4 = board.digital[12]

    LEDs = [LED1, LED2, LED3, LED4]
    LED_index = 0
    previous_button_state = 0

    # Start iterator to receive input data
    it = pyfirmata.util.Iterator(board)
    it.start()

    # Setup LEDs and button
    button.mode = pyfirmata.INPUT

    for LED in LEDs:
        LED.write(0)

    # The "void loop()"
    while True:
        # We run the loop at 100Hz
        time.sleep(0.01)

        # Get button current state
        button_state = button.read()

        # Check if button has been released
        if button_state != previous_button_state:
            if button_state == 0:
                print("Button released")

                # Power off current LED
                # and power on next LED
                LEDs[LED_index].write(0)
                LED_index += 1
                if LED_index >= len(LEDs):
                    LED_index = 0
                LEDs[LED_index].write(1)

        # Save current button state as previous
        # for the next loop iteration
        previous_button_state = button_state
Make the file executable (chmod +x) and run the Python script.
Once the communication is started, press and release the button. You should see one LED (actually the second LED) be powered on. Then, press and release again. The LED will be powered off, and the next one will be powered on. You can continue like that an infinite number of times.
Breaking down the code
Let’s break down this code step by step.
#!/usr/bin/env python3

import pyfirmata
import time

if __name__ == '__main__':
    # Initiate communication with Arduino
    board = pyfirmata.Arduino('YOUR_PORT_HERE')
    print("Communication Successfully started")
As for the previous example, we import pyFirmata, start the communication with Arduino, and print a success message.
    # Create bunch of useful variables
    button = board.digital[5]
    LED1 = board.digital[9]
    LED2 = board.digital[10]
    LED3 = board.digital[11]
    LED4 = board.digital[12]

    LEDs = [LED1, LED2, LED3, LED4]
    LED_index = 0
    previous_button_state = 0
We create variables here so as to simplify the rest of the code. Basically we’ll only have to deal with LEDs through the LEDs[] array and the LED index variable. We also create a variable to keep the button’s state between 2 read operations, so we can know when the button is pressed + released.
    # Start iterator to receive input data
    it = pyfirmata.util.Iterator(board)
    it.start()
In order to get Arduino inputs with pyFirmata, you need to create and start a pyFirmata iterator with those 2 lines. This will handle updates from Arduino in a different thread.
    # Setup LEDs and button
    button.mode = pyfirmata.INPUT

    for LED in LEDs:
        LED.write(0)
By default, pyFirmata will consider that you want to use pins as OUTPUT pins. As we want to get the button’s state, we need to configure it as INPUT.
Also, we power off all LEDs, to set the (arbitrary) initial state. Note how it’s easy with the LEDs[] array.
    # The "void loop()"
    while True:
        # We run the loop at 100Hz
        time.sleep(0.01)

        # Get button current state
        button_state = button.read()

        # Check if button has been released
        if button_state != previous_button_state:
            if button_state == 0:
                print("Button released")
We now enter what’s similar to the void loop() function in Arduino.
Between each loop iteration, we make the program sleep for a certain amount of time. If we don’t add a pause here, the program will run as fast as possible and use one full CPU. That’s something you want to avoid.
So, in this case the program will run at approximately 100Hz. Note that to get a better precision, we should use something as a rate or a timer, but let’s keep things simple here to focus on pyFirmata.
The first thing we do in the loop is to get the button’s state with the read() function from pyFirmata. This function will return 0 for LOW (not pressed) and 1 for HIGH (pressed).
To know if the button was released, 2 things must be true: the button’s state is different from the previous state, and the new state is LOW (which means the last state was HIGH).
                # Power off current LED
                # and power on next LED
                LEDs[LED_index].write(0)
                LED_index += 1
                if LED_index >= len(LEDs):
                    LED_index = 0
                LEDs[LED_index].write(1)
When the button is pressed, we then power off the current LED (the one which was previously powered on) with the pyFirmata write() function. We increase the index by 1 to get to the next LED in the LEDs[] array, and we power on this LED.
        # Save current button state as previous
        # for the next loop iteration
        previous_button_state = button_state
Finally we save the button’s state for the next loop iteration. Pay attention to the indentation, so this code doesn’t get executed in a wrong place!
(Note: as a simplification we didn’t manage the hardware bounce of the push button so as to simplify the code and focus on pyFirmata.)
Going further with pyFirmata
pyFirmata is not only about reading and writing on digital pins. You can find a more detailed reference documentation here, or directly check out the code on GitHub (open source).
Here I’ll show you 2 more things you can do with pyFirmata.
Analog output
Let’s keep the same hardware setup as before. In fact, for this you only need one LED, connected to a pin which is compatible for analog output (check out Arduino Uno pinout to know more about that).
#!/usr/bin/env python3

import pyfirmata
import time

if __name__ == '__main__':
    board = pyfirmata.Arduino('YOUR_PORT_HERE')
    print("Communication Successfully started")

    LED = board.digital[9]
    LED.mode = pyfirmata.PWM

    pwm_counter = 0.01
    increase_pwm = True

    while True:
        if increase_pwm:
            pwm_counter += 0.01
            if pwm_counter >= 1:
                increase_pwm = False
        else:
            pwm_counter -= 0.01
            if pwm_counter <= 0:
                increase_pwm = True
        LED.write(pwm_counter)
        time.sleep(0.01)
The code is similar to what you’ve seen before, with some small differences.
We setup the pin 9 with pyfirmata.PWM, so it’s not a simple OUTPUT pin anymore (default value).
Then, instead of writing 0 or 1, we can write any float value between 0 and 1. We start at 0, then 0.01, 0.02, up until 1, and then we decrease the counter to get to 0. And so on.
When you run this code, you should see the brightness of the LED change over time.
Analog Input
Let’s read a value from a potentiometer.
#!/usr/bin/env python3

import pyfirmata
import time

if __name__ == '__main__':
    board = pyfirmata.Arduino('YOUR_PORT_HERE')
    print("Communication Successfully started")

    it = pyfirmata.util.Iterator(board)
    it.start()

    potentiometer = board.analog[0]
    potentiometer.enable_reporting()

    while True:
        print(potentiometer.read())
        time.sleep(0.1)
We start the pyFirmata iterator to be able to read value from Arduino.
Then we get the potentiometer pin but this time using board.analog[pin_number]. To be able to receive analog data, we also need to call enable_reporting() on the pin as an additional step.
Then, we simply print the value of the potentiometer at 10Hz. The read value is a float number between 0 and 1.
That’s it!
To practice, you can combine the 2 analog examples together. Get an analog value from the potentiometer, and give it to the LED, so when you turn the potentiometer, the LED brightness changes accordingly.
Conclusion
In this tutorial you have seen how to use pyFirmata to control an Arduino board from a Raspberry Pi board (or directly from your computer).
pyFirmata makes it easy for you to write complete Arduino applications in Python. Your Python code can also interact with any other library you have on your Raspberry Pi. It’s great because you don’t have to have 2 programs (1 for Raspberry Pi and 1 for Arduino), you can just write everything in one program, while pyFirmata takes care of the rest.
However, note that if you need high performances, or complex Arduino functionalities, pyFirmata will be limited and you’ll have to find another way. But for most basic and intermediate applications, it will save you a lot of time.
Also, a question you may have is: do you need both Arduino and Raspberry Pi for your application? Or just Raspberry Pi? Or just Arduino? Check out when to use Arduino vs Raspberry Pi to find some answers.