This is the first post [1/4] of a post series on how to create a ROS driver package.
So, you have a piece of hardware, you wrote a driver for it, and now you want to interface it with ROS, in order to control it from the rest of your robotics application.
In this post series you’ll see how to organize your driver inside a ROS driver package, with a ROS wrapper. (This guide also applies to any library you want to use with ROS, not only hardware drivers.)
I’ll first explain to you what is a ROS wrapper. Then you’ll see how to create one, and at the end I hope you’ll also know why and when you should use a ROS wrapper.
I’ll also provide a complete code example so you can learn how to write a Python and/or a Cpp ROS wrapper for a hardware driver.
Finally, you’ll see how to correctly package and launch your new wrapped driver, with some improvement tips at the end.
You are learning ROS?
Check out ROS For Beginners and learn ROS step by step.
Here are the 4 post of this series:
- What is a ROS wrapper + introduction to the driver we’ll use for the series. (this post)
- Write your own Python ROS wrapper.
- Write your own Cpp ROS wrapper.
- Package and test your ROS driver.
Ready? Let’s get started.
Table of Contents
What is a ROS wrapper?
Before we really get started, let’s make sure we’ll all on the same page.
Wrapping concept in programming
More generally, when we talk about a wrapper class for a library (for any language, not specific to ROS), it means that we create a class around another class (or a function around another function, a module around another module, etc.), in order to add new functionalities or a different interface. I’ll keep using classes for the following.
If you have a class A wrapping a class B, then the client developer will only use the interface provided by class A. Then, class A will be responsible for making the right calls on class B.
ROS wrapper
A ROS wrapper is simply a node that you create on top of a piece of (non-ROS) code, in order to create ROS interfaces for this code.
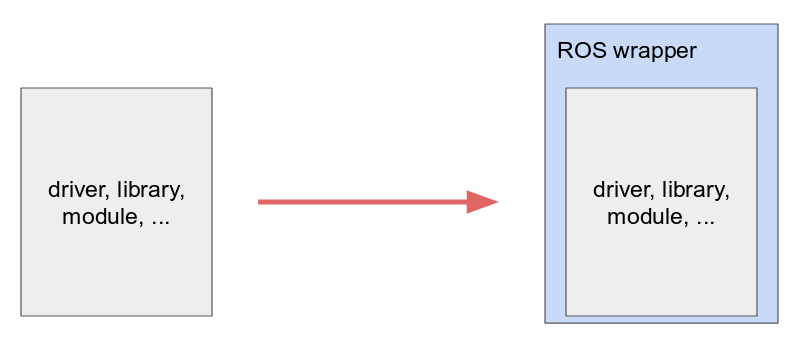
With ROS, creating a wrapper is often done for bringing ROS features to hardware drivers.
To be 100% clear, by driver I mean a piece of code that interacts with some hardware. The driver’s interface allows you to use the hardware without knowing the specifics of the communication (ex: SPI, I2C, Serial, Websockets, …).
Why using a ROS wrapper?
Creating a ROS wrapper has a few big advantages:
- You can easily integrate any driver/library into your ROS stack.
- Anyone knowing how to use ROS will know how to use your driver, without having to learn the driver’s interface.
- If you decide to change some code in the driver later, you can do it without changing the ROS interface, and thus it won’t be the source of breaking changes in other people’s code.
- With the same ROS wrapper interface, you can easily switch between various hardware modules underneath.
Now, let’s see how to actually create your ROS wrapper. First, you’ll need the driver, and then you’ll be able to write the ROS wrapper.
First, write your driver/library with no ROS dependency
The “write your driver/library” part is different and specific for every application. Mostly you’ll be facing 3 situations:
- The hardware comes with a vendor specific driver/SDK.
- Or you found an open source library that works for your purpose.
- Or you developed the driver/library yourself.
What you want to do here is to keep your driver code completely independent from ROS. You may ask: why?
Well, this part has actually nothing to do with ROS. It’s just about writing code to interact with some hardware, or lower-level functions in the case of a pure software library.

ROS is used mostly for organizing parts of your code (into nodes and packages), make them communicate together, and make them work with other people’s nodes. The internal code, which is close to hardware, has nothing to do with ROS in the first place. If you keep it independent – meaning no dependencies to ROS, then it will be easier to:
- Separate the implementation and the interface in your own code.
- Use the driver for another application that doesn’t use ROS.
- Share your work with other developers who don’t know ROS.
Create a ROS wrapper on top of the non-ROS driver
From this point, your driver/library is working, and now you want to use it inside your ROS application, so you can control it from ROS communication tools.
The best way to do that is to create a ROS wrapper around it. Note: the clearer the driver’s interface, the easier it will be for you to create a good ROS wrapper.
Most basic ROS wrapper for your driver
You’ll simply create a ROS node which will setup and manage your driver. Basically the simplest version of your wrapper will look like that:
- Initialize a node.
- Initialize the driver/library.
- Keep the driver running while the node is alive.
- When the node shuts down, cleanly stop the driver.
In fact, it can be quite simple if done right. No need to think this part is difficult: it’s only difficult if you mix all code layers and end up with a giant spaghetti code. Also, once you have understood how to create one ROS wrapper, well, after that it’s always the same thing.
Add ROS features to your driver
You can add ROS parameters, topics, services, actions, and many other ROS features, in order to bring in more functionalities.
For example, you can:
- Get default settings from ROS parameters. When initializing the driver you can pass those settings.
- Use a ROS Service server to call a specific function inside the driver. For example you can wrap a start() and stop() method from a Service.
- Receive data stream and feed them into your driver with a ROS Subscriber.
- Send internal data to the outside with ROS Publishers. For example, if your hardware is a simple temperature sensor, you may create a “/temperature” topic. The ROS wrapper will get data from the driver, and publish it on this topic.
With this implementation, you can control your driver from the outside, just by knowing ROS basics and how to use ROS communication tools.
Now let’s get to the code implementation!
Code example for writing your own ROS wrapper
This first tutorial was mostly useful so you get a good overview of the concepts around creating a ROS driver package. Now it’s time to practice, and dive into the code!
The next 2 posts of the series will teach you how to create a Python wrapper and a Cpp wrapper. The driver we’ll use is a class managing a “fake” speed controlled motor.
In the motor driver class you have those main functions:
- Constructor with max_speed as a parameter.
- set_speed() to give a new speed for the motor to reach.
- stop() to set motor speed to zero and thus stop the motor.
- get_speed() to get current motor speed.
- get_status() to get current temperature and voltage from the motor.
Here is what the ROS wrapper will allow you to do (as a ROS user of this driver):
- Start the motor driver when you start the node, and stop the motor when you shutdown the node.
- Set ROS params to set default settings in the driver constructor.
- Publish on the “speed_command” topic to send speed commands to the motor.
- Send a service request on the “stop_motor” service, to immediately stop the motor.
- Subscribe to the “current_speed” topic to get current speed, and “motor_status” to get motor temperature and voltage.
As you can see, the functionalities are the same when we add the ROS wrapper, but the way to use the driver is totally different.
You can find the following posts here:
- Write a Python ROS wrapper [2/4].
- Write a Cpp ROS wrapper [3/4].
- And finally, you’ll test and package your new ROS driver [4/4].
Note: if you want you can choose to either do the Python wrapper [2/4] or the Cpp wrapper [3/4] tutorial, and then directly go to the packaging & testing post [4/4].
Both Python and Cpp codes are providing the same ROS communications. That’s another powerful advantage of a ROS wrapper: no matter in which language the driver is written, the ROS interface will be the same.