This tutorial is the last post [4/4] of a series on how to create a ROS driver package.
Make sure you have read the introduction [1/4] of this series, as well as either the Python ROS wrapper tutorial [2/4] or the Cpp ROS wrapper tutorial [3/4].
Let’s continue with the creation of your ROS driver package. This is almost the end!
Now that you have understood the concepts, and written a ROS wrapper around your driver (either in Python or Cpp, you don’t need to do both to continue, as they produce the same output), it’s time to package the ROS driver, and test if everything is working correctly.
In this tutorial we’ll start from the Python wrapper or Cpp wrapper you wrote in the previous posts of this series. This post alone doesn’t make any sense if you haven’t at least checked one of those previous tutorials, so I’ll wait you there until you’ve read them.
Alright? Let’s get started!
You are learning ROS?
Check out ROS For Beginners and learn ROS step by step.
Table of Contents
Organizing your driver package
Well, it’s great to have a driver and a ROS wrapper, but don’t forget that you also need to create a ROS package to keep them organized.
This ROS package will be your driver package. The main node of the driver package will be the ROS wrapper, which will itself use the driver code.
It’s best to separate your driver code from your ROS wrapper code. Each one in its own file.
Tip: if you develop both the driver and the wrapper, you can put them together in the same package (as we’ll do here). However, if you use an independent driver, your package will only contain the ROS wrapper and a dependency to the driver.
Also, keep your driver package only for your driver. Anything else in your application that is not related to your driver – or the ROS wrapper around it – should be in another package.
Python driver package
If you just did the Cpp implementation, go ahead and skip this part.
Here is a basic package organization for the Python driver package.
my_robot_driver/
├── CMakeLists.txt
├── package.xml
├── scripts
    └── motor_driver.py
    └── motor_ros_wrapper.py
Now, you can do better than that. A good practice is to put your non-ROS code and other libraries in a src/my_robot_driver/ folder inside the package.
my_robot_driver/
├── CMakeLists.txt
├── package.xml
├── setup.py
├── scripts
│   └── motor_ros_wrapper.py
└── src
    └── my_robot_driver
        └── __init__.py
        └── motor_driver.py
A few things you’ll need to change here:
- Change the import line in your motor_ros_wrapper.py file (becomes
from my_robot_driver.motor_driver import MotorDriver). - In the src/my_robot_driver folder/, create an empty __init__.py file.
- Add a setup.py file in your package and write this code into it:
from distutils.core import setup
from catkin_pkg.python_setup import generate_distutils_setup

d = generate_distutils_setup(
    packages=['my_robot_driver'],
    package_dir={'': 'src'}
)

setup(**d)
- In your CMakeLists.txt file, add a new line:
catkin_python_setup(). - Once you’ve done those steps, don’t forget to compile with
catkin_make, and thensource ~/.bashrcto update your environment.
If you are wondering about the previous steps, check out: How to import a Python module from another package (also works for the same package, if Python files are located in another directory from scripts/, which is the case here).
Cpp driver package
If you just did the Python implementation and already read the previous paragraph, go ahead and skip this part.
Here’s a Cpp package basic organization.
my_robot_driver/
├── CMakeLists.txt
├── package.xml
├── include
│   └── my_robot_driver
│       └── motor_driver.hpp
└── src
    └── motor_ros_wrapper.cpp
Your CMakeLists.txt will include those lines:
...

include_directories(
  include
  ${catkin_INCLUDE_DIRS}
)

add_executable(motor_driver src/motor_ros_wrapper)
target_link_libraries(motor_driver ${catkin_LIBRARIES})
If you need a .cpp file for the motor driver, place it in the src/ folder – you can also create a sub-folder to clearly separate the wrapper and driver cpp files. You’ll have to add this .cpp file in the add_executable() of the CMakeLists.txt.
Don’t forget to compile with catkin_make and source ~/.bashrc to update your environment.
In the case where you want to separate even more your wrapper and driver files (put them in different packages), check out how to import a Cpp header from another ROS package.
Testing the ROS wrapper
Now you have:
- One ROS wrapper around your driver code (either in Python or Cpp).
- A package for your driver and wrapper.
It’s time to check if everything is correctly working!
Set ROS parameters
The wrapper node we’ve written tries to get 3 ROS parameters. If it can’t find the parameters, it will set default values by itself.
Let’s create those 3 parameters with the rosparam command line tool. Of course, don’t forget to start roscore in another terminal to start the Parameter Server.
$ rosparam set /motor_driver/max_speed 5
$ rosparam set /motor_driver/publish_current_speed_frequency 15.0
$ rosparam set /motor_driver/publish_motor_status_frequency 3.0
As the parameters should be private to the node “motor_driver”, we have to add a “motor_driver/” prefix to them.
Start the driver node
To start the Python ROS wrapper:
$ rosrun my_robot_driver motor_ros_wrapper.py
[INFO] [1571908257.956039]: Motor driver is now started, ready to get commands.
To start the Cpp ROS wrapper:
$ rosrun my_robot_driver motor_driver
[ INFO] [1571908385.670128701]: Motor driver is now started
Start only one of them, as they are the same node with same functionalities.
Now you can find your node with rosnode list.
$ rosnode list
/motor_driver
/rosout
Note: Even if we have created a wrapper class around the driver class, the node can be called “driver”. In fact, the ROS user of this driver doesn’t care if there is a wrapper or not, they just want to use the driver as a node inside the ROS environment.
From now on, the rest of the tests will be the same whether you launched the Python node or the Cpp node.
Get the current speed and motor status
Let’s use the rostopic command line tool to find if the topics are working correctly.
$ rostopic list
/current_speed
/motor_status
/rosout
/rosout_agg
/speed_command
First good news: topics appear on the graph.
$ rostopic info /current_speed
Type: std_msgs/Int32

Publishers:
 * /motor_driver (http://user-pc:37429/)

Subscribers: None

$ rostopic info /motor_status
Type: diagnostic_msgs/DiagnosticStatus

Publishers:
 * /motor_driver (http://user-pc:37429/)

Subscribers: None
The 2 topics “current_speed” and “motor_status” receive data from the 2 publishers located in the “motor_driver” node.
We have set the publishing frequency of those 2 topics with ROS params. Let’s see if the frequency is correct.
$ rostopic hz /current_speed
subscribed to [/current_speed]
average rate: 14.981
    min: 0.066s max: 0.068s std dev: 0.00050s window: 14
average rate: 14.991
    min: 0.066s max: 0.068s std dev: 0.00046s window: 29

$ rostopic hz /motor_status
subscribed to [/motor_status]
average rate: 2.999
    min: 0.333s max: 0.334s std dev: 0.00053s window: 3
average rate: 3.000
    min: 0.333s max: 0.334s std dev: 0.00055s window: 6
Great! The “current_speed” topic receives data at 15 Hz, and the “motor_status” at 3 Hz.
Now let’s check the values we receive.
$ rostopic echo /current_speed
data: 0
---
data: 0
---
data: 0
---
data: 0
---
data: 0
---
^C
$ rostopic echo /motor_status
level: 0
name: ''
message: ''
hardware_id: ''
values:
  -
    key: "temperature"
    value: "47"
  -
    key: "voltage"
    value: "12"
---
level: 0
name: ''
message: ''
hardware_id: ''
values:
  -
    key: "temperature"
    value: "47"
  -
    key: "voltage"
    value: "12"
---
^C
The current speed is indeed 0, because we haven’t sent any command yet. We can also get the motor temperature and voltage directly with the topic interface.
Send a speed command
Now let’s send a command to the “speed_command” topic.
$ rostopic pub -1 /speed_command std_msgs/Int32 "data: 4"
publishing and latching message for 3.0 seconds
If we listen to the “current_speed” topic again:
$ rostopic echo /current_speed
data: 4
---
data: 4
---
data: 4
---
data: 4
---
One last thing we didn’t test about the ROS params we’ve set earlier: the max_speed setting. Let’s try to send a speed command over this limit and see what happens.
$ rostopic pub -1 /speed_command std_msgs/Int32 "data: 12"
publishing and latching message for 3.0 seconds
$ rostopic echo /current_speed
data: 5
---
data: 5
---
data: 5
---
data: 5
---
Alright, the max_speed setting is working! If we send a speed command greater than this limit, the command will be set to the max allowed value instead.
Stop the motor
Let’s use the “stop_motor” service to stop the motor, with the rosservice command line tool.
First, see if the service exists.
$ rosservice list
/motor_driver/get_loggers
/motor_driver/set_logger_level
/rosout/get_loggers
/rosout/set_logger_level
/stop_motor
Then, send a request.
$ rosservice call /stop_motor "{}"
success: True
message: "Successfully stopped motor."
You can now check the “current_speed” topic again.
$ rostopic echo /current_speed
data: 0
---
data: 0
---
data: 0
---
Success, the motor has stopped!
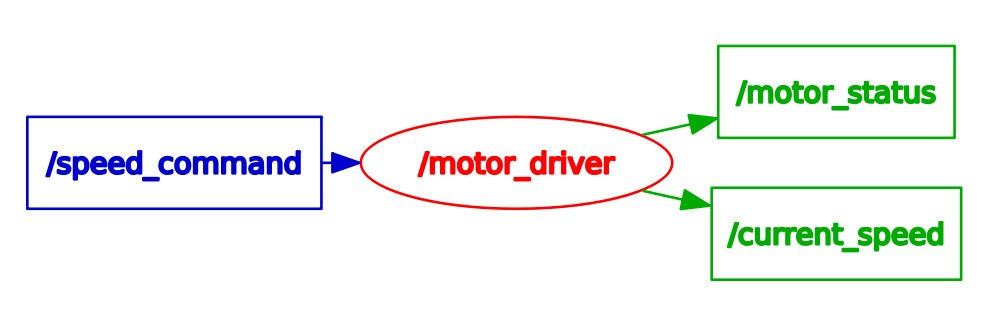
Your driver ROS graph
Here is the final graph of your driver node. You can use rqt_graph to easily visualize what’s going on in your ROS graph.
Create a launch file for your Driver
You now have a clean ROS package and wrapper around your driver. In order to fully launch it, you have to manually start one node, and 3 parameters.
Use a launch file to be able to launch everything with only one command line. It will also make your driver package more scalable.
Write your driver launch file
Here is the launch file you can use for your Python driver:
<launch>
    <node name="motor_driver" pkg="my_robot_driver" type="motor_ros_wrapper.py" output="screen">
        <param name="max_speed" type="int" value="5" />
        <param name="publish_current_speed_frequency" type="double" value="10.0" />
        <param name="publish_motor_status_frequency" type="double" value="2.0" />
    </node>
</launch>
For Cpp, simply change type="motor_ros_wrapper.py" with type="motor_driver". Only the executable name changes.
And then, you just need one command line to launch everything (1 roscore, 3 parameters, 1 node):
$ roslaunch my_robot_driver motor_driver.launch
... logging to /home/user/.ros/log/c4648940-f649-11e9-9850-3ca9f44ca860/roslaunch-user-pc-13400.log
Checking log directory for disk usage. This may take awhile.
Press Ctrl-C to interrupt
Done checking log file disk usage. Usage is <1GB.

started roslaunch server http://user-pc:33203/

SUMMARY
========

PARAMETERS
 * /motor_driver/max_speed: 5
 * /motor_driver/publish_current_speed_frequency: 10.0
 * /motor_driver/publish_motor_status_frequency: 2.0
 * /rosdistro: melodic
 * /rosversion: 1.14.3

NODES
  /
    motor_driver (my_robot_driver/motor_ros_wrapper.py)

auto-starting new master
process[master]: started with pid [13410]
ROS_MASTER_URI=http://localhost:11311

setting /run_id to c4648940-f649-11e9-9850-3ca9f44ca860
process[rosout-1]: started with pid [13422]
started core service [/rosout]
process[motor_driver-2]: started with pid [13428]
[INFO] [1571913230.904346]: Motor driver is now started, ready to get commands.
With this launch file you can go much further than just launch your node and parameters. You can, for example, add a namespace.
Add a namespace and launch multiple driver nodes
Let’s say the driver is for one robot. Now you have an application which requires you to use 2 robots: robot1 and robot2. Well, it’s as simple as launching 2 drivers with 2 namespaces!
<launch>
    <group ns="robot1">
        <!-- put your node and params here -->
    </group>

    <group ns="robot2">
        <!-- put the same node and params here -->
    </group>
</launch>
Now, start this launch file again. You’ll get 2 nodes within 2 different namespaces. All parameters, topics, services relative to one node will be inside the namespace of the node.
$ rosnode list
/robot1/motor_driver
/robot2/motor_driver
/rosout

$ rosparam list
/robot1/motor_driver/max_speed
/robot1/motor_driver/publish_current_speed_frequency
/robot1/motor_driver/publish_motor_status_frequency
/robot2/motor_driver/max_speed
/robot2/motor_driver/publish_current_speed_frequency
/robot2/motor_driver/publish_motor_status_frequency
/rosdistro
/roslaunch/uris/host_user_pc__36273
/rosversion
/run_id

$ rostopic list
/robot1/current_speed
/robot1/motor_status
/robot1/speed_command
/robot2/current_speed
/robot2/motor_status
/robot2/speed_command
/rosout
/rosout_agg

$ rosservice list
/robot1/motor_driver/get_loggers
/robot1/motor_driver/set_logger_level
/robot1/stop_motor
/robot2/motor_driver/get_loggers
/robot2/motor_driver/set_logger_level
/robot2/stop_motor
/rosout/get_loggers
/rosout/set_logger_level
Well, your driver can now benefit from the modularity brought by launch files!
Another example: you have a driver for only one motor, and your robot can work with several motors. In this case, you could create one driver package for one motor, and then use namespaces to launch several driver nodes.
Going further
In this tutorial series you have seen how to:
- Know when to use a ROS wrapper, and what it is.
- Create a ROS wrapper around a driver/library + test it.
- Create and organize your driver package for more scalability and modularity.
- Use launch files to start your new ROS driver.
Now that your Driver package is ready, you might want to know more about how to organize your overall package architecture.
The driver package is just one of them. There are many more in any ROS stack developed for a robot!
Check out those best practices on package organization for a ROS stack.
