What is the best package organization for your ROS stack? How can your better separate your code into different packages?
Although there is no right answer to this question, and everyone is free to do what they think is best, I’ll try to give here some feedback from my own experience. I have analyzed what I’ve worked on and what I’ve seen on other robots, and found some good patterns that I consider being best practices.
In this guide, first you’ll see what you should not do within a package. Then, I’ll show you the different core packages that your application probably needs. And finally, you’ll get an overview of many other packages you can add to your ROS stack, depending on your application.
There are several factors you need to take into account when designing your architecture and organizing your code:
- Maintainability
- Modularity
- Collaboration
- Readability
- Performance
- …
Try to get those factors in mind during this post.
All right, let’s get started!
You are learning ROS?
Check out ROS For Beginners and learn ROS step by step.
Table of Contents
Everything you can add in a package (please don’t)
First of all, here’s everything you can add in a ROS package:
- Python scripts
- Python libraries
- Cpp files
- Cpp libraries
- Launch files
- Config files (YAML or other)
- Msg, Srv, and Action definitions
- Install scripts, bash scripts
- And basically everything else you want: more scripts from different languages, more libraries, …
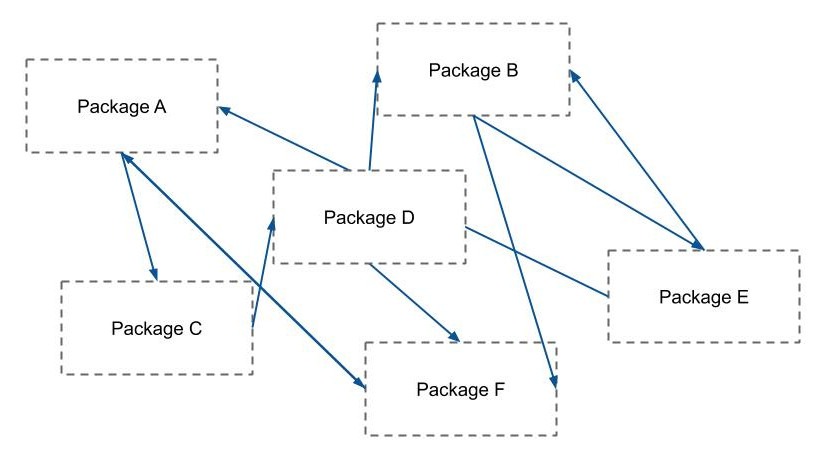
If you put too much stuff in one package, it will quickly become a nightmare.
Also you’ll have too much dependencies on your package, and too many other packages will depend on it. At the end you’re very likely to have cyclic dependencies in your overall application, and if you want to use only a part of your package, well… that will be much harder.
So, you definitely want to avoid this ROS package organization:
Instead, you’d prefer having something like that:

Proposed ROS package organization
Here are a few important rules:
- One package should be one independent unit, with one purpose.
- In your overall architecture you should be able to replace/rewrite a package, without having to break everything else.
- Use the minimum number of dependencies you really need.
- Don’t create circular dependencies (package A depends on package B, and package B depends on package A).
Now, how to name your packages?
Naming a ROS package can be quite complicated if you want to do it right. What I’ve often seen, and that I recommend, is to add the prefix “my_robot_” to all packages designed for your robot. This will clearly make a difference between packages that are specific to your robot, and those who aren’t.
Then, there are several package names that are quite common to see: msgs, bringup, control, driver, description, teleop, slam, …
Let’s see what are the core packages you’ll probably have in your package organization.
Core ROS packages for your ROS stack
The following is a list of packages you will certainly need for your robot. They are common to almost all ROS stacks you can find on the Internet.
Those will bring you a more scalable foundation for your application.
Message definitions package
Let’s get the message definitions first out of the way. If you need to add custom messages/services/actions for your robot, in addition to the already existing ones (std_msgs, control_msgs, std_srvs, …) it’s better to put all of them in a separate package.
Create a package named my_robot_msgs, with no dependencies to rospy or roscpp. You’ll probably need a dependency to std_msgs, and other common _msgs or _srvs packages.
In this package you will create a msg/, a srv/ and an action/ folder. All the message/service/action definitions for your robot will be there. It will make things much simpler when compiling and linking to this package.
You will be able to compile just your messages, and then in all other custom packages you create, you can decide to import this package.
Then, in any other package, don’t create message definitions! Keep the my_robot_msgs package for that purpose.
Bringup package
If you have already programmed with ROS, you have discovered that at one point, you need to create launch files to start your nodes and parameters (when you have too many of them, if you need namespaces, etc).
You may have seen that putting your launch files inside a launch/ folder is a good practice.
Yes, you should do that, but if you have one launch/ folder per package, this will quickly become a mess. One launch file will need to include another launch file from another package, which itself will need a config file or a launch file from another package, and… You’ve just created a dependency mess. Also, maintaining several launch files over several packages may not be easy to do.
That’s why you should put all your launch files for your robot application in the same package: my_robot_bringup. This package will have a launch/ folder, and contain all required dependencies to start the nodes in the launch files.
Also, in this package you can also add a config/ folder. When you have many parameters to launch, you can create a YAML file to keep parameters and load them from your launch file. If both are in the same package, things become easier to manage.
Description package
Many ROS packages are using the URDF of your robot. If you have ever created a ROS stack for a robot, chances are that you are already familiar with URDF.
Also, URDF is very practical for using ROS simulation tools – a must have if you want to save some time when developing.
Here’s what your my_robot_description package will contain:
- urdf/ folder, containing one or multiple xacro files which describe your robot.
- meshes/ folder, containing Collada and/or STL files for visualization and collision.
- An optional launch/ folder, with one launch file just to visualize the URDF in Rviz. This is an exception to the rule “put all your launch files in the bringup package”, but here this launch files has only one purpose, which is to check your URDF correctness. You won’t use it in production.
- An optional rviz/ or config/ folder, to keep Rviz configuration.
Driver package
Of course, robotics without hardware is not really robotics!
For all complete ROS stacks (apart from simulation stacks), you will need to write some code to talk to your hardware. Basically, this means you need to control the motors on your robot, and get feedback from them (position, velocity, status, temperature, etc.).
This package should be the lower level of your architecture – you can still add a dependency to my_robot_msgs.
As for naming this package, I think you’ve guessed: my_robot_driver. Also, it’s not uncommon to see my_robot_hw being used. This is also fairly explicit, as the driver package is used to talk to the hardware.
If you have to write/handle a driver package for your robot, check out this tutorial series on how to create your driver package using a ROS wrapper.
Control package
This package can be used to centralize all control algorithms for your robot. For example you can implement a position or a velocity controller, with a PID to globally control your robot trajectory. You will name this package my_robot_control.
It’s quite close to the driver package but I think it’s best to separate them. The driver package is here to talk to the hardware, that’s it. And then, you can add if you want a control package to focus on the control itself, independently from hardware.
Thus, you can also use the control package with a different hardware, for example if you have different versions of your robot (size, weight, degrees of freedom, …). And you can also use the same control package for both your real robot (through the driver package) or your simulation.
Note that sometimes you might not need such a control package, if your controllers are too basic for example.
Meta package
If you look at some ROS stacks on GitHub, you’ll find that most of them have a simple “my_robot” package, with nothing in it – just a “CMakelists.txt” and a “package.xml” files. Those 2 files have some special tags for meta packages.
Simply put, a meta package will do nothing, but you can use it to easily install your complete ROS stack. It’s similar to virtual packages when installing Debian dependencies.
It’s a good practice to create one, and its name will often be just “my_robot”.
Core packages specific to a robot type
The packages I’ve described above can be created for almost all robots developed with ROS.
Now, there are some packages that are still general, but specific to a type of robot. You won’t have the same core application code for a robotic arm, a mobile robot, a drone, etc.
Here are some packages for some of the most common robot types. The lists are non-exhaustive, this is just a starting point and some ideas you can use when you get started. If you develop a ROS stack for a real robot, then I advise you to look for other similar robots, find some patterns between the different package organizations, and see if some patterns make sense to you for your own robot.
Also, don’t follow this to the letter! Some packages are purely optional and you only need them if you need the underlying functionality.
Mobile robot
- my_robot_navigation: Use the 2D navigation stack for your robot.
- my_robot_slam: SLAM (Simultaneous Localization and Mapping) functionalities, for example using the gmapping ROS package.
- my_robot_teleop: A package to tele-operate a robot from a mouse, joystick, keyboard, …
Robotic arm
- my_robot_moveit_config: If you use Moveit to use motion planning for your robotic arm, then you will have this package. It is automatically generated when you run the Moveit setup assistant.
- my_robot_manipulation: Algorithms specifics to manipulating objects with an end effector – often a gripper – attached to the arm.
- my_robot_kinematics: If you need forward and inverse kinematics for your arm, and if you don’t want to use the default ones provided by ROS and Moveit (ex: KDL), you might want to create your own kinematics package.
Of course there are more types of robots (drones, submarines, boats, spiders, …) , but I’ll keep it there for now.
Some other packages you might add
Here are some other packages that can be quite useful in your ROS package organization. Again, create such packages only if you need them for your application.
Simulation with Gazebo
Gazebo is a great tool for simulating your robot in a real world environment with physical constraints.
If you want to integrate your robot in Gazebo, you will certainly add a my_robot_gazebo package. Inside this package you’ll add specific configuration (and sometimes launch files) related to Gazebo: Gazebo world, objects to add, specific controllers for simulation, etc.
Custom interface
Let’s say you want to provide an interface for other developers to use your robot without having to use ROS topics, services, and actions.
For example you want to create a simple ASCII TCP server, or a serial port interface. A developer can then start your serial-to-ROS node, and send commands directly via serial communication.
In this case you can create packages such as my_robot_ascii_tcp and my_robot_serial.
Independent hardware module
If your application consists of several hardware parts, let’s say your robot, and a vendor specific gripper, or camera, then you might need to create a driver package for this additional hardware.
So, basically the same rules apply here: you’ll create a package for this driver, as you already did for your robot.
But this package needs to be completely independent from your robot package stack, because you could use the same hardware with different robots, and also you could make this new package publicly available (with a permissive open source license) so other developers can use it in their application. It’s important to also give back to the open source community if you use ROS.
So, a few things to consider here:
- When naming the package, don’t use your robot name as a prefix. If the hardware is named qsdqd654, then create a package named qsdqd654_driver, for example.
- Don’t use dependencies from your other robot packages.
- Even better, if you use GitHub/BitBucket/etc, then host the package in its own repository, not on your robot’s repository.
- Create a documentation (at least a README) to explain how to use the ROS interfaces you’ve created.
Then, in the code for your robot, you’ll just have to add a dependency to this package, that’s it!
What your package organization will look like
As a quick resume, in your ROS stack you’ll have this package organization:
- my_robot
- my_robot_bringup
- my_robot_description
- my_robot_msgs
- my_robot_driver
- my_robot_control (optional)
- … and any other package that may be relevant to your robot and your robotics application.
Almost all of your packages will depend on my_robot_msgs (as soon as they need to use a custom message), but the my_robot_msgs will depend on no other my_robot_ package.
The my_robot_bringup will be responsible for getting the URDF from the my_robot_description package, and launch nodes from other packages.
The my_robot_driver won’t depend on any package (just my_robot_msgs).
All other packages you create will maybe depend on my_robot_msgs, and if they need to send commands to, or get data from the hardware, they will depend on my_robot_driver.
As you can see, this overall ROS package organization is completely free of circular dependencies, and I believe it is a good foundation to start with.
Conclusion – Don’t take my word for it
The organization/architecture for ROS packages that I’ve proposed here is simply what I have found is best from my own experience, and I hope that this tutorial will give you some structure to make your ROS project better in several ways.
I want to point that it’s not necessary the best organization, and some persons who are more expert than me in ROS might find some advice here not so appropriate for some use cases.
That’s why I encourage you to read this, process it, and challenge it with what you see in the real world. I’m totally open for discussion if you have some better ideas, prove me I’m wrong on something, or want to discuss a point.