In this tutorial I will show you how to create a web server on your Raspberry Pi using the Flask framework.
We will start with the setup and then see how you can connect some GPIOs with Flask.
Table of Contents
Install – Setup Raspberry Pi OS and Flask
First you’ll need to make sure that you installed Raspberry Pi OS on an SD card, and that you can have access to either the desktop or a terminal using SSH.
>> Here is a video showing you the process to install Raspberry Pi OS.
Once you’ve done that, nothing else to do, as Flask should already be installed by default.
You are learning how to use Raspberry Pi to build your own projects?
Check out Raspberry Pi For Beginners and learn step by step.
If not, you can install it with pip install Flask.
Basic Flask application
If you have desktop access (for example using VNC) on your Raspberry Pi, open Thonny Python IDE or any other text editor you want. If you only have SSH access, you can write code using Nano, Vim, etc.
>> Here is a video version of this tutorial section:
After watching the video, subscribe to the Robotics Back-End Youtube channel so you don’t miss the next tutorials!
Minimal code structure
Here is the minimal code you need to write to start a Flask application.
from flask import Flask

app = Flask(__name__)

app.run(host="0.0.0.0")
What does this code do?
from flask import Flask

app = Flask(__name__)
First you need to import the Python Flask module. The second line is just required to setup Flask. As you can see, you get an “app” variable that you can use later in your program.
app.run(host="0.0.0.0")
This line will start the Flask application. If you run the code you’ll see that the program hangs there. The server is now up. You can stop by pressing CTRL + C.
First URL
The program is working fine, but nothing is happening, and for now there is no URL, or no access point to the server – so it’s pretty useless. Let’s add a URL and see how to use it.
from flask import Flask

app = Flask(__name__)

@app.route("/")
def index():
    return "Hello from Flask"

app.run(host="0.0.0.0")
This is the first URL you will create for most application: “/”. This is usually refered as the index.
For example, if you have a domain named “mydomain.abc”, then when you try to access “”mydomain.abc” or “mydomain.abc/” you’re getting access to the main page, or the index page.
So, we are “attaching” a function to this URL. In this example I just returned a basic string, but you can return some HTML if you want to.
For any new route or URL, you just add @app.route(“/url-path”) followed by a Python function that will return some text/HTML/etc.
Call the Flask server as a client
Now, how to use the Flask server that you created on your Raspberry Pi?
Well, first, start the Python program.
Then, you have different options.
From the Raspberry Pi
On your Raspberry Pi, open a web browser, and type “0.0.0.0:5000”. This is the URL where you can access the server from the same computer.
You should see a very simple white page with “Hello from Flask” written at the top. Success!
Note that the URL contains 2 parts: “0.0.0.0” and “:5000”. The first is the IP address (or domain name if you set one – but we’ll keep things simple here), the second is the port. By default, Flask uses the port 5000, so you have to add “:5000” after the IP address.
For the URL, as you are getting access from the same machine, you can also use 127.0.0.1 IP address which is the loopback IP address. So you’d type “127.0.0.1:5000”.
From another machine in the network
You can also get access to the server hosted on the Pi, from any other machine (phone, laptop, etc) connected to the same network.
To call the server you will need to find what’s the Raspberry Pi IP address. And as you already have access to the Raspberry PI (as you launched a Python program from there), this is super easy. Open a terminal on the Pi, and type hostname -I. In my case I get 192.168.233.76.
Then, all you need to do is to type the IP address followed by “:5000” in a web browser. With my example that would be “192.168.233.76:5000”. And you should get the same result as before.
Great, now you can start a Flask server on your Raspberry Pi and get access to it from any machine on the network!
Change the port
One more thing: by default the port used by Flask is 5000. I would leave it like this, but if you need or want to change it, it’s not difficult.
You just need to add another argument to this line.
app.run(host="0.0.0.0", port=8000)
If you run the app like this, then instead of “:5000” you’ll have to add “:8000” after the IP address.
Note: if you change the port, make sure to use a value that is greater than 1024. Ports below that value are reserved, you could get an error.
Application example: Connect Flask with Raspberry Pi GPIOs
With this basic Flask app, you can already host a web server on your Raspberry Pi. That’s pretty cool, but let’s go one step further. As the Raspberry Pi is close to hardware with the 40 GPIO header, why don’t we try to make a connection between the hardware and the web server?
Circuit
Let’s create a very basic circuit with a push button and 2 wires. First, make sure you power off your Raspberry Pi before you do anything with GPIOs.
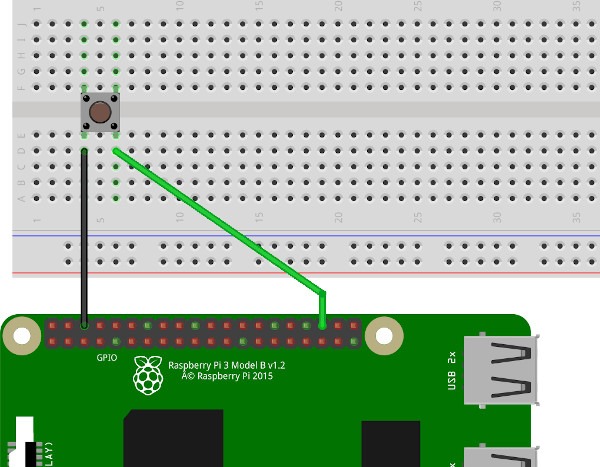
- Place the button in the middle of the breadboard.
- Connect one side of the button to the ground (GND) with a black wire.
- Connect the other side of the button to an available pin (here GPIO 16).
No extra resistor here, we’ll use the internal pull up resistor from the code.
Once the circuit is complete and you’ve double checked everything, you can power on your Raspberry Pi.
Add a URL to monitor a push button
>> Here is a video version of this tutorial section (using an external pull down resistor instead of the internal pull up resistor):
Here is the code to monitor a push button with Flask on your Raspberry Pi.
from flask import Flask
import RPi.GPIO as GPIO

BUTTON_PIN = 16

GPIO.setmode(GPIO.BCM)
GPIO.setup(BUTTON_PIN, GPIO.IN, pull_up_down = GPIO.PUD_UP)
app = Flask(__name__)

@app.route("/")
def index():
    return "Hello from Flask"

@app.route("/push-button")
def check_push_button_state():
    if GPIO.input(BUTTON_PIN) == GPIO.LOW:
        return "Button is pressed"
    else:
        return "Button is not pressed"

app.run(host="0.0.0.0")
Code explained
Let’s break down the code line by line.
from flask import Flask
import RPi.GPIO as GPIO
First we make the imports, for Flask and the GPIO Python module.
BUTTON_PIN = 16
We are using GPIO number 16 for the push button, so we define a variable to store this. That will make it more practical for the following.
GPIO.setmode(GPIO.BCM)
GPIO.setup(BUTTON_PIN, GPIO.IN, pull_up_down = GPIO.PUD_UP)
app = Flask(__name__)
This is now setup time. We choose “GPIO.BCM” mode so that we can use the GPIO number system (if not, pin 16 would be something else).
Then we set the button pin as an INPUT pin, and we also use the internal pull up resistor to set the default signal to HIGH (close to 3.3V). This means that when the button is not pressed, the signal will be HIGH, and when the button is pressed, the signal will be LOW (close to 0V).
And finally we also set Flask up, so now we can get started with the app functionalities.
@app.route("/")
def index():
    return "Hello from Flask"
This is the first URL we have created with the index function, we don’t change it.
@app.route("/push-button")
def check_push_button_state():
    if GPIO.input(BUTTON_PIN) == GPIO.LOW:
        return "Button is pressed"
    else:
        return "Button is not pressed"
We add another URL “/push-button”. The usual way to add spaces between words is to use dashes “-“. Make sure not to use spaces in the URL.
After the URL, we create a function that will return a different string depending on the button’s state. So, whenever you call this URL (as a client), the button pin will be read, and used in the if structure.
app.run(host="0.0.0.0")
Finally we start the application that will now run with 2 routes.
Testing
Open a web browser and type “ip_address:5000/push-button”. You should see the text “Button is not pressed”.
Now press on the push button, and while you’re doing that, refresh the page. You should now see “Button is pressed”.
Going further with Raspberry Pi and Flask
Now that you can create some basic routes and connect GPIOs with Flask, you can start to create a complete application around it.
To go further you could:
- Return some real HTML pages with buttons to interact, etc.
- Create a web API that you can call from a mobile/web app.
- Make your Raspberry Pi available from the internet, so that you can get access to your hardware from anywhere.
- Control more components, such as LEDs, screens, motors, etc.
