In this tutorial I’ll teach you how to use GPIO interrupts on your Raspberry Pi, thanks to the RPi.GPIO library.
You’ll see:
- Why and when you need interrupts.
- How to use interrupts in your programs.
- 3 working examples to practice on different situations.
This tutorial works on Raspberry Pi 4 (and earlier, 3B, 3B+), with Raspbian and Ubuntu Mate.
>> Here is an additional video resource for this tutorial:
After watching the video, subscribe to the Robotics Back-End Youtube channel so you don’t miss the next tutorials!
You are learning how to use Raspberry Pi to build your own projects?
Check out Raspberry Pi For Beginners and learn step by step.
Table of Contents
Why interrupts?
A quick real life analogy
There are two main ways to check input pin states: polling and interrupts.
Here’s the difference through a real life example: imagine you’re waiting for an important email and want to open it as soon as it arrives. You can either:
- Check your emails every 5 minutes, or 1 minutes, or even 10 seconds until you get it.
- Or you can activate a notification bell so you get a popup on your screen as soon as the email arrives.
As you can guess, the second method is much more efficient in this case. When dealing with interrupts, think “notification”. Note that interrupts (notifications) are not the solution to all problems, it really depends on the situation.
Polling example with RPi.GPIO
Let’s now come back to real GPIOs on our Raspberry Pi.
For the beginning of this tutorial we’ll use a simple push button connected to the Raspberry Pi board.
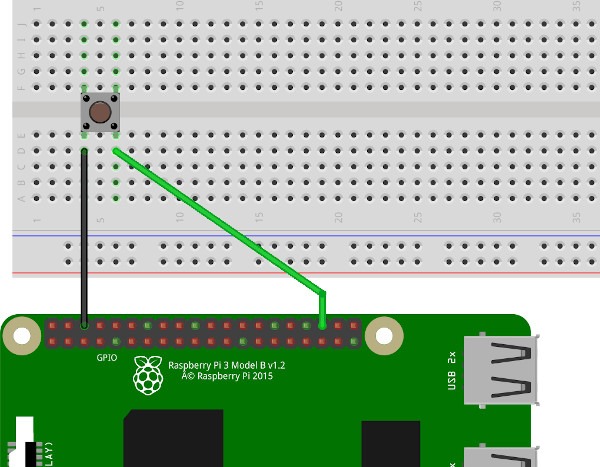
Here’s the hardware setup (if needed: Raspberry Pi pinout guide):
- Make sure all 4 legs of the push button are separated on the breadboard.
- Connect one leg to the ground (GND).
- Connect another leg to GPIO 16 (no need for pull up resistor, there is an internal one that we’ll use in the code).
So, we want to get to know when the user presses the button, by printing something on the screen. Let’s do that with polling first, using Python and the RPi.GPIO module.
#!/usr/bin/env python3

import time
import RPi.GPIO as GPIO

BUTTON_GPIO = 16

if __name__ == '__main__':
    GPIO.setmode(GPIO.BCM)
    GPIO.setup(BUTTON_GPIO, GPIO.IN, pull_up_down=GPIO.PUD_UP)

    pressed = False

    while True:
        # button is pressed when pin is LOW
        if not GPIO.input(BUTTON_GPIO):
            if not pressed:
                print("Button pressed!")
                pressed = True
        # button not pressed (or released)
        else:
            pressed = False
        time.sleep(0.1)
First, we set the pin for the button as input, and activate the pull up resistor (pull_up_down=GPIO.PUD_UP). The default state for the GPIO (when button is not pressed) is HIGH. When the button will be pressed, state will change to LOW.
Then, in a loop we read the button’s state with GPIO.input(). Thanks to the flag “pressed” we only print a message once when the button switches from a released state to a pressed stated.
Now if you run this code and press the button, you will see “Button pressed!” printed on the screen. But here are some of the problems we meet here:
- In this example the polling frequency is 10Hz (every 0.1 second). If you press the button too fast you might miss it. As humans, 0.1 second is quite fast, but for a machine, that’s a loooong duration.
- Even if you know that the button was pressed, you don’t know exactly when. It can be anytime between now and 0.1 second before.
- To reduce the time for both previous points, you could increase the frequency. From 10Hz to 100Hz, or even 1000Hz or 3000Hz. The problem here is that the more you increase the polling frequency, the more your program will use CPU. Using a full CPU just to check on a pin’s state is a little bit overkill. Also, increasing the frequency does not solve the two previous points. If the pin state is changing too fast your program might still miss it, and you still won’t be able to know exactly when the pin was pressed.
The solution here, when you have to deal with such an issue, is to use interrupts.
How Raspberry Pi GPIO interrupts work
Interrupts will be triggered when a signal’s state (LOW/HIGH) changes.

There are 2 kind of interrupts:
- RISING: when the state goes from LOW to HIGH.
- FALLING: when the state goes from HIGH to LOW.
So, basically in your program if you set up a FALLING interrupt, then your program will be notified as soon as the signal goes from HIGH to LOW. No need to poll the signal’s state anymore.
If you’re already familiar with interrupts in Arduino, note that the concept is similar. Check out this Arduino interrupts tutorial for more info. But note that Arduino interrupts are real hardware interrupts, on the Raspberry Pi this is only done by software.
In the rest of this tutorial I’ll show you how to work with Raspberry Pi GPIO interrupts using Python and the RPi.GPIO module.
Interrupts with RPi.GPIO wait_for_edge()
#!/usr/bin/env python3

import RPi.GPIO as GPIO

BUTTON_GPIO = 16

if __name__ == '__main__':
    GPIO.setmode(GPIO.BCM)
    GPIO.setup(BUTTON_GPIO, GPIO.IN, pull_up_down=GPIO.PUD_UP)

    while True:
        GPIO.wait_for_edge(BUTTON_GPIO, GPIO.FALLING)
        print("Button pressed!")
Use the wait_for_edge() function to wait (block) until a GPIO’s state changes. This function takes 2 (+1 optional) arguments:
- channel: here the GPIO number (BCM mode).
- type of interrupt.
- (optional) timeout.
Here for the type of interrupt we used GPIO.FALLING as the button’s state is HIGH by default, due to the internal pull up resistor.
If you want to wait until the button is released, use GPIO.RISING instead.
And there is a third option: if you want to wait until either the button is pressed or released (both RISING and FALLING), use BOTH. In this case you’ll have to read the button’s state to know if the signal is LOW or HIGH.
For example:
    while True:
        GPIO.wait_for_edge(BUTTON_GPIO, GPIO.BOTH)
        if not GPIO.input(BUTTON_GPIO):
            print("Button pressed!")
        else:
            print("Button released!")
Note: for now we haven’t used any debounce mechanism, so you can sometimes get a weird behavior. A button is a physical system that will bounce when you press or release it, so it may seem like you pressed the button multiple times whereas you only did it once.
Interrupts with add_event_detect() and threaded callback
Using wait_for_edge() is nice, but it completely blocks the main thread. You’d have to spawn multiple threads yourself if you want to use this function along with other running code.
There is another function in the RPi.GPIO module which is more practical to use: add_event_detected(), along with a callback function. This is the solution you’ll use most of the time.
Let’s see how this works.
Python code with RPi.GPIO
#!/usr/bin/env python3

import signal
import sys
import RPi.GPIO as GPIO

BUTTON_GPIO = 16

def signal_handler(sig, frame):
    GPIO.cleanup()
    sys.exit(0)

def button_pressed_callback(channel):
    print("Button pressed!")

if __name__ == '__main__':
    GPIO.setmode(GPIO.BCM)
    GPIO.setup(BUTTON_GPIO, GPIO.IN, pull_up_down=GPIO.PUD_UP)

    GPIO.add_event_detect(BUTTON_GPIO, GPIO.FALLING,
            callback=button_pressed_callback, bouncetime=100)

    signal.signal(signal.SIGINT, signal_handler)
    signal.pause()
Let’s break down this code step by step.
Code explained
#!/usr/bin/env python3

import signal
import sys
import RPi.GPIO as GPIO

BUTTON_GPIO = 16
First we add the necessary imports. We’ll use the signal module to be able to handle CTRL+C and make the program pause indefinitely.
def signal_handler(sig, frame):
    GPIO.cleanup()
    sys.exit(0)
This callback will be triggered when the user presses CTRL+C (we’ll setup that below in the main function). That’s an opportunity to do some cleanup before actually exiting the program.
def button_pressed_callback(channel):
    print("Button pressed!")
This is the callback for the add_event_detect() function. When an interrupt with the chosen pin is triggered, this callback will be called. In the callback you get the channel – or GPIO number – as a parameter.
if __name__ == '__main__':
    GPIO.setmode(GPIO.BCM)
    GPIO.setup(BUTTON_GPIO, GPIO.IN, pull_up_down=GPIO.PUD_UP)
Nothing new here, we initialize the button GPIO the same way we did before, with the internal pull up resistor activated.
    GPIO.add_event_detect(BUTTON_GPIO, GPIO.FALLING,
            callback=button_pressed_callback, bouncetime=100)
After you’ve initialized the GPIO mode to input, this is where you can use the add_event_detect() function to register a callback for an interrupt on this GPIO. The function takes a maximum of 4 parameters:
- channel: GPIO number (here because BCM mode).
- type of interrupt: GPIO.FALLING, GPIO.RISING, or GPIO.BOTH.
- (optional) callback: function to be called when an interrupt is triggered. This is optional because you can choose to register a callback with another function –
add_event_callback()(but there’s no point here), or you can just not use a callback at all and see if an interrupt has been triggered withevent_detected()(but you’re going back to polling mode in this case). - (optional) bouncetime, in milliseconds. In case multiple interrupts are triggered in a short amount of time – due to button bounce – the callback will only be called once.
So, with the parameters we gave to it, the add_event_detect() function will trigger button_pressed_callback() as soon as the signal from the button’s GPIO is falling (HIGH to LOW), with a debounce time of 100 milliseconds.
    signal.signal(signal.SIGINT, signal_handler)
    signal.pause()
And finally, here we register the callback for CTRL+C handling, and make the program pause indefinitely with signal.pause() (because if we don’t do that, the main function will exit right away).
Improvement: detect both rising and falling signals
Here’s the code if you want to detect both changes in signal.
#!/usr/bin/env python3

import signal
import sys
import RPi.GPIO as GPIO

BUTTON_GPIO = 16

def signal_handler(sig, frame):
    GPIO.cleanup()
    sys.exit(0)

def button_callback(channel):
    if not GPIO.input(BUTTON_GPIO):
        print("Button pressed!")
    else:
        print("Button released!")

if __name__ == '__main__':
    GPIO.setmode(GPIO.BCM)
    GPIO.setup(BUTTON_GPIO, GPIO.IN, pull_up_down=GPIO.PUD_UP)

    GPIO.add_event_detect(BUTTON_GPIO, GPIO.BOTH,
            callback=button_callback, bouncetime=50)

    signal.signal(signal.SIGINT, signal_handler)
    signal.pause()
In the callback function you’ll have to check what’s the current GPIO’s state (LOW or HIGH) because at this point you don’t know if you come from a rising or falling interrupt. You only know it’s one of them.
Another change here: I’ve set the bouncetime to 50 milliseconds instead of 100 milliseconds. This will avoid missing some triggers when you press + release the button fast. Setting the bouncetime can be quite tricky: you don’t want to put too much so you don’t miss triggers, but you don’t want to put too little either so you don’t get undesired triggers. You’ll have to do some tests in your programs – and also, you can change the hardware to get a better quality button with much less bounce.
A few applications with Raspberry Pi GPIO interrupts
Here are 3 more code example to show you different ways to use GPIO interrupts on your Raspberry Pi.
First, let’s add a LED to our circuit.
Connect the shorter leg to the ground, and in between add a resistor (330 Ohm here). Then connect the longer leg of the LED to GPIO 20.
RPi.GPIO interrupts application example #1
Goal: power on the LED when the button is pressed, power off the LED when the button is released (you might have to tweak the bouncetime if you press the button very fast).
#!/usr/bin/env python3

import signal
import sys
import RPi.GPIO as GPIO

BUTTON_GPIO = 16
LED_GPIO = 20

def signal_handler(sig, frame):
    GPIO.cleanup()
    sys.exit(0)

def button_callback(channel):
    if GPIO.input(BUTTON_GPIO):
        GPIO.output(LED_GPIO, GPIO.LOW)
    else:
        GPIO.output(LED_GPIO, GPIO.HIGH)

if __name__ == '__main__':
    GPIO.setmode(GPIO.BCM)

    GPIO.setup(BUTTON_GPIO, GPIO.IN, pull_up_down=GPIO.PUD_UP)
    GPIO.setup(LED_GPIO, GPIO.OUT)

    GPIO.add_event_detect(BUTTON_GPIO, GPIO.BOTH,
            callback=button_callback, bouncetime=50)

    signal.signal(signal.SIGINT, signal_handler)
    signal.pause()
We use GPIO.BOTH to get both rising and falling interrupts. In the button_callback() function we check the current button’s state (so, right after the interrupt has been triggered) and power on/off the LED accordingly.
Note: if you do this with the polling method it will also work, but won’t be as precise/reactive.
RPi.GPIO interrupts application example #2
Goal: change the LED’s state every time you press the button.
#!/usr/bin/env python3

import signal
import sys
import RPi.GPIO as GPIO

BUTTON_GPIO = 16
LED_GPIO = 20

last_LED_state = 0

def signal_handler(sig, frame):
    GPIO.cleanup()
    sys.exit(0)

def button_pressed_callback(channel):
    global last_LED_state
    GPIO.output(LED_GPIO, not last_LED_state)
    last_LED_state = not last_LED_state

if __name__ == '__main__':
    GPIO.setmode(GPIO.BCM)

    GPIO.setup(BUTTON_GPIO, GPIO.IN, pull_up_down=GPIO.PUD_UP)
    GPIO.setup(LED_GPIO, GPIO.OUT)

    GPIO.add_event_detect(BUTTON_GPIO, GPIO.FALLING,
            callback=button_pressed_callback, bouncetime=200)

    signal.signal(signal.SIGINT, signal_handler)
    signal.pause()
Here we only care about when the user presses the button, so we use GPIO.FALLING for the interrupt (remember, since there is a pull up resistor, the default button’s state is HIGH, and goes LOW when pressed).
We also need a global variable, so we can use it in the callback function and keep the state between two interrupt triggers. Inside the callback, we simply change the LED’s state to the opposite of the previous one, and then save this new state into the global variable.
The bouncetime here is 200 milliseconds. By increasing it a little bit you have more chances of not getting unwanted triggers, and since you only care about pressing – not releasing – the button, it’s OK (but “OK” really depends on what you want in your application, it’s up to you to decide).
RPi.GPIO interrupts application example #3
The LED is blinking on its own. Goal: start/stop blinking LED when button is released.
#!/usr/bin/env python3

import signal
import sys
import time
import RPi.GPIO as GPIO

BUTTON_GPIO = 16
LED_GPIO = 20

should_blink = False

def signal_handler(sig, frame):
    GPIO.cleanup()
    sys.exit(0)

def button_released_callback(channel):
    global should_blink
    should_blink = not should_blink

if __name__ == '__main__':
    GPIO.setmode(GPIO.BCM)

    GPIO.setup(BUTTON_GPIO, GPIO.IN, pull_up_down=GPIO.PUD_UP)
    GPIO.setup(LED_GPIO, GPIO.OUT)

    GPIO.add_event_detect(BUTTON_GPIO, GPIO.RISING,
            callback=button_released_callback, bouncetime=200)

    signal.signal(signal.SIGINT, signal_handler)

    while True:
        if should_blink:
            GPIO.output(LED_GPIO, GPIO.HIGH)
        time.sleep(0.5)
        if should_blink:
            GPIO.output(LED_GPIO, GPIO.LOW)
        time.sleep(0.5)
Here we use the GPIO.RISING option since we only care about when the user releases the button. It’s similar to a computer mouse interaction. When you click on a button with your mouse, the action is only validated once you release.
As you can notice, there is no signal.pause() anymore. We’ll use the main function to make the LED blink. In order to know if we should blink the LED or not, we use a global variable that can be modified inside the interrupt callback.
Going further with GPIO interrupts on your Raspberry Pi
By now you should now have a good understanding about when to use interrupts with Raspberry Pi GPIOs, and how to actually use them with the RPi.GPIO Python module.
If you want to practice more, try to redo the 3 code examples by yourself. After that, imagine some new rules or add more hardware (multiple buttons, LEDs, and other components), and make it happen with your code.
The “polling vs interrupt” question is sometimes really obvious, and sometimes often quite tricky. You’ll see as you go. The more you practice, the easier it becomes!