In this article I will give you an overview of the different applications you can do with a Raspberry Pi, the history behind the board, and the different hardware components you can find on the board.
>> Here is the video version of this article, which is also the 1st part in a Raspberry Pi tutorial series:
After watching the video, subscribe to the Robotics Back-End Youtube channel so you don’t miss the next tutorials!
Table of Contents
Raspberry Pi – What can you do with it?
There is an infinite list of applications you can do with a Raspberry Pi. Here are some of the most important ones:
- Home automation.
- IoT (Internet of Things) – make your personal devices smarter.
- Retro gaming console.
- Security or alarm system.
- Server for a web or mobile application. You can even run a Minecraft server on your Pi!
- Robotics – program robots such as robotic arms, drones, hexapods, mobile robots, etc.
- Smart mirror.
- Install different operating systems, for example Raspberry pi OS, Ubuntu, Windows IoT, and much more.
- Or simply use the Raspberry Pi as your own portable computer!
And of course this list is far from being exhaustive. You can find many more projects online, and you can also get inspired to create your own custom projects.
You are learning how to use Raspberry Pi to build your own projects?
Check out Raspberry Pi For Beginners and learn step by step.
One great thing about Raspberry Pi is the online community around open source projects. So, what does the community aspect bring to you?
Well, you can:
- See what other people do with their Pi,
- You can ask your questions, get some help from more advanced users,
- You can also collaborate with other users on similar projects and progress together.
So, don’t worry, you will for sure find an interesting application to do with your board.
Raspberry Pi – Where does it come from?
The Raspberry Pi Foundation
Raspberry Pi is created by the Raspberry Pi foundation. The foundation’s goal is to make computers and digital making available for everyone across the world.
For less than 40$ you can get the Raspberry Pi board (of course with the semiconductor crisis, the price rose for individual buyers, so this is not accurate as long as the foundation has stock issues. Once they can produce and ship enough Raspberry Pi boards for everyone, the price should go down).
The complete setup with computer, screen, keyboard and mouse would cost you less than 100$, which is a very good first step, when you compare this with the price of any other computer or laptop on the market.
Different models
The first Raspberry Pi board was released in 2012. Then, the foundation has continued to develop new iterations to make the board more powerful, add more functionalities, make it easier to use, and develop the community.
In 2015 the Raspberry Pi 2 was released, with much more computation power than the first one. A different kind of board, more minimalist and cheaper, the Raspberry Pi zero, was also released this year.
Then the Raspberry Pi 3 came in 2016, with again more computation power, and this time the Wi-Fi feature was directly integrated in the board, so you don’t have to use a Wi-Fi USB dongle anymore.
As of today, the latest version is the Raspberry Pi 4, released in 2019. This version is really great: much better performance than the version 3, a few changes in the external connectors to make it compatible with modern applications, and an increased amount of RAM.
In fact, with Raspberry Pi 4 you can even choose the amount of RAM you want!
The Raspberry Pi 2 and 3 boards had 1 GB of RAM, which was already good. Now, for the Raspberry Pi 4, you can choose between 2GB, 4GB and even 8GB of RAM, which is huge for that board. At the beginning the Raspberry Pi 4 was also available with 1GB of RAM, but this configuration is now discontinued.
Raspberry Pi 4 – What’s on the board?
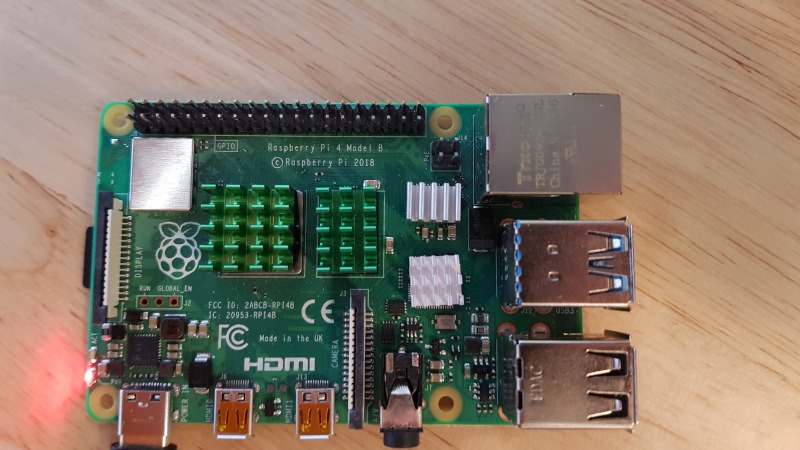
On the Raspberry Pi 4 board you can find the CPU, RAM, Wi-Fi, Bluetooth chips, and all other components required to make the Raspberry Pi work. Those are mainly placed in the middle of the board (where I have put the heat sinks on the photo).
But the most important is actually the connector parts. And there are quite a few:
- 1 Ethernet port with gigabit ethernet
- 4 USB ports, including 2 USB3 ports in blue
- 1 USB C port to power the board
- 2 micro HDMI ports with 4K video support, for 2 external displays
- 1 Jack audio output port
- 1 display port for the Raspberry Pi touch screen (on the left)
- 1 port for the Raspberry Pi camera module (next to the micro HDMI ports)
- 1 micro SD slot on the back of the board. You will install the operating system directly on a micro SD card.
- And finally a 40 pins header, also called a GPIO header. GPIO means General Purpose Input/Output. You will use this to control different hardware components, using Python programming for example. The GPIO header is the same for Raspberry Pi 2B, 3B, and 4.
As you can see, there are quite a lot of connectors on the Raspberry Pi. The board is very small but contains a lot of features.
How to go further?
Here are some ideas to go further and learn how to properly use your Raspberry Pi board:
