In this Arduino tutorial I will show you how to control an LED with a potentiometer, and more specifically, how to control the LED brightness.
You will learn how to dynamically make the LED fade in/fade out when you turn the potentiometer knob.
If you’re not familiar yet with the LED or the potentiometer, check out first this Arduino LED tutorial and this Arduino Potentiometer tutorial.
And let’s get started!
Table of Contents
Arduino circuit with LED and potentiometer
Let’s first build the circuit. You will need those components:
- Arduino board – any will do. For this tutorial I will use an Arduino Uno board.
- Breadboard.
- LED – any color.
- 220 Ohm resistor.
- Potentiometer.
- A bunch of wires (male to female).
Here is the circuit.
You are learning how to use Arduino to build your own projects?
Check out Arduino For Beginners and learn step by step.
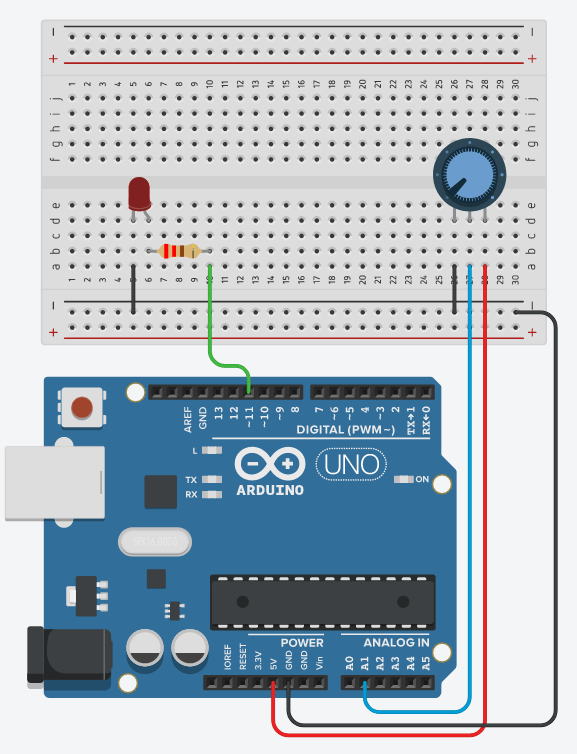
Steps to build the circuit:
- As a best practice we’ll start with the ground (GND). It’s very important to make a common ground for all components. To do this we will first plug a black wire (black is convention for GND) between a GND pin of the Arduino and the “minus” line on the breadboard. From this “minus” line, then we will be able to connect all other grounds, which will make things easier to manage.
Add the LED:
- Connect the shorter leg of the LED to the ground. You can directly plug this leg into the “minus” line of the breadboard, or add a small black wire.
- Plug the other (longer) leg of the LED to an independent line on the breadboard.
- From this leg, add a 220 Ohm resistor to yet another line.
- Add a wire between the other side of the resistor and a PWM-compatible digital pin (so we can control the brightness). Here on Arduino Uno you can choose between pins 3, 5, 6, 9, 10, and 11 – you can recognize PWM compatibility with the “~” next to the pin number.
Add the Potentiometer:
- Plug the 3 legs of the potentiometer to 3 different lines on the breadboard.
- Connect the extreme left (or right) leg to GND.
- Connect the other extreme leg to 5V on the Arduino.
- Add a wire between the middle pin and an analog pin.
Arduino code to control LED brightness with the potentiometer
In this application, what we want to do is simple: when we turn the knob up (for example turning clockwise), we want the LED brightness to increase.
The minimum knob position will correspond to the minimum brightness – LED turned off. And the maximum position will correspond to the maximum brightness – LED with full intensity, same as if you used digitalWrite() with HIGH.
Here is the code to do that.
#define LED_PIN 11
#define POTENTIOMETER_PIN A1

void setup()
{
  pinMode(LED_PIN, OUTPUT);
}

void loop()
{
  int potentiometerValue = analogRead(POTENTIOMETER_PIN);
  int brightness = potentiometerValue / 4;
  analogWrite(LED_PIN, brightness);
}
Code explained step by step
Let’s break down the code line by line.
Setup
#define LED_PIN 11
#define POTENTIOMETER_PIN A1
We start by a best practice, which is to create some defines (you could also create some const int variables) for the pins we are going to use in the program.
One for the LED pin, one for the potentiometer. This way, we can modify the circuit at any moment, all we’ll need to do in the code is to modify those 2 lines.
void setup()
{
  pinMode(LED_PIN, OUTPUT);
}
In the void setup(), we need to initialize the mode for the pins we want to use:
- The LED is a component we control, so we use pinMode() with OUTPUT.
- The potentiometer is a component we read from, so its mode is INPUT. However, for analog pins, no need to use pinMode() as those pins are already in INPUT mode!
Now that everything is setup, we can start to control the brightness of the LED with what we read from the potentiometer.
Read potentiometer value
void loop()
{
  int potentiometerValue = analogRead(POTENTIOMETER_PIN);
We enter the void loop(), and the first thing we do is to read the potentiometer value.
To do that we use the analogRead() function, which takes one parameter: the pin number to read from. We store the value inside an integer variable. This value will be in the range 0-1023. In other words, this is a 10 bit number: 2^10 = 1024.
This number corresponds to the voltage we read on the analog pin. The higher the voltage, the higher this number. For 0V you get 0, and for 5V you get 1023.
Compute LED brightness (option 1)
int brightness = potentiometerValue / 4;
In order to control the LED brightness, we are going to use the analogWrite() function on the LED pin (later on). This analogWrite() function takes a byte value, or in other words, a number between 0 and 255.
So, before we use this function, we need to make sure the value is in the correct range. And as I really like simplicity, you can see that, roughly, 1024 is 255 multiplied by 4 (not exactly this value but this is a good enough approximate for what we need to do). So, if we want to put a value from the range 0-1023 to the range 0-255, we can just divide by 4.
Nothing fancy here, it’s very simple and it works.
Compute LED brightness with map (option 2)
int brightness = map(potentiometerValue, 0, 1023, 0, 255);
To do the same thing, you could also use the Arduino map() function which can put a number into a different range.
With this line and the 5 arguments in the function, what we’re saying is: take the potentiometerValue from the range 0-1023, to the range 0-255.
Using map() is great whenever you need to do operations like this, and it works for any integer range.
Apply brightness setting to LED
  analogWrite(LED_PIN, brightness);
}
So now we have computed the brightness to apply to the LED. This brightness variable is an integer number between 0 and 255. Exactly what we need for the analogWrite() function.
analogWrite() takes 2 arguments: the pin to apply the voltage to, and then a byte number between 0-255.
Note: this is only going to work on PWM compatible pins. So if you see that the LED is just fully powered off/on when you run this program, this is probably because the digital pin you’ve chosen is not PWM compatible.
So, what’s going to happen here: the value 0-255 will be translated into a voltage. 0V for 0, 5V for 255, and proportional values in between.
After this instruction, the void loop() exits and is called again, so we directly apply the new potentiometer value to the LED brightness. The update frequency is very high here, so you when you turn the potentiometer knob, you will immediately see the LED brightness change.
Conclusion – Control LED brightness with potentiometer
In this tutorial you’ve learnt how to control an LED brightness with a potentiometer, using Arduino.
In the end, here’s a summary of what you need to do in the code:
- Init the pins.
- Read the potentiometer value with analogRead().
- Convert this value from the range 0-1023 to the range 0-255.
- Apply this value to the LED with analogWrite().
To go further from here, check out those tutorials:
