In this Arduino tutorial, you will discover different examples of what you can do with an LED, a push button, and a potentiometer – using the 3 components at the same time.
This tutorial is more of a practice/exercise on top of a series focused on Arduino and the various basic components you can control. As a starting point, I suggest you check out those 2 other tutorials:
And now let’s get started!
Table of Contents
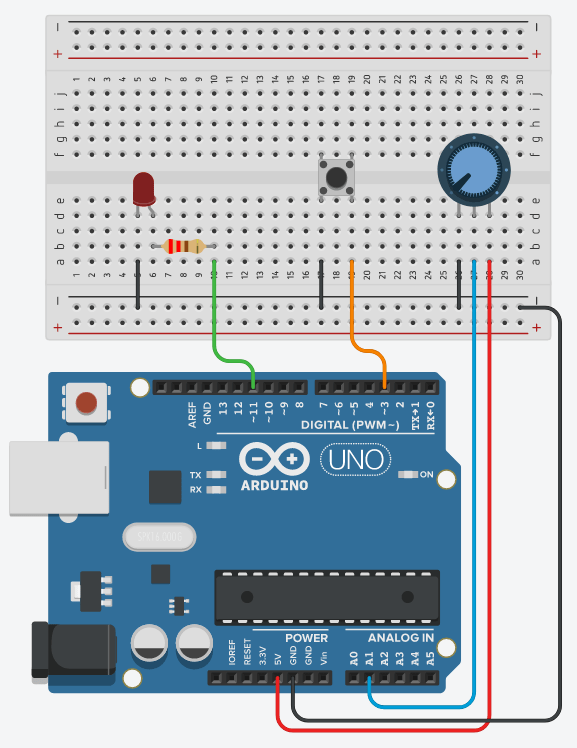
Arduino circuit with an LED, a push button, and a potentiometer
To do this circuit, you will need:
- Arduino board – I use Uno, but whatever is fine, as long as you have at least a PWM compatible digital pin (for the LED), and an analog pin (for the potentiometer).
- Breadboard.
- Some male-female wires.
- LED.
- 220 Ohm resistor.
- Push button.
- Potentiometer.
Here is the circuit.
You are learning how to use Arduino to build your own projects?
Check out Arduino For Beginners and learn step by step.
Steps to build the circuit:
- Connect a GND pin from the Arduino to the line made for GND on the breadboard (the “minus” line).
- LED: Connect the shorter leg to the GND line, and the longer leg to a PWM compatible digital pin, with a 220 Ohm resistor in between. Note: PWM compatible pins are the ones with a “~” next to them.
- Push button: Plug the push button in the middle of the breadboard. Connect one side to the ground, and the other side to a digital pin.
- Potentiometer: Connect one of the extreme leg (right or left) to the ground, and the other extreme leg to 5V on the Arduino. Connect the middle leg to an analog pin.
App 1 – Button enables potentiometer, potentiometer sets LED’s brightness
Let’s make something simple first. In this application, the LED’s brightness will be controlled from the potentiometer. The addition to that is that the potentiometer is only “enabled” when the push button is pressed.
Here is the code to do that.
#define LED_PIN 11
#define BUTTON_PIN 3
#define POTENTIOMETER_PIN A1

void setup()
{
  pinMode(LED_PIN, OUTPUT);
  pinMode(BUTTON_PIN, INPUT_PULLUP);
}

void loop()
{
  if (digitalRead(BUTTON_PIN) == LOW) {
    int potentiometerValue = analogRead(POTENTIOMETER_PIN);
    int brightness = map(potentiometerValue, 0, 1023, 0, 255);
    analogWrite(LED_PIN, brightness);
  }
}
Let’s now analyze this code.
Setup
#define LED_PIN 11
#define BUTTON_PIN 3
#define POTENTIOMETER_PIN A1
As a best practice, we create some defines (you could also create some const int variables) to keep the pin for each component.
void setup()
{
  pinMode(LED_PIN, OUTPUT);
  pinMode(BUTTON_PIN, INPUT_PULLUP);
}
In the void setup(), nothing special, we just set the:
- LED pin to OUTPUT,
- button pin to INPUT_PULLUP (we’re going to use the internal Arduino pull up resistor instead of an external one),
- and nothing for the potentiometer, as an analog pin is already in fact an “analog input pin”.
Set LED’s brightness from potentiometer only if button is pressed
void loop()
{
  if (digitalRead(BUTTON_PIN) == LOW) {
    int potentiometerValue = analogRead(POTENTIOMETER_PIN);
    int brightness = map(potentiometerValue, 0, 1023, 0, 255);
    analogWrite(LED_PIN, brightness);
  }
}
This is the most interesting part of the code.
First, we check if the button is pressed. As we work with the INPUT_PULLUP mode, the button is pressed when the state is LOW (and not pressed when state is HIGH).
Only if the button is pressed, we read the potentiometer’s value. With the map() function, we change the range from 0-1023 (what we read with analogRead()) to 0-255 (what we need to give to analogWrite().
Once we’ve computed the brightness, we apply it to the LED. Note: make sure you’ve used a PWM compatible pin for the LED, otherwise it won’t work.
App 2 – Button powers on/off the LED, potentiometer sets LED’s brightness
Let’s increase the complexity a bit. In this app, we will still use the potentiometer to compute the LED’s brightness, but the behavior of the button is different.
Here, the button will act as a switch for the LED. By default the LED is powered on. When you press + release on the button, you power off the LED. When you press + release again, you power on the LED, etc. And on top of that, the brightness is directly linked to the potentiometer’s value.
#define LED_PIN 11
#define BUTTON_PIN 3
#define POTENTIOMETER_PIN A1

unsigned long debounceDuration = 50; // millis
unsigned long lastTimeButtonStateChanged = 0;

byte lastButtonState = HIGH;
bool LEDOn = true;

void setup()
{
  pinMode(LED_PIN, OUTPUT);
  pinMode(BUTTON_PIN, INPUT_PULLUP);
}

void loop()
{
  unsigned long timeNow = millis();
  if (timeNow - lastTimeButtonStateChanged > debounceDuration) {
    byte buttonState = digitalRead(BUTTON_PIN);
    if (buttonState != lastButtonState) {
      lastTimeButtonStateChanged = timeNow;
      lastButtonState = buttonState;
      if (buttonState == HIGH) { // button has been released
        LEDOn = ! LEDOn;
      }
    }
  }

  if (LEDOn) {
    int potentiometerValue = analogRead(POTENTIOMETER_PIN);
    int brightness = map(potentiometerValue, 0, 1023, 0, 255);
    analogWrite(LED_PIN, brightness);
  }
  else {
    digitalWrite(LED_PIN, LOW);
  }
}
In this code we still create some defines for each pin, and setup those pins in the void setup(). Let’s now focus on the new things we wrote.
Read button’s state – with debounce
unsigned long debounceDuration = 50; // millis
unsigned long lastTimeButtonStateChanged = 0;

byte lastButtonState = HIGH;
bool LEDOn = true;
and
void loop()
{
  unsigned long timeNow = millis();
  if (timeNow - lastTimeButtonStateChanged > debounceDuration) {
  	byte buttonState = digitalRead(BUTTON_PIN);
    if (buttonState != lastButtonState) {
      lastTimeButtonStateChanged = timeNow;
      lastButtonState = buttonState;
      if (buttonState == HIGH) { // button has been released
        LEDOn = ! LEDOn;
      }
    }
  }
As we want to toggle the LED when we press + release the button, we need to check not only the button’s state, but when the state changes (from pressed to released).
I’m not going to explain fully the debounce mechanism here, for that you can check this Push Button + LED tutorial. Basically, we make sure that once the button’s state has changed, we wait for a given duration (50 millis in this example) before allowing the code to read the state again. This way we can avoid getting weird values due to the physical bouncing of the button.
On line 25, after we know that the state changed, we also check if the state is HIGH, which means that we went from LOW to HIGH, or in other words, from pressed to released.
If this is the case, we invert the LEDOn boolean that we previously created as a global variable.
Power on/off the LED and set the brightness accordingly to the potentiometer
  if (LEDOn) {
    int potentiometerValue = analogRead(POTENTIOMETER_PIN);
    int brightness = map(potentiometerValue, 0, 1023, 0, 255);
    analogWrite(LED_PIN, brightness);
  }
  else {
    digitalWrite(LED_PIN, LOW);
  }
}
Still in the void loop(), we check if the LED is enabled, with the LEDOn boolean flag.
If yes, we read the potentiometer’s value, map it to the 0-255 range, and apply it to the LED with analogWrite().
If no, we simply power off the LED with digitalWrite() and LOW. We could also have written analogWrite() with 0, the result would have been the same.
App 3 – LED blinks on its own, button pauses blink, potentiometer sets blink delay
In this new application, the LED blinks on its own, with full intensity. The push button will pause/restart the blink when you press + release it. And the potentiometer will set the delay() for the blink.
#define LED_PIN 11
#define BUTTON_PIN 3
#define POTENTIOMETER_PIN A1

unsigned long delayBetweenBlink = 500;
unsigned long lastTimeLEDBlinked = 0;

unsigned long debounceDuration = 50; // millis
unsigned long lastTimeButtonStateChanged = 0;
byte lastButtonState = HIGH;

bool blinkEnabled = true;

byte LEDState = LOW;

void setup()
{
  pinMode(LED_PIN, OUTPUT);
  pinMode(BUTTON_PIN, INPUT_PULLUP);
}

void loop()
{
  unsigned long timeNow = millis();
  if (timeNow - lastTimeButtonStateChanged > debounceDuration) {
    byte buttonState = digitalRead(BUTTON_PIN);
    if (buttonState != lastButtonState) {
      lastTimeButtonStateChanged = timeNow;
      lastButtonState = buttonState;
      if (buttonState == HIGH) { // button has been released
        blinkEnabled = !blinkEnabled;
      }
    }
  }

  int potentiometerValue = analogRead(POTENTIOMETER_PIN);
  delayBetweenBlink = map(potentiometerValue, 0, 1024, 0, 2000);

  if (blinkEnabled) {
    if (timeNow - lastTimeLEDBlinked > delayBetweenBlink) {
      lastTimeLEDBlinked = timeNow;
      LEDState = (LEDState == HIGH) ? LOW : HIGH;
      digitalWrite(LED_PIN, LEDState);
    }
  }
}
Let’s analyze the code which is specific to this application.
Enable/disable blink when push button is pressed + released
unsigned long debounceDuration = 50; // millis
unsigned long lastTimeButtonStateChanged = 0;
byte lastButtonState = HIGH;

bool blinkEnabled = true;
and
void loop()
{
  unsigned long timeNow = millis();
  if (timeNow - lastTimeButtonStateChanged > debounceDuration) {
  	byte buttonState = digitalRead(BUTTON_PIN);
    if (buttonState != lastButtonState) {
      lastTimeButtonStateChanged = timeNow;
      lastButtonState = buttonState;
      if (buttonState == HIGH) { // button has been released
        blinkEnabled = !blinkEnabled;
      }
    }
  }
As for detecting the change of state in the button, this code is exactly the same as before. Now, what we do here is we toggle a boolean flag named blinkEnabled, which we are going to use later to choose if we pause the blink or not.
Set the blink delay with the potentiometer
unsigned long delayBetweenBlink = 500;
and
  int potentiometerValue = analogRead(POTENTIOMETER_PIN);
  delayBetweenBlink = map(potentiometerValue, 0, 1024, 0, 2000);
The delayBetweenBlink variable contains the time we wait to toggle the LED. We set a default value, which will be replaced by a value we compute from the potentiometer.
Here, in the void loop(), we read the potentiometer’s value, and then map it in the range 0-2000, so the minimum blink delay will be 0, and the max blink delay 2 seconds.
Make the LED blink
unsigned long delayBetweenBlink = 500;
unsigned long lastTimeLEDBlinked = 0;
and
  if (blinkEnabled) {
    if (timeNow - lastTimeLEDBlinked > delayBetweenBlink) {
      lastTimeLEDBlinked = timeNow;
      LEDState = (LEDState == HIGH) ? LOW : HIGH;
      digitalWrite(LED_PIN, LEDState);
    }
  }
}
Before we do anything with the LED, in the void loop(), we check the blinkEnabled flag. If it’s false, we just don’t do anything, and the blink is thus paused.
If the blink is enabled, then we proceed to do a classic blink – without using the delay() function. To do that, we check that enough time has passed since the last blink. To blink the LED, we first modify the LEDState variable with a one-liner. If it’s HIGH, we set it to LOW, and if it’s LOW, we set it to HIGH. We can then use digitalWrite() on the LED pin with the new state.
Conclusion – Arduino with LED, push button, and potentiometer
In this tutorial you have seen various examples of Arduino applications you can do with the combination of LED + push button + potentiometer.
To go further, check out this Arduino multitasking tutorial, in which you will learn how to create a multitask program with multiple LEDs, a push button, and a potentiometer.
