In this tutorial I’ll show you how to create a ROS Python Subscriber on your Raspberry Pi.
This is the direct following of how to create a ROS Publisher on Raspberry Pi. Please check out this previous tutorial first, before you continue. In the first tutorial you have seen how to read the state of a push button, and publish it on a topic at 10 Hz.
Here, you’ll reuse this ROS topic and continue to improve the application. You’ll create a subscriber node to power on and off a LED, depending on the button’s state.
This tutorial works for Raspberry Pi 4 and earlier versions: 3B, 3B+.
Alright, let’s get started!
Table of Contents
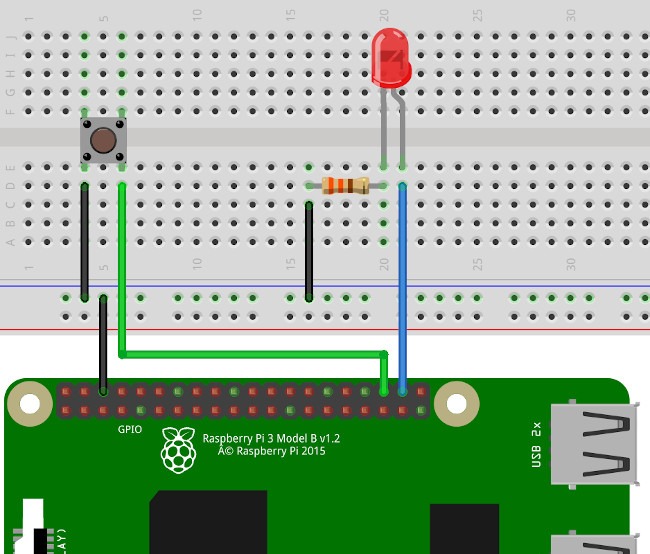
Hardware setup
You are learning ROS?
Check out ROS For Beginners and learn ROS step by step.
For the push button:
- All 4 legs must be on different breadboard lines. One leg is connected to the ground, one is connected to GPIO 16.
For the LED:
- Connect the shorter leg of the LED to the ground, with a 330 Ohm resistor in between so you can protect the LED from too much current. As you can see on the breadboard, use the horizontal line to make a common ground between the push button and the LED, and then you only need one wire connected to the Raspberry Pi’s GND.
- Connect the longer leg directly to a GPIO, in this case GPIO 20. Check out this Raspberry Pi pinout guide for more info about all the pins.
Make sure you power off your Raspberry Pi before you make any modification. And power it on again only after you’ve finished the hardware setup.
And now, let’s write the code!
Write the ROS Python Subscriber node on your Raspberry Pi
Be sure to open a few ssh terminals to connect to your Pi.
Setup the subscriber node
First, create a new Python file inside the scripts/ folder of your rpi_ros_tutorials package. Make the Python file executable.
$ touch led_actuator.py
$ chmod +x led_actuator.py
Now, write the code to create a basic node.
#!/usr/bin/env python

import rospy

if __name__ == '__main__':
    rospy.init_node('led_actuator')
After your start roscore in a terminal, your node should work fine (in another terminal) with either python led_actuator.py or rosrun rpi_ros_tutorials led_actuator.py. “Work fine” here means that there is no output. The node starts and then stops, with no error message at all.
Initialize GPIO
#!/usr/bin/env python

import rospy
import RPi.GPIO as GPIO

LED_GPIO = 20

if __name__ == '__main__':
    rospy.init_node('led_actuator')

    GPIO.setmode(GPIO.BCM)
    GPIO.setup(LED_GPIO, GPIO.OUT)

    GPIO.cleanup()
We import the RPi.GPIO module and define a global variable LED_GPIO which we’ll use as a constant.
In the main program, after the node is initialized, we use the setmode() function to set the mode as BCM. This will simply tell the GPIO module to use the GPIO numbers (not the pin numbers, which are different).
Then we can setup the LED pin to output. Quite straightforward here. Note: you have to set a GPIO to input or output before you can actually use it.
Finally we cleanup the pins used in this program with GPIO.cleanup(). This is really important in this program as you’ve set a pin in output mode. Default state for all GPIOs is input because this can prevent some damage (an output pin connected to the wrong place can burn your Raspberry Pi). The cleanup will basically set back the pins used in this program to default input mode – and some other things, but let’s keep things simple here.
Subscribe to the button state topic with a ROS Python subscriber
This is the complete code for this tutorial.
#!/usr/bin/env python

import rospy
from std_msgs.msg import Bool
import RPi.GPIO as GPIO

LED_GPIO = 20

def button_state_callback(msg):
    GPIO.output(LED_GPIO, msg.data)

if __name__ == '__main__':
    rospy.init_node('led_actuator')

    GPIO.setmode(GPIO.BCM)
    GPIO.setup(LED_GPIO, GPIO.OUT)

    rospy.Subscriber('button_state', Bool, button_state_callback)

    rospy.spin()

    GPIO.cleanup()
Let’s see how we implemented the ROS Python subscriber on Raspberry Pi, step by step:
from std_msgs.msg import Bool
We need to import the std_msgs/Bool to use it, so we add a new import line at the beginning of the Python file. This is the same message definition that was used by the publisher.
rospy.Subscriber('button_state', Bool, button_state_callback)
After initializing the node and setting up the LED pin we can directly create a subscriber. We do this with rospy.Subscriber(). It takes 3 arguments:
- Name of the topic. We use the same name as for the publisher in the last tutorial.
- Message type. Again, the message is the same as for the publisher.
- Callback function to handle any received message.
def button_state_callback(msg):
    GPIO.output(LED_GPIO, msg.data)
Now we can create the callback function. This function will be triggered whenever a message is received on the “button_state” topic. The parameter we get in the function is the received message, here a std_msgs/Bool.
Inside the callback function we write what we want to do with this newly received Bool message. So, to achieve the goal we set for this tutorial, we power on or off the LED depending on what’s inside the Bool message. As you can see we use “msg.data”, because the actual boolean value is stored into a “data” field. You can find this info on the std_msgs/Bool definition. To actuate the LED, you simply need to use GPIO.output() and give the GPIO number for the LED, as well as the state – 0 or 1, False or True, LOW or HIGH.
    rospy.spin()

    GPIO.cleanup()
Finally, don’t forget the rospy.spin() at the end of the program – but before cleaning up the pins! If you don’t add a spin, the program will exit immediately and the node will shut down. rospy.spin() will keep the program alive while the node is alive, and will also trigger all the callbacks for the topics you’ve subscribed to.
Then, at any moment, when you press CTRL+C, the node will be shut down, the spinning will stop, GPIO.cleanup() will be executed, and the program will exit smoothly.
Testing the ROS Python subscriber on your Pi
Testing the overall application
Let’s test the Python publisher and subscriber working together.
You’ll need at least 4 ssh terminal windows connected to your Raspberry Pi. One for roscore, one for your ROS publisher, one for your ROS subscriber, and one for testing stuff with command line tools (and you can keep one additional terminal for editing your files).
In the first terminal, start roscore. Then, you can start the publisher and subscriber in any order you want, it doesn’t really matter.
Start the publisher with rosrun rpi_ros_tutorials button_state_publisher.py and start the subscriber with rosrun rpi_ros_tutorials led_actuator.py.
Now, let’s check what we have here:
$ rostopic list
/button_state
/rosout
/rosout_agg
As you can expect, the /button_state topic is present. Let’s get more info about it.
$ rostopic info /button_state
Type: std_msgs/Bool

Publishers:
 * /button_state_publisher (http://ros-pi:37209/)

Subscribers:
 * /led_actuator (http://ros-pi:33181/)
With rostopic info you can see who publishes and who subscribes to a given topic (more info on rostopic command line tool).
So, here we can clearly see that the button_state_publisher node is a publisher on this topic, and the led_actuator node is a subscriber. From that we can be confident that messages are going through.
Now, the ultimate test: just press the button and see what happens! If everything works well, as soon as you press the button, the LED will be powered on. And when you release the button the LED is powered off.
Debugging your ROS Python subscriber if it’s not working
If at this point, things are not working well – which means the behavior is not what you were expecting, there are a few things you can do to debug and find where the issue is.
First, make sure your hardware setup is correct. It can be worth it double (or triple) checking it.
If the hardware is correct, then you have to check into your code to see what’s happening. First, to check that your button and LED are working correctly, try to reduce the code to a minimum Python code with only the lines to setup and actuate – or read – the GPIO (remove all the ROS stuff). Add some rospy.loginfo() functions here and there to get to know what’s happening.
If you can validate that your button and your LED are both working fine and independently, check your publisher and subscriber. For example, you can add a rospy.loginfo(msg) inside the subcriber callback to see 1. if you receive any message and if yes, 2. what’s inside this message.
Improvements and what to do next
All right, if you’ve made it until here, congratulations! You can now write a basic – but complete – ROS Python Publisher/Subscriber application on your Raspberry Pi.
Here are some improvements you can work on to practice further:
- Polling the state of the button at a given frequency is not the more precise way to know when exactly you’ve pressed the button. In this tutorial we’ve used a 10Hz frequency, which means that you can’t be more precise than 0.1 second. This was not a problem because the goal didn’t require us to know exactly when the button was pressed. But if you want to know that, it can be quite tricky. Of course you could increase the frequency, but this will never be as precise as it can be, and you’ll end up eating a lot of CPU resources. Instead, try to use GPIO interrupts to detect exactly when the button is pressed.
- In this example we’ve only used 1 pin for the button and 1 pin for the LED. Try to use more pins and see how you can send arrays of data through a ROS topic. For example, you could have one button controlling 4 LEDs. Each time you press the button, you change the LED configuration – think about a christmas tree light (you may also want to use interrupts for the button here)!
- Instead of a publish/subscribe model, you could write this application with a client/server model, using a ROS Service. Check out this tutorial on how to write a ROS Service on your Raspberry Pi.
