In this tutorial I’ll show you how to write a ROS Python publisher on your Raspberry Pi.
With the following code example you’ll learn how to publish a GPIO state with ROS. For that we’ll use a simple push button with a minimal hardware setup. You’ll see all the steps, from setting up the environment, to writing the code, to testing it.
What we want to achieve is simple: publish the button state at 10Hz – every 0.1 second.
This is a good opportunity for you to practice on ROS Topics.
The tutorial is valid for Raspberry Pi 4 and earlier versions: 3B, 3B+.
Let’s get started!
You are learning ROS?
Check out ROS For Beginners and learn ROS step by step.
Table of Contents
Hardware setup
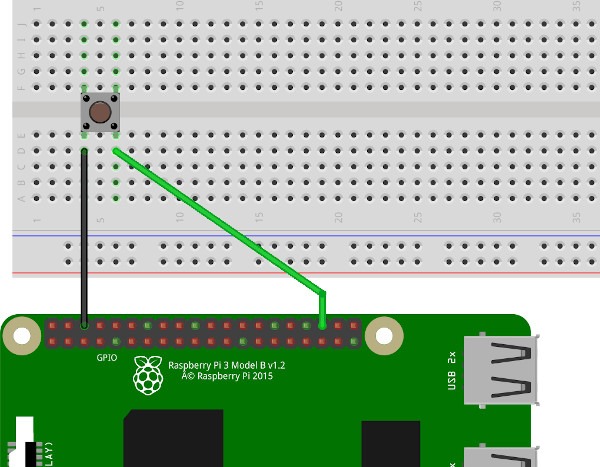
The hardware setup is pretty simple:
- On your breadboard, place your push button so that each leg is not connected with other legs.
- Connect one leg to the ground. This can be any GND pin on the Raspberry pi GPIO header.
- Connect the other leg of the same side to a GPIO. In this case, GPIO 16. Check out this complete Raspberry Pi pinout guide to know more about GPIOs and other pins.
Now, only after the hardware setup is complete, power on your Raspberry Pi.
Note: you can still follow the tutorial if you don’t have the hardware setup, but the state of the GPIO will always be the same.
Installation and setup for your publisher node
First things first, if you haven’t already installed ROS on your Raspberry Pi, check out how to install Ubuntu and install ROS on your Pi.
Connect to your Pi via ssh. If you don’t know how to do this, follow the tutorial on how to install Ubuntu on your Pi.
Create a catkin workspace on your Pi if not done before or if you just installed ROS.
$ mkdir -p ~/catkin_ws/src/
$ cd ~/catkin_ws/
$ catkin_make
$ echo "source ~/catkin_ws/devel/setup.bash" >> ~/.bashrc
The last command adds one line to your bashrc. Open a new terminal window or simply run source ~/.bashrc to source your new catkin workspace on your environment.
Also, create a package for this tutorial. We’ll need rospy and the std_msgs package.
$ cd src/
$ catkin_create_pkg rpi_ros_tutorials rospy std_msgs
$ cd ..
$ catkin_make
Now, create a new Python file and make it executable. This will be your publisher node for the push button state.
$ cd ~/catkin_ws/src/rpi_ros_tutorials
$ mkdir scripts
$ cd scripts/
$ touch button_state_publisher.py
$ chmod +x button_state_publisher.py
Everything’s ready, now let’s build the code step by step! From there you can use any text editor you want: Vim, nano, …
Write the code for the ROS Python publisher
Initialize the node
I recommend you open 3 ssh windows: one for writing the code, one for starting roscore, and one for testing the node in the terminal.
Use the first ssh window to write your code:
#!/usr/bin/env python

import rospy

if __name__ == '__main__':
    rospy.init_node('button_state_publisher')
This will just initialize the node, and then the program will exit.
On your second ssh terminal, start roscore.
And on your third ssh terminal, start the node with either python button_state_publisher.py or rosrun rpi_ros_tutorials button_state_publisher.py (make sure to source your catkin workspace or else this last command won’t work).
If you can start the node and get no error so far, everything is working great.
Initialize the GPIO with the RPi.GPIO module
#!/usr/bin/env python

import rospy
import RPi.GPIO as GPIO

BUTTON_GPIO = 16

if __name__ == '__main__':
    rospy.init_node('button_state_publisher')

    GPIO.setmode(GPIO.BCM)
    GPIO.setup(BUTTON_GPIO, GPIO.IN, pull_up_down = GPIO.PUD_UP)

    GPIO.cleanup()
First we import the RPi.GPIO module (as “GPIO”, which makes it easier to write in the code).
In order to use the GPIO numbers for Raspberry Pi pins we set the mode to BCM.
Then we can setup the GPIO mode for the button. We set it as input (GPIO.IN) and activate the internal pull up resistor with the last argument: “pull_up_down = GPIO.PUD_UP”. The button is in fact between 2 pins: GND (0V) and a GPIO (max 3.3V). If we don’t add a pull up resistor here, the default state of the pin will be totally random. With the pull up resistor we can be sure that the default state will always be HIGH, and when we press the button, the state will switch to LOW. Also, no need to add a resistor yourself, you just need to activate the internal one here.
Finally, before the program exits, we call GPIO.cleanup(). This will cleanup all the pins used in this program.
Read GPIO state with a ROS rate
Add those lines after setting up the GPIO (in your main):
    rate = rospy.Rate(10)

    while not rospy.is_shutdown():
        gpio_state = not GPIO.input(BUTTON_GPIO)
        rospy.loginfo(gpio_state)
        rate.sleep()

    GPIO.cleanup()
First define a ROS rate at 10Hz.
While the node is still running (i.e. you don’t press CTRL+C in the terminal) we will read the state of the GPIO with GPIO.input(gpio_number). The “not” before this statement will simply change 0 into 1, and 1 into 0 (as we know this function will only return 0 or 1). By doing this we make sure that we later use a value which will not create any confusion for the user. 0 for “not pushed” and 1 for “pushed” seems more “logical” than the opposite.
For testing purposes I’ve added a log line, you can use it to see the current state – printed as 0 or 1. So, if you run this node, you should see “0” printed every 0.1 second. When you push the button you’ll see “1” instead.
Also, don’t forget the rate.sleep() to respect the 10Hz frequency, or else your program will run at max speed and use all of the resources of one core of your CPU.
Publish GPIO state with a ROS Python publisher on your Raspberry Pi
Here is the complete node code, with the ROS Python publisher.
#!/usr/bin/env python

import rospy
from std_msgs.msg import Bool
import RPi.GPIO as GPIO

BUTTON_GPIO = 16

if __name__ == '__main__':
    rospy.init_node('button_state_publisher')

    pub = rospy.Publisher('button_state', Bool, queue_size = 10)

    GPIO.setmode(GPIO.BCM)
    GPIO.setup(BUTTON_GPIO, GPIO.IN, pull_up_down = GPIO.PUD_UP)

    rate = rospy.Rate(10)

    while not rospy.is_shutdown():
        gpio_state = not GPIO.input(BUTTON_GPIO)
        pub.publish(gpio_state)
        rate.sleep()

    GPIO.cleanup()
Here are the important additions relative to the publisher:
from std_msgs.msg import Bool
First, we need to determine what kind of data we’ll send. As the button’s state will either be LOW (0) or HIGH (1), we can use a simple boolean. So, we use the Bool message definition from the std_msgs package.
pub = rospy.Publisher('button_state', Bool, queue_size = 10)
Just after we initialize the node, we can create the publisher with rospy.Publisher(). This will take 3 parameters:
- Name of the topic you want to publish to.
- Data type of what you will publish.
- Queue size for the sending buffer. This can be helpful when publishing at a higher frequency, in case your system is overloaded with messages. But for now, don’t worry to much about this. Using the value “10” is probably good for most of your learning applications.
pub.publish(gpio_state)
In the loop with the rospy Rate at 10Hz, we publish the state on the topic just after we get it. As you can see this can be done with only one line. Note that this is a shortcut provided for Python publishers. The full publishing code (so you can better understand) would be:
        msg = Bool()
        msg.data = gpio_state
        pub.publish(msg)
First, you create a message with the Bool() constructor.
If you look at the std_msgs/Bool documentation you’ll see that there is a “data” field inside, which type is boolean. So, you need to fill this field. That’s what we do on the second line.
And finally, you can publish your message to the “button_state” topic.
So, as you can see, using directly pub.publish(gpio_state) is a convenient way to directly publish the data without creating a message. This shortcut is really helpful for messages with only a few fields. When you have to deal with more complex message definitions you’ll have to create the message first.
Test your ROS Python Publisher on your Pi
Testing time!
Save your file, start roscore in another terminal (if not already done), and start your node in yet another terminal.
As we removed the log line to print the button’s state, nothing will be displayed. Not a problem! Open a new terminal (again with ssh) and use the rostopic command line tool to see what’s going on.
$ rostopic list
/button_state
/rosout
/rosout_agg
Well, good news: the topic we are publishing to is here! As you can see there is a leading “/” automatically added to it, for namespace purpose.
Let’s check what data is going through this topic.
$ rostopic echo /button_state
data: False
---
data: False
---
data: False
---
data: False
---
data: True
---
data: True
---
data: True
---
data: True
---
data: True
---
data: False
---
data: False
---
^C
You’ll see a new message coming every 0.1 second. By default, when the button is not pressed, the data will be “False”. Press the button and you’ll see that it changes to “True”. When you release the button, the data comes back to “False”.
You’ve successfully combined ROS with Raspberry Pi, using a rospy Publisher to publish the state of a GPIO.
Next: create a subscriber
OK, great, you now have a working ROS Python publisher on your Raspberry Pi! The next logical part would be to create a subscriber node so you can receive the published data, and take action.
Check out part 2 of this tutorial: Create a ROS Python subscriber on your Raspberry Pi, to power on a LED.
Well, before you actually check part 2, try to do the node yourself, and then compare with the solution (more accurately: “a” solution, not “the” solution, as there are many valid ways to solve a problem). The goal will be to receive the button’s state, and power on a LED accordinlgy. If the button is pressed, then the LED is powered on, and if the button is not pressed, then the LED is not powered on. That’s it.
Now it’s your turn to practice!
